Tools / Power Tools
Owner's Manual for Bauer 12-inch Disc Sander 21107E-B
Comprehensive owner's manual for the Bauer 12-inch Disc Sander (21107E-B). Includes assembly instructions, safety guidelines, operation procedures, maintenance tips, and troubleshooting steps.
Quick answers from the manual
Quick answer
- The Bauer 12-inch Disc Sander (21107E-B) is a stationary power tool for sanding wood, plastic, and non-ferrous metals. It requires a 120V power source and features a safety switch with a removable key. p. 1, 7
Key actions
- Assembly p. 7, 9
- Replacing Discs p. 9
First start
- Ensure the tool is unplugged, assemble the work table, verify the 1/16 inch clearance, insert the safety key, and plug in. p. 7, 9, 11
Show 4 more answers Show less
Problems and fixes
Disc Sander does not turn on
Check power, ensure Safety Key is inserted, check switch position.
p. 13Maintenance and reset
- The bearings are sealed and do not require lubrication. Clean the tool after use and inspect for loose hardware. p. 12
Technical specifications
| Parameter | Value | Meaning | Pages |
|---|---|---|---|
| Electrical Rating | 120VAC / 60Hz / 8A | Power requirements | p. 7 |
| Disc Size | 12" | Sanding disc diameter | p. 7 |
| Maximum Speed | 1725 RPM | Rotational speed | p. 7 |
Where to find it in the PDF
- Safety Warnings p. 2, 3, 4, 5
- Assembly/Mounting p. 7, 9
- Troubleshooting p. 13
- Parts List and Diagram p. 14, 15
Table of contents
Manual images
Click an image to enlargeQuick guide from the manual
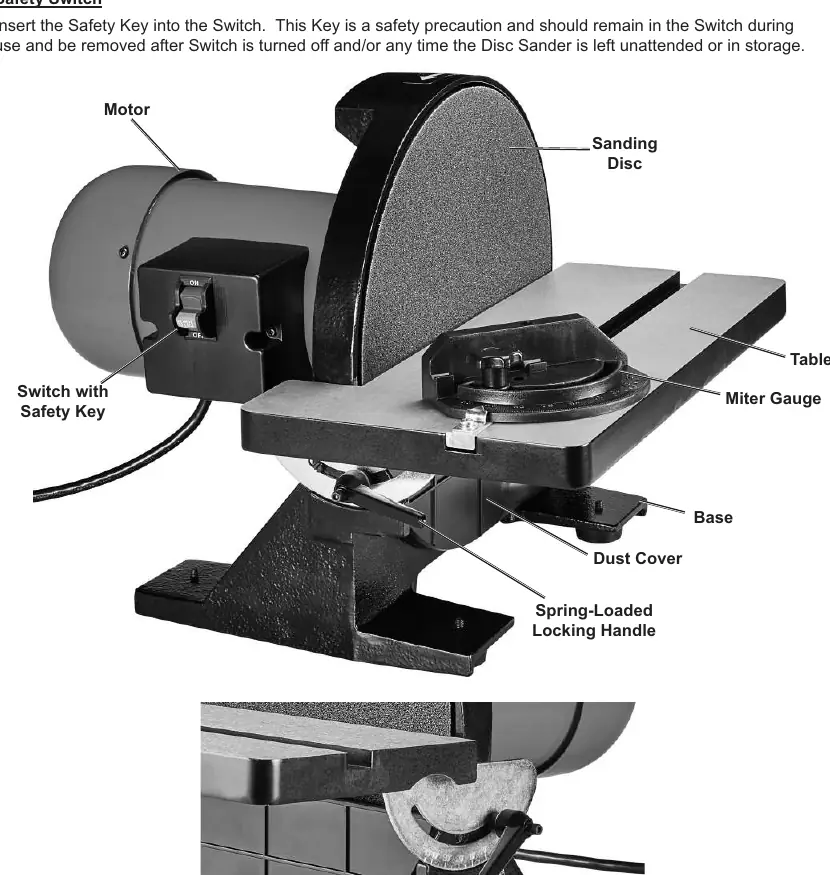
The Bauer 12-inch Disc Sander (21107E-B) is designed for sanding wood, plastic, and non-ferrous metals. Important: Always insert the Safety Key into the switch before operation and remove it when the tool is unattended or in storage. Maintain a maximum of 1/16 inch clearance between the work table and the sanding disc to prevent injury.
Safety Warnings
- General: Keep guards in place, remove adjusting keys/wrenches, and keep the work area clean and well-lit.
- Grounding: This tool must be used with a properly grounded 120V outlet. Do not modify the plug or use adapters.
- Operation: Sand only on the downward moving surface of the disc to prevent kickback. Never leave the tool running unattended.
- Vibration: If you experience numbness or tingling, seek medical advice. Use tools with the lowest vibration and take breaks.
Assembly and Mounting
The sander should be mounted to a stable workbench for safe operation.
- Mounting: Place the sander on a workbench, mark hole locations, drill 3/8" holes, and secure using 5/16" washers, screws, locking washers, and nuts.
- Work Table Assembly: Slide the work table onto the base frame. Thread the indexing pin into the pivot hole and through the scale plate. Insert the locking handle assembly into the flat washer and scale plate, then into the base frame.
- Clearance: Ensure the table edge is set 1/16" away from the sanding disc.
Operation
- Switch: Insert the Safety Key to enable the switch.
- Leveling the Table: Loosen locking handles, place a combination square on the table against the disc. If not 90°, tilt the table until square and retighten. Adjust the angle pointer to 0°.
- Squaring the Miter Gauge: Loosen the miter gauge knob, set to 0°, and use a combination square against the disc to ensure it is at 90°.
- Replacing Sanding Discs: Remove the table, disc guard, and dust cover. Peel off the old disc. Clean the backing disc with denatured alcohol, then apply the new disc firmly.
- Dust Collection: Connect a dust hose to the dust port on the bottom of the lower guard plate.
Maintenance
- Inspection: Before each use, check for loose hardware, damaged wiring, or binding parts.
- Cleaning: Use compressed air to blow dust from the sander and motor. The dust port can be removed for vacuuming.
- Lubrication: The bearings are sealed and do not require lubrication. Apply a light coat of paste wax to the table to improve material feeding.
Practical help
Common problems
Disc Sander does not turn on
Check if the unit is plugged in, ensure the Safety Key is inserted into the switch, and verify the switch is in the 'ON' position.
Motor overheats
Reduce pressure on the workpiece and ensure the extension cord is of the correct gauge and length.
Wood burns while sanding
Clean or replace the sanding disc, reduce pressure, or use a coarser grit disc.
Deep grooves or scars in workpiece
Use a finer grit disc, reduce pressure, keep the workpiece moving, or sand with the grain.
Before use
- Ensure the work area is clean and well-lit.
- Verify all guards are in place and functioning.
- Check that the table is square to the sanding disc.
- Ensure the Safety Key is inserted.
- Wear eye protection and appropriate apparel.
Show more Show less
Specs in practice
- Electrical Rating
- 120V / 60Hz / 8A
- Maximum Speed
- 1725 RPM
Images and diagrams
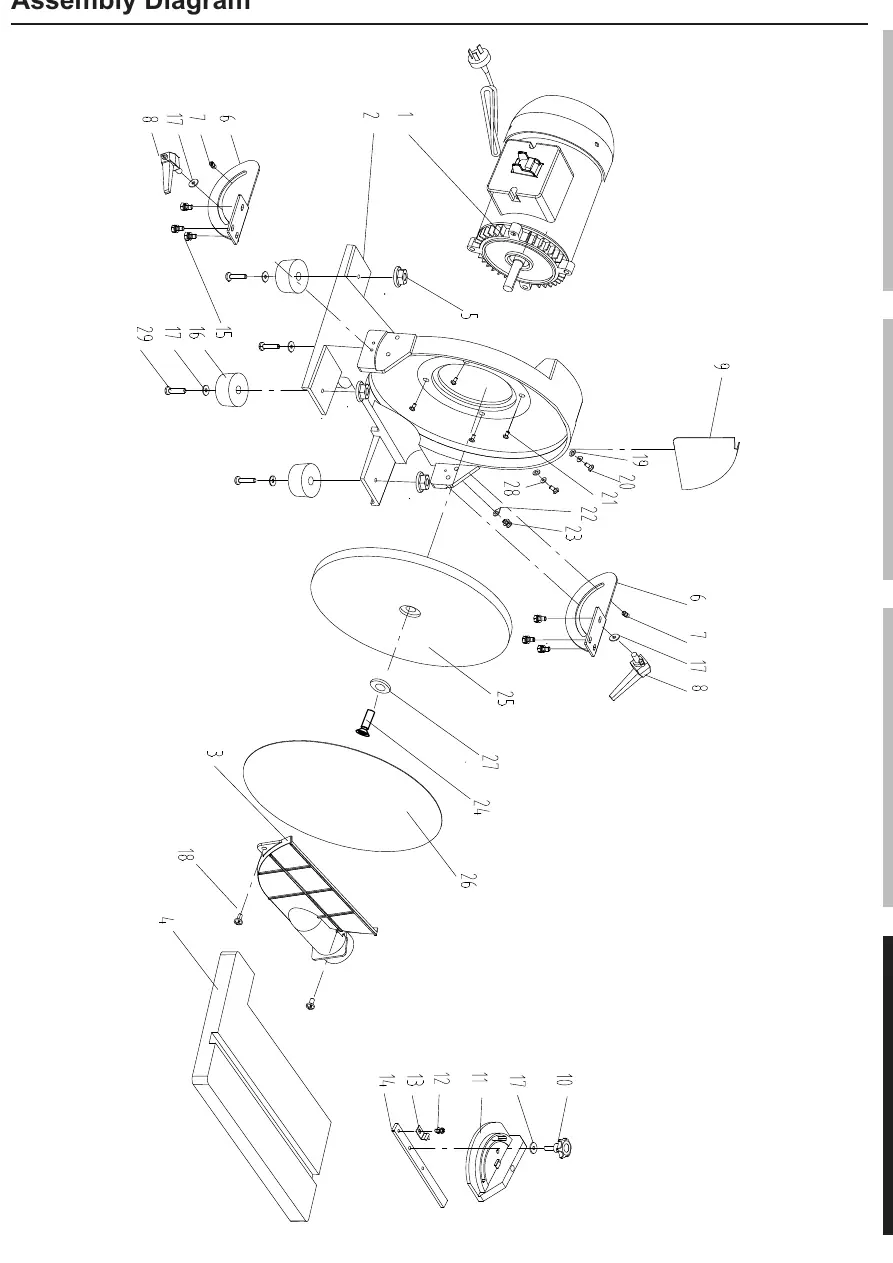
- The Assembly Diagram illustrates the motor, base, work table, and miter gauge components.
- The Grounding Instructions diagram shows the correct 3-prong plug and outlet configuration.
Model compatibility
- Use for sanding wood, plastic, and non-ferrous metals only.

Manual page author
Emily Carter
User documentation editor