Tools / Power Tools
Bauer 1712E-B 5-Inch Random Orbital Palm Sander
A comprehensive guide for the Bauer 1712E-B 5-Inch Random Orbital Palm Sander. Includes assembly, operation, maintenance, safety warnings, and troubleshooting steps.
Quick answers from the manual
Quick answer
- The Bauer 1712E-B is a 5-inch random orbital palm sander. It features a variable speed dial, dust collection system, and requires a 120V power source. Always empty the dust box frequently to prevent fire hazards. p. 7, 9
Key actions
- Attach Dust Box p. 7
- Change Sanding Disc p. 8
- Turn On/Off p. 9
First start
- Ensure the switch is in the 'O' (off) position before plugging in. Clear the work area, secure the workpiece, and wear appropriate PPE. p. 8, 9
Problems and fixes
Tool will not start
Check power, cord, and thermal reset.
p. 11Maintenance and reset
- If the tool has a thermal reset breaker, allow the tool to cool and press the reset button. p. 11
Technical specifications
| Parameter | Value | Meaning | Pages |
|---|---|---|---|
| Electrical Rating | 120VAC / 60Hz / 2.8A | Power requirements | p. 7 |
| No Load Speed | 3000-13000/min | Operating speed range | p. 7 |
Where to find it in the PDF
- Specifications p. 7
- Assembly p. 7
- Operating Instructions p. 8, 9
- Maintenance p. 10
- Troubleshooting p. 11
Table of contents
Manual images
Click an image to enlargeQuick guide from the manual
The Bauer 1712E-B is a 5-inch random orbital palm sander designed for sanding wood and other materials. Before use, ensure the work area is clean, well-lit, and free of flammable materials. Always wear ANSI-approved safety goggles and a NIOSH-approved dust mask. The tool features a variable speed dial and a dust collection box.
Product Overview
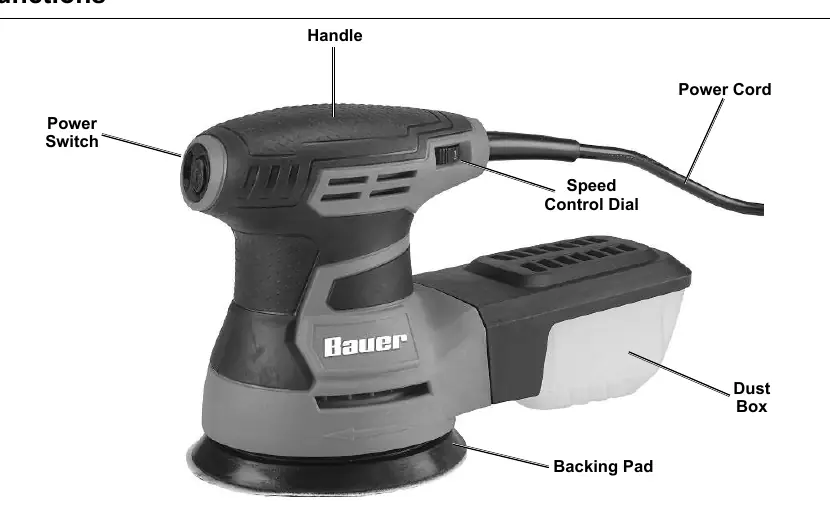
The sander consists of a power switch (I/O), a speed control dial, a backing pad for sanding discs, and a detachable dust box. It is a corded power tool requiring a 120V outlet.
Assembly
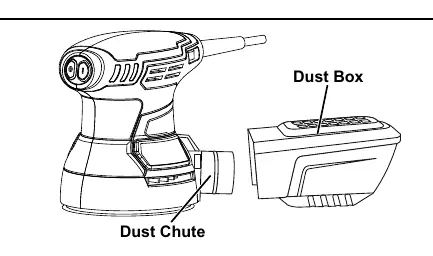
To assemble the dust collection system:
- Slide the Dust Box onto the Dust Chute located at the back of the sander.
- Push the Dust Box fully onto the chute using firm pressure.
- To remove, gently rotate and disconnect from the chute.
Operation
Tool Changing: Ensure the tool is unplugged. Place the desired sanding disc on the backing pad, aligning all 8 holes to ensure proper dust collection. Press the disc firmly into place.
General Use:
- Plug the tool into a 120V outlet.
- Press the 'I' button on the power switch to turn the tool on.
- Adjust the speed dial as needed.
- Hold the tool firmly with both hands.
- Once the tool reaches full speed, gently contact the workpiece.
- Move the tool in a uniform pattern (up/down or side-to-side).
- Do not apply heavy pressure; let the tool do the work.
- Empty the dust box frequently (at least every 10 minutes) to prevent fire hazards from self-igniting sanding dust.
Maintenance
- Before each use: Inspect for loose hardware, damaged cords, or cracked parts.
- After use: Empty the dust box and wipe external surfaces with a clean cloth.
- Periodic: Blow dust out of the motor vents using dry compressed air while wearing appropriate eye and respiratory protection.
- Service: If the plug or cord is damaged, it must be replaced by a qualified technician.
Troubleshooting
If the tool will not start, check the power source, ensure the cord is plugged in, and check if the thermal reset breaker has tripped. If the tool operates slowly or overheats, ensure you are not forcing the tool, check for blocked vents, and verify that any extension cord used is of the correct gauge for the length and load.
Safety Information
This tool vibrates during use; avoid prolonged exposure. Do not operate in explosive atmospheres. Keep children and bystanders away. Always use a GFCI-protected supply if operating in damp locations. If you have a pacemaker, consult a physician before use.
Practical help
Common problems
Tool will not start
Check power at outlet, ensure cord is connected, and check if the thermal reset breaker has tripped.
Tool operates slowly
Do not force the tool. If using an extension cord, ensure it is the correct gauge and length.
Overheating
Clean motor housing vents, reduce pressure on the tool, and ensure the extension cord is not too long or thin.
Dust collection ineffective
Ensure sanding disc holes are aligned with the backing pad and empty the dust box frequently.
Before use
- Inspect tool for loose hardware or damaged parts.
- Check power cord and plug for damage.
- Ensure work area is clean and well-lit.
- Wear ANSI-approved safety goggles and NIOSH-approved dust mask.
- Secure workpiece with clamps or a vise.
- Ensure sanding disc is properly aligned with the backing pad.
Specs in practice
- Electrical Rating
- 120VAC / 60Hz / 2.8A power requirement.
- No Load Speed
- 3000-13000/min (RPM range).
- Max Accessory Diameter
- 5 inches (standard size for this sander).
Images and diagrams
- The Dust Box attaches to the rear dust chute.
- The Speed Control Dial is located on the side of the handle.
- The Power Switch (I/O) is located on the front of the handle.
Model compatibility
- Requires 120V AC power outlet.
- Use only 5-inch sanding discs with 8-hole pattern.

Manual page author
Michael Turner
Technical manual editor
Reviews PDF manuals for structure, safety notes, and practical product details so readers can find the right information quickly.