Tools / Power Tools
Bauer 1793E-B Heavy Duty Drywall Screwdriver User Manual
Comprehensive user guide for the Bauer 1793E-B Heavy Duty Drywall Screwdriver. Includes setup, operating instructions, maintenance, troubleshooting, and safety guidelines.
Quick answers from the manual
Quick answer
- The Bauer 1793E-B is a corded drywall screwdriver. It features a depth-adjustable collar for consistent screw seating and a trigger lock for continuous operation. p. 7
Key actions
- Adjusting screw depth p. 7, 9
- Changing bits p. 8
First start
- Plug in the tool, adjust the depth collar, place the screw on the bit, and apply pressure to drive the screw. p. 9
Problems and fixes
Tool will not start
Check cord connection, power at outlet, or internal damage.
p. 11
Overheating
Allow tool to work at its own rate, keep bits sharp, clean vents, and check extension cord.
p. 11Maintenance and reset
- Blow dirt and dust out of all air vents and the clutch housing weekly. p. 10
Technical specifications
| Parameter | Value | Meaning | Pages |
|---|---|---|---|
| Electrical Rating | 120VAC / 60Hz / 5A | Power requirements | p. 7 |
| No Load Speed | 0 - 4000 RPM | Rotational speed | p. 7 |
Where to find it in the PDF
- Safety Instructions p. 2, 3, 4, 5
- Operating Instructions p. 7, 8, 9
- Maintenance p. 10
Table of contents
Manual images
Click an image to enlargeImportant Information
The Bauer 1793E-B is a corded drywall screwdriver designed for fastening drywall. Before use, ensure the work area is clean, well-lit, and free of children or pets. Always inspect the tool for damaged cords, loose hardware, or binding parts before each use. The tool requires a 120V power source and should be used with appropriate extension cords if necessary.
Product Functions
The tool features several key controls:
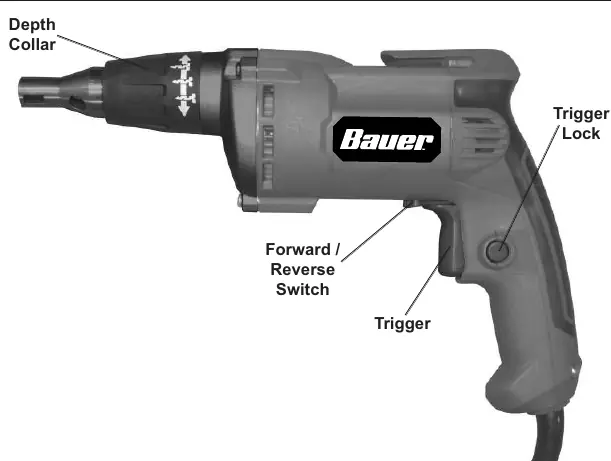
- Trigger: Activates the motor.
- Trigger Lock: Allows for continuous operation. Squeeze the trigger and push the lock to engage; squeeze and release the trigger to disengage.
- Forward/Reverse Switch: Located near the trigger, used to change the direction of rotation.
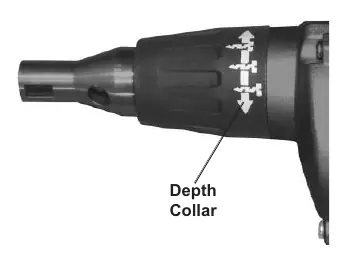
- Depth Collar: Located at the front of the tool. Rotate it to adjust the fastening depth of the screw. Turn right to seat screws deeper, turn left to seat them higher.
Setup and Bit Changing
To change the bit holder or bit:
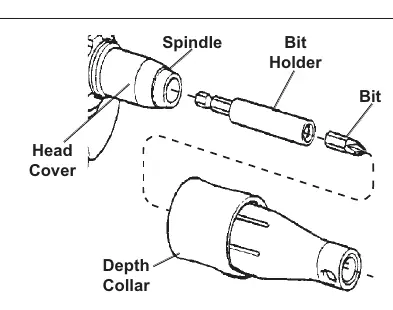
- Ensure the tool is unplugged.
- Twist and pull forward on the Depth Collar to remove it from the Head Cover.
- If changing the bit holder, pull it straight out with pliers if necessary. Push the new bit holder into the spindle until it snaps into place.
- If changing the bit, pull the old bit out with pliers and push the new one into the holder until it snaps.
- Replace the Depth Collar by aligning the ribs on the inside with the grooves on the head cover and snapping it back into place.
Operating Instructions
- Ensure the trigger is in the off-position, then plug in the tool.
- Rotate the Depth Collar to the desired screw depth.
- Place the screw on the end of the bit.
- Position the tip of the screw where it will be driven.
- Apply pressure to the bit to drive the screw into place, pulling back as soon as the clutch engages.
- Turn off and unplug the tool after use.
Maintenance and Cleaning
Regular maintenance ensures tool longevity:
- Before each use: Inspect for loose hardware, damaged wiring, or cracked parts.
- After use: Wipe external surfaces with a clean cloth.
- Weekly: While the tool is running, blow dirt and dust out of all air vents using dry air. Remove the Depth Collar and blow drywall dust out of the clutch housing. Wear ANSI-approved safety goggles and a NIOSH-approved dust mask during this process.
Troubleshooting
If the tool fails to start, check the power connection and circuit breaker. If the tool operates slowly or overheats, ensure you are not forcing the tool, check that the bit is sharp, and verify that the motor vents are not blocked. If using an extension cord, ensure it is of the correct gauge for the length and load.
Technical Specifications
- Electrical Rating: 120VAC / 60Hz / 5A
- No Load Speed: 0 - 4000 RPM
- Chuck Size: 1/4" Hex
Practical help
Common problems
Tool will not start
Check if the cord is plugged in and the outlet has power. If the circuit breaker is tripped, check the circuit capacity.
Tool operates slowly
Avoid forcing the tool. If using an extension cord, ensure it is the correct gauge for the length and load.
Overheating
Ensure the bit is sharp, vents are not blocked, and the tool is not being forced. Clear dust from vents and clutch housing.
Before use
- Inspect for loose hardware.
- Check for misalignment or binding of moving parts.
- Inspect cord and electrical wiring for damage.
- Check for cracked or broken parts.
- Ensure the work area is clean and well-lit.
Specs in practice
- Electrical Rating
- 120VAC / 60Hz / 5A power requirements.
- No Load Speed
- The rotational speed of the tool without resistance (0-4000 RPM).
Images and diagrams
- Figure A illustrates the removal of the Depth Collar to access the Bit Holder and Spindle for maintenance or bit changes.
Model compatibility
- Requires a 120V grounded outlet.
- Use extension cords with appropriate wire gauge based on length (see Table A in manual).

Manual page author
David Miller
Documentation analyst
Organizes user manual content into clear summaries, with attention to model details, product context, and everyday usability.