Tools / Drills
Owner's Manual for Bauer 1952E-B14 14 Gallon Wet Dry Vacuum
Quick guide for the Bauer 1952E-B14 14 Gallon Wet Dry Vacuum. Includes assembly instructions, wet/dry vacuuming procedures, blower operation, filter maintenance, and safety guidelines.
Quick answers from the manual
Quick answer
- The Bauer 1952E-B14 is a 14-gallon wet/dry vacuum. For dry vacuuming, ensure the filter is installed. For wet vacuuming, remove the filter. If the motor sound becomes high-pitched, the tank is full and must be emptied. p. 3, 5, 6
Key actions
- Assemble the vacuum by attaching casters and installing the filter for dry use. p. 5
- Empty the tank when the motor sound becomes high-pitched during wet vacuuming. p. 6
First start
- Remove power head, attach casters to the tank, install filter (for dry use), and secure power head. p. 5
Problems and fixes
Motor sound becomes high-pitched
Turn off vacuum, unplug, and empty the tank.
p. 6Maintenance and reset
- Clean filter by tapping or flushing with water; dry for 24 hours before reuse. p. 8
Technical specifications
| Parameter | Value | Meaning | Pages |
|---|---|---|---|
| Electrical Rating | 120VAC / 60Hz / 10A | Power requirements | p. 3 |
| Tank Capacity | 14 Gallons | Maximum liquid/debris capacity | p. 3 |
Where to find it in the PDF
- Safety Instructions p. 2, 3
- Assembly p. 5
- Operating Instructions p. 6, 7
- Parts List and Diagram p. 10, 11
Table of contents
Manual images
Click an image to enlargeQuick guide from the manual
This manual provides essential instructions for the Bauer 1952E-B14 14 Gallon Wet Dry Vacuum. Key operations include proper assembly of casters and filters, switching between wet and dry vacuuming modes, and using the blower function. Always ensure the power switch is off and the unit is unplugged before performing any maintenance or assembly.

Safety Instructions
Important: Read all instructions before use. This appliance is for household use only.
- Electrical Safety: This appliance features double insulation and a polarized plug. Do not modify the plug. If it does not fit, contact a qualified electrician.
- Usage Restrictions: Do not use to pick up flammable or combustible liquids (e.g., gasoline). Do not use to pick up burning or smoking materials (e.g., cigarettes, hot ashes).
- Wet Vacuuming: Do not immerse the nozzle completely in liquid. If the motor sound becomes high-pitched, the tank is full; turn off immediately, unplug, and empty the tank.
- General Safety: Keep hair, loose clothing, and body parts away from openings. Do not use without the dust bag or filter in place.
Assembly
Before using the vacuum, perform the following assembly steps:
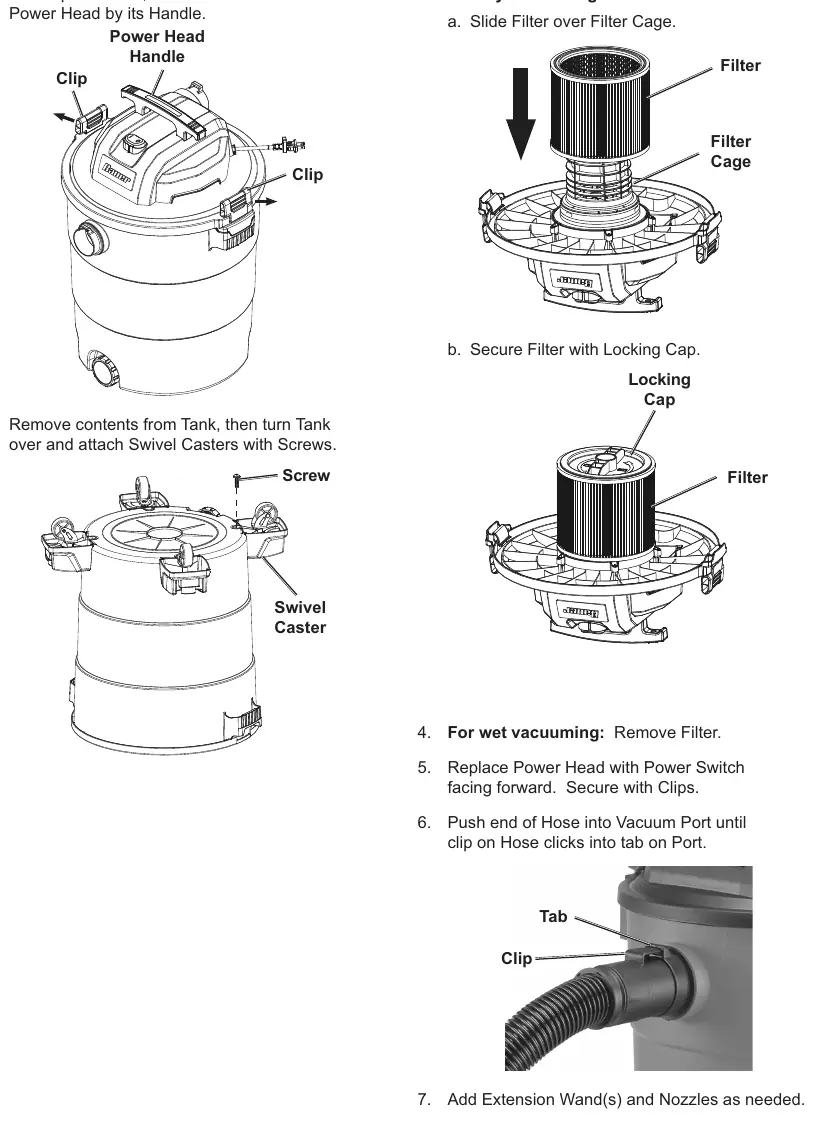
- Power Head: Pull clips outward to remove the power head.
- Casters: Remove contents from the tank, turn the tank over, and attach the swivel casters using the provided screws.
- Dry Vacuuming: Slide the filter over the filter cage and secure it with the locking cap.
- Wet Vacuuming: Remove the filter entirely.
- Final Assembly: Replace the power head with the switch facing forward and secure it with the clips. Push the hose into the vacuum port until it clicks.
Operation
Vacuuming
Ensure the correct filter configuration (filter installed for dry, removed for wet). Plug the power cord into an outlet, hold the hose securely, and turn the power switch ON. Use the appropriate extension cord gauge based on the length (refer to Table A in the manual).
Blower Operation
- Remove the power head and clean the tank.
- Replace the power head and secure with clips.
- Remove the hose from the vacuum port and insert it into the blower port on the back of the power head until it clicks.
- Turn the power switch ON. Do not point the hose at people or animals.
Maintenance
- Cleaning: After use, wipe external surfaces with a clean cloth.
- Filter Maintenance: Clean the filter regularly by tapping or shaking it into a waste can. If necessary, flush with plain water from the inside. Important: Allow the filter to dry for at least 24 hours before replacing. Never install a wet filter.
- Storage: Store the appliance indoors in a dry area, out of reach of children.
Practical help
Common problems
Motor sound becomes high-pitched
The tank is full. Turn off the vacuum, unplug it, and empty the tank immediately.
Filter is torn
Replace the filter immediately. Do not operate the vacuum without a proper filter.
Vacuum not working
Check the power cord connection, ensure the switch is ON, and verify the tank is not full.
Before use
- Inspect for loose hardware or damaged wiring.
- Ensure the filter is installed for dry vacuuming.
- Remove the filter for wet vacuuming.
- Verify the extension cord gauge is appropriate for the length (see manual Table A/B).
- Ensure the tank is clean and empty.
Specs in practice
- Electrical Rating
- 120VAC / 60Hz / 10A
- Tank Capacity
- 14 Gallons
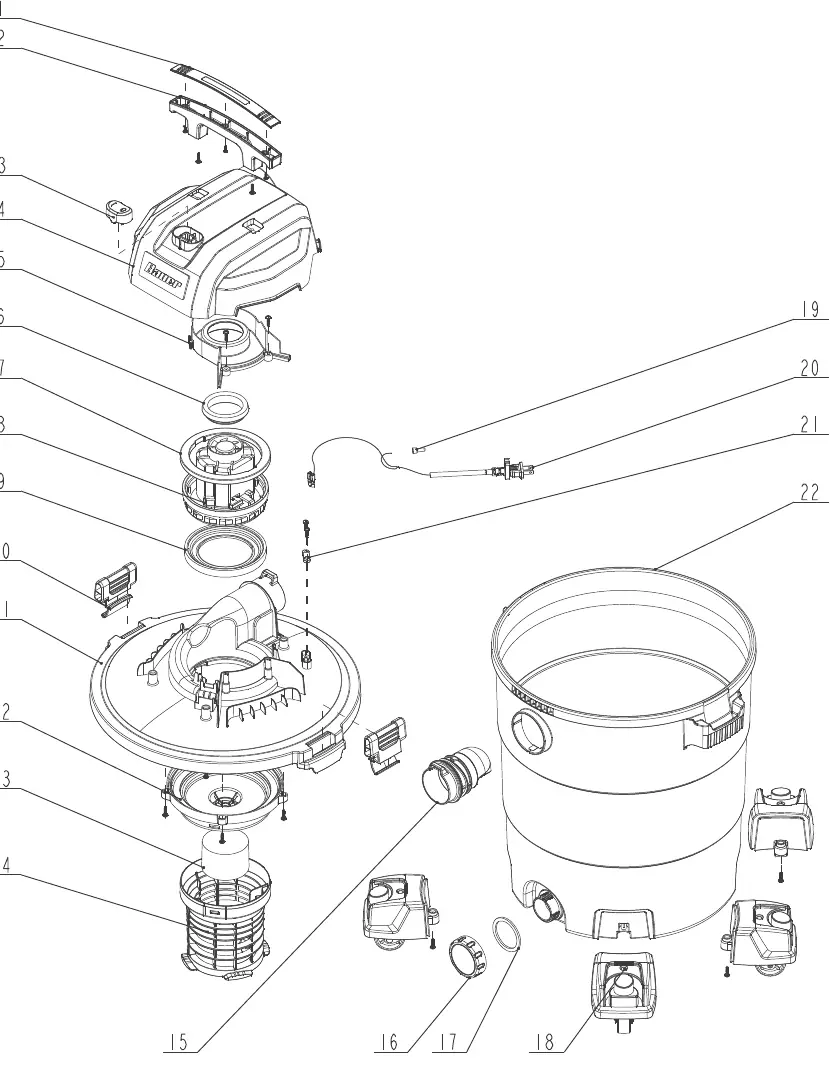
Images and diagrams
- The Assembly Diagram (Page 11) illustrates the breakdown of the power head, motor, filter cage, and tank components for maintenance and part identification.
Model compatibility
- Use only manufacturer-recommended attachments.
- For household use only.

Manual page author
David Miller
Documentation analyst
Organizes user manual content into clear summaries, with attention to model details, product context, and everyday usability.