Industrial / Access Control
Installation Guide for Suprema FaceLite Access Control Terminal
Quick installation and setup guide for the Suprema FaceLite access control terminal. Includes wiring diagrams, mounting instructions, power requirements, and safety precautions.
Table of contents
Manual images
Click an image to enlargeQuick Start Guide
The Suprema FaceLite is an access control terminal designed for secure authentication. This guide provides essential information for installation, wiring, and configuration. Always ensure the power is turned off for all devices before performing any wiring connections.
Safety Instructions
Warning: Miswiring may result in serious fire, electric shock, or product damage. Do not install the product in locations exposed to direct sunlight, high humidity, or radio frequency interference. Use a separate power supply for the device, electric locks, and Secure I/O 2 to prevent malfunctions.
Components
The package includes the FaceLite device, wall bracket, drilling template, connection cables, diode, 120 Ω resistor, PVC anchors, fixing screws, ferrite core, and documentation.
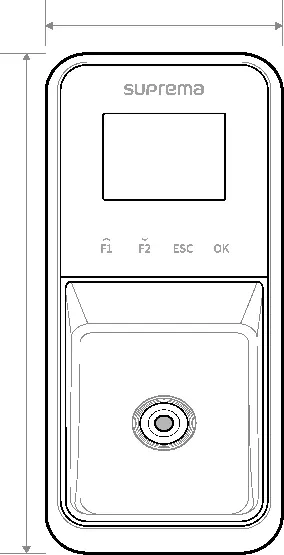
Device Overview
The device features an LCD screen, function buttons, IR camera, and RF card authentication unit. The rear panel contains ports for Wiegand, TTL input, Power Supply, Ethernet, RS-485, and Relay connections.
Installation
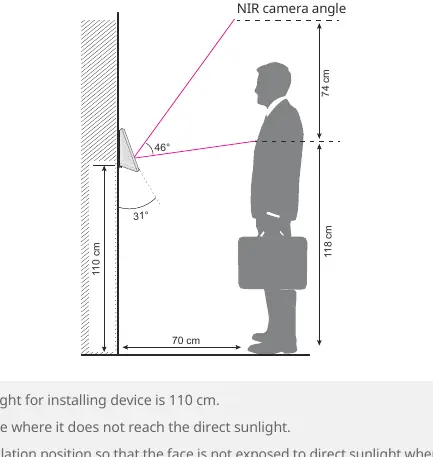
Mounting: Use the provided drilling template to determine the installation position. The optimal installation height is 110 cm. Ensure the device is installed in a dry location away from direct sunlight.

Wiring:
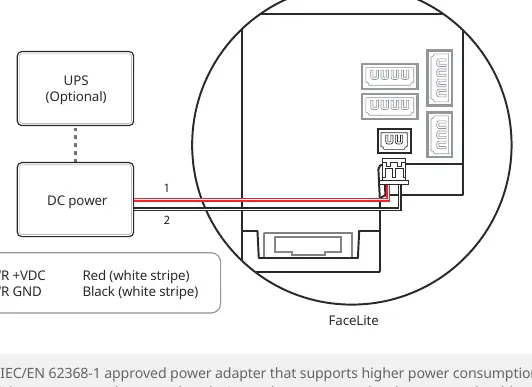
- Power Supply: Connect to 24 Vdc. Use the recommended cable standards (16-20 AWG) based on distance.
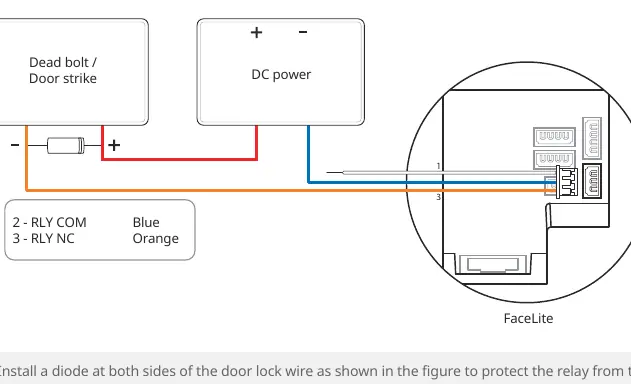
- Relay: Connect according to the lock type (Fail Safe or Fail Secure). Always install a diode close to the door lock to protect the relay from reverse current.
- Network: Connect via Ethernet (CAT-5e) to a hub or directly to a PC.
- TTL Input: Used for door sensors and buttons.
- Wiegand: Used for connecting external RFID readers.
Face Enrollment and Authentication
For optimal performance, maintain a distance of 40 cm to 80 cm between the face and the device. Avoid changing facial expressions during enrollment. Do not wear hats, masks, or sunglasses during registration or authentication. If wearing glasses, it is recommended to register both with and without glasses.
Technical Specifications
Power: 24 Vdc, Max 1.2 A. Operating Temperature: -20°C to 50°C. Max Users: 30,000. Camera Resolution: 720 x 480 pixels.
Practical help
Common problems
Device malfunction or unexpected behavior
Ensure a separate power supply is used for the device, electric lock, and Secure I/O 2. Using the same power source may cause interference.
Authentication failure
Ensure the face is within the 40-80 cm range, avoid covering eyebrows or eyes, and ensure the face is not covered by masks, hats, or sunglasses.
RF interference
Maintain the minimum required separation distance between multiple devices installed in the same area.
Before use
- Ensure power is turned off for all devices before wiring.
- Verify the power supply meets the 24 Vdc requirement.
- Check the installation height (optimal 110 cm).
- Ensure the installation location is dry and away from direct sunlight.
- Use a separate power supply for the lock and the device.
- Install a diode close to the door lock for relay protection.
Specs in practice
- Operating Temperature
- -20°C to 50°C.
- Camera Resolution
- 720 x 480 pixels.
Images and diagrams
- Wiring diagrams are provided for Power, Relay (Fail Safe/Secure), TTL, RS-485, and Wiegand connections.
- The installation diagram illustrates the optimal height and camera angle for face recognition.
Model compatibility
- Compatible with Secure I/O 2, DM-20, and CoreStation.
- Supports OSDP V2 protocol.
- Supports NFC and BLE mobile credentials.

Manual page author
Michael Turner
Technical manual editor
Reviews PDF manuals for structure, safety notes, and practical product details so readers can find the right information quickly.