Lighting / Outdoor Landscape
Battery Replacement Guide for Sure-Lites EBPLEDSD14W LED Emergency Battery Pack
A comprehensive guide for replacing the battery on the Sure-Lites EBPLEDSD14W LED Emergency Battery Pack. Includes step-by-step replacement instructions, safety precautions, maintenance schedules, and troubleshooting for battery faults.
Table of contents
Manual images
Click an image to enlargeImportant Information
This document provides instructions for replacing the battery in the Sure-Lites EBPLEDSD14W LED Emergency Battery Pack. The EBP is designed to maintain illumination of the LED fixture for a minimum of 90 minutes during an AC power failure. The battery requires a 24-hour charge period to reach full capacity.
Safety Precautions
- Disconnect both normal and emergency power supplies at the fuse or circuit breaker before installing or servicing.
- Ensure the EZ Key is securely in place to disconnect the existing battery before servicing.
- Do not use this equipment outdoors, near gas or electric heaters, or in wet/hazardous locations.
- This product is for use in indoor fixtures only and is not compatible with sealed and gasketed fixtures.
- All maintenance must be performed by qualified service personnel.
When to Replace the Battery
The battery should be replaced if the LED fixture fails to illuminate for the full 90-minute duration during a power failure. Additionally, the EBP indicates a battery fault if the test button indication light (TBIL) displays two red LED blinks.
Battery Replacement Procedure
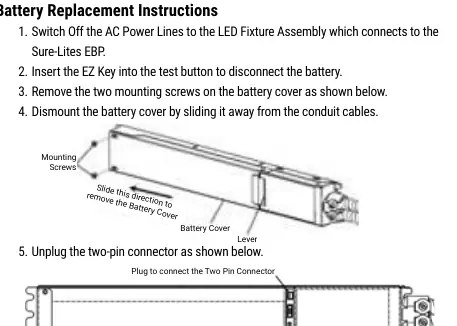
- Switch off the AC power lines to the LED fixture assembly.
- Insert the EZ Key into the test button to disconnect the battery.
- Remove the two mounting screws on the battery cover.
- Dismount the battery cover by sliding it away from the conduit cables.
- Unplug the two-pin connector.
- Replace the old battery and connect the new battery's two-pin connector to the existing plug.
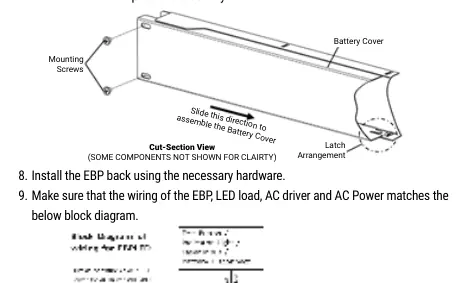
- Slide the battery cover back towards the conduit cables to lock it into position using the latch arrangement.
- Mount the two existing screws to complete the assembly.
- Install the EBP back using the necessary hardware.
- Switch on the AC power lines to the LED fixture assembly and remove the EZ Key for storage.
Maintenance
While no routine maintenance is required to keep the emergency LED driver functional, it should be checked periodically to verify proper operation. Visually inspect that the indication light is illuminated monthly. When AC power is applied, the charging indicator light will blink green while charging and turn solid green once fully charged.
Manufacturer information
Cooper Lighting Solutions
Practical help
Common problems
LED fixture does not illuminate for 90 minutes during power failure
The battery has reached the end of its service life and requires replacement.
Test button indication light (TBIL) shows two red LED blinks
This indicates a battery fault; the battery must be replaced.
Before use
- Ensure power is disconnected at the fuse or circuit breaker.
- Verify the EZ Key is available to disconnect the battery.
- Confirm the fixture is for indoor use only.
- Ensure the replacement battery is the correct type for the EBPLEDSD14W.
- Check that the wiring matches the block diagram provided in the manual.
Specs in practice
- Emergency Runtime
- Maintains LED fixture illumination for at least 90 minutes during power failure.
- Blinking Green Light
- Indicates the battery is currently charging.
- Solid Green Light
- Indicates the battery is fully charged.
Images and diagrams
- The replacement diagram illustrates the removal of mounting screws, the direction to slide the battery cover, and the location of the two-pin connector.
- The cut-section view shows the latch arrangement required to properly reassemble the battery cover.
Model compatibility
- For indoor fixtures only.
- Not for use with sealed and gasketed fixtures.
- Do not mount near gas or electric heaters.

Manual page author
Michael Turner
Technical manual editor
Reviews PDF manuals for structure, safety notes, and practical product details so readers can find the right information quickly.