Plumbing / Showers & Tubs
Basin Overflow Cover Installation and Care Guide
Learn how to install and maintain your Better Bathrooms basin overflow cover. Follow our simple guide for removal, installation, and cleaning to keep your bathroom fixtures looking their best.
Table of contents
Quick guide from the manual
This guide provides instructions for the removal, installation, and maintenance of your basin overflow cover. Ensure the overflow hole is clean before installation and avoid using abrasive materials during cleaning to protect the finish.
Removal of existing cover
If you need to remove an existing overflow cover, you can typically do so by pulling it out from the hole or slot in the basin. No tools are required for this process. If the cover is too tight to remove by hand, you may use a thin-bladed screwdriver. To prevent scratching the basin, place a thin piece of cloth between the screwdriver blade and the basin surface.
Installation
- Remove the new overflow cover from the packaging and inspect it for any damage.
- Ensure the overflow hole on the basin is clean and free of any debris.
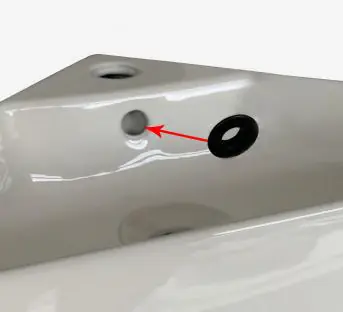
- Insert the teeth of the overflow cover into the hole.
- Push the cover in until the outer ring is flush with the basin surface. Do not force the cover, as this could break the teeth.
Cleaning
To maintain the surface finish of the overflow cover, clean it regularly using only a clean, damp cloth. Do not use any abrasive cleaning agents or materials, as these will damage the plated finish.
Contact and support
If you encounter any issues with your product, you can contact the Better Bathrooms customer service team through the following channels:
- Log in to your account and use the self-serve portal at betterbathrooms.com/CustomerAccount/Login
- Contact support via the website at betterbathrooms.com/content/contact-us
- Email: [email protected]
- Phone: 0330 390 3062
- Write to: Trident Business Park, Neptune Way, Huddersfield, HD2 1UA
Official resources from the manual
Manufacturer information
Better Bathrooms
Practical help
Common problems
Cover is too tight to remove by hand
Use a thin-bladed screwdriver, placing a cloth between the blade and the basin to prevent scratching.
Cover teeth breaking during installation
Do not force the cover into the hole. Ensure it is aligned correctly and the hole is free of debris.
Before use
- Check the new overflow cover for any damage
- Ensure the basin overflow hole is clean and free of debris
Images and diagrams
- The diagram illustrates the alignment of the overflow cover teeth with the basin overflow hole.
Model compatibility
- Designed for standard basin overflow holes.

Manual page author
David Miller
Documentation analyst
Organizes user manual content into clear summaries, with attention to model details, product context, and everyday usability.