Plumbing / Sinks Faucets
Bristan Hourglass 1 Hole Bath Filler Installation and User Guide
Installation and user guide for the Bristan Hourglass 1 Hole Bath Filler. Includes setup steps, maintenance, cleaning, and troubleshooting.
Quick answers from the manual
Quick answer
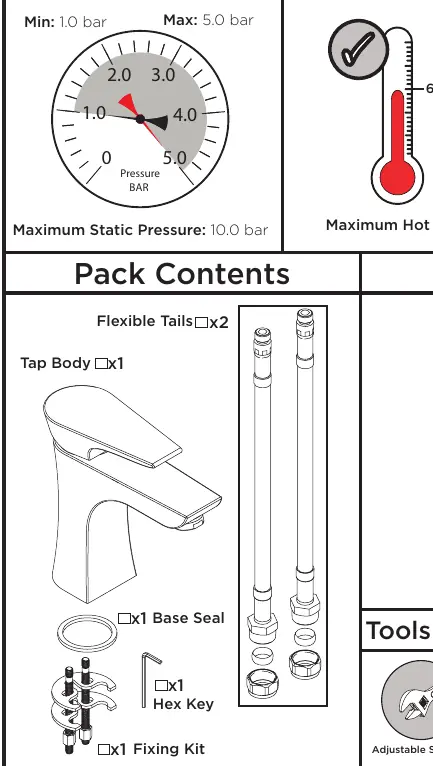
- The Bristan Hourglass 1 Hole Bath Filler requires a dynamic water pressure between 1.0 and 5.0 bar and a maximum hot water temperature of 60°C. Installation involves securing the tap body, connecting flexible tails, and fitting the waste. p. 1
Key actions
- Install the tap body and connect flexible tails. p. 2, 3
- Clean the tap using warm water and mild pH-neutral soap. p. 3
- Replace cartridge or outlet if flow is restricted. p. 4
First start
- Flush the water supply before installation to remove debris. p. 1
- Turn on water supply and check all joints for leaks. p. 3
Problems and fixes
Low Flow
Open isolation valve, flush pipework, or clean outlet.
p. 5
No Flow
Open isolation valve or turn on mains water supply.
p. 5Maintenance and reset
- Service the tap at least once every year to prolong its life. p. 5
Technical specifications
| Parameter | Value | Meaning | Pages |
|---|---|---|---|
| Dynamic Water Pressure | 1.0 - 5.0 bar | Operating pressure range | p. 1 |
| Max Hot Water Temp | 60°C | Maximum safe temperature | p. 1 |
Where to find it in the PDF
- Specifications and Pack Contents p. 1
- Installation Steps p. 2, 3
- Maintenance and Troubleshooting p. 4, 5
Table of contents
Manual images
Click an image to enlargeImportant Information
Before installing the Bristan Hourglass 1 Hole Bath Filler, ensure the water supply is thoroughly flushed to remove swarf and solder. Isolation valves must be fitted to the inlet water supplies to facilitate future maintenance. This product must not be modified, as doing so will invalidate the guarantee. Ensure full access is available for future servicing.
Specifications
- Dynamic Water Pressure: Min 1.0 bar, Max 5.0 bar.
- Maximum Static Pressure: 10.0 bar.
- Maximum Hot Water Temperature: 60°C.
- Inlet Connections: 22mm Compression Flexible Tails.
- Outlet: Housed M24 Flow Straightener.
Installation
Preparation: Check the pack contents, which include the tap body, base seal, fixing kit, hex key, and flexible tails. Ensure you have the required tools: adjustable spanner, 2.5mm hexagonal keys, size 1 cross-head screwdriver, 9mm box spanner (for fixing rod nut), and 30mm box spanner (for cartridge).
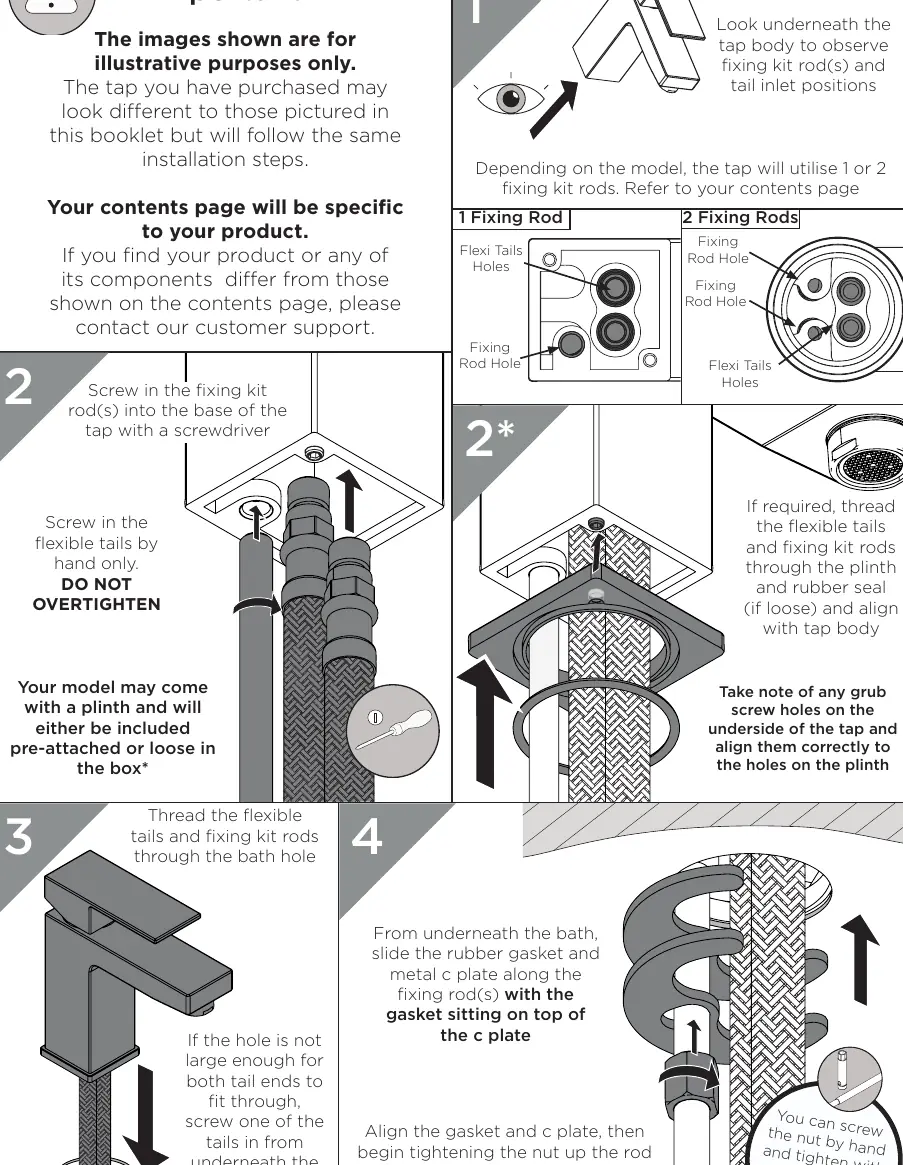
- Positioning: Look underneath the tap body to observe the fixing kit rod(s) and tail inlet positions.
- Fixing: Screw the fixing kit rod(s) into the base of the tap using a screwdriver. Screw the flexible tails in by hand only—do not overtighten. If required, thread the tails and rods through the plinth and rubber seal.
- Mounting: Thread the flexible tails and fixing kit rods through the bath hole. If the hole is too small, one tail may need to be screwed in from underneath the bath.
- Securing: From underneath the bath, slide the rubber gasket and metal C-plate along the fixing rods. Align the gasket and C-plate, then tighten the nut up the rod until secure.
- Connection: Connect the hot and cold water supplies to the flexible tails. Ensure hot is on the left and cold is on the right. Turn on the water supply and check all joints for leaks.
Waste Installation and Operation
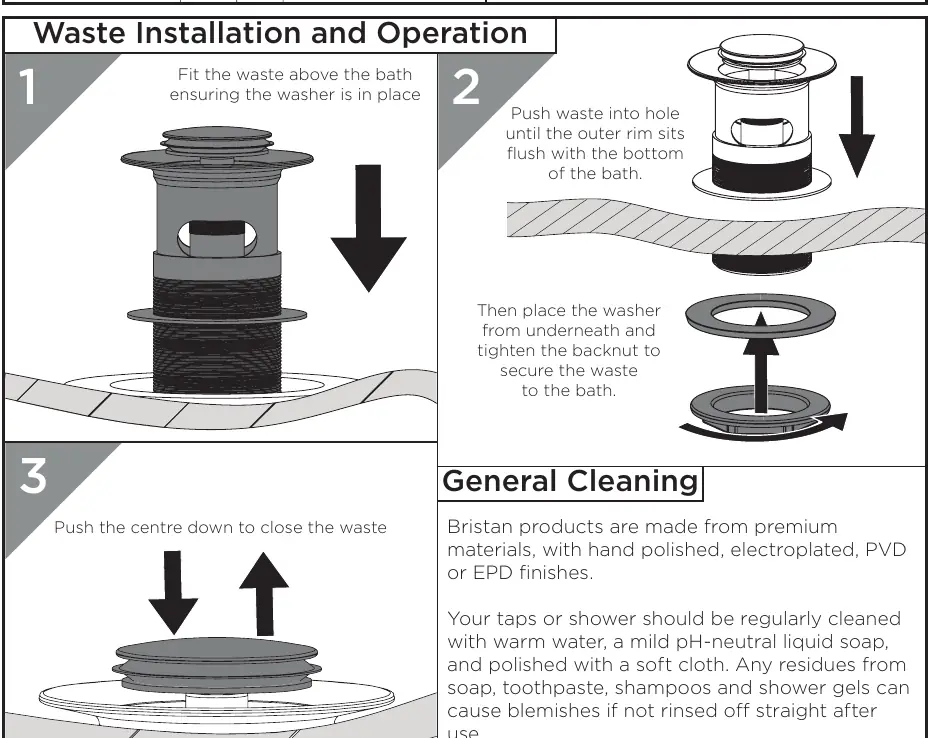
- Fit the waste above the bath, ensuring the washer is in place.
- Push the waste into the hole until the outer rim sits flush with the bottom of the bath.
- Place the washer from underneath and tighten the backnut to secure the waste.
- To operate, push the centre down to close the waste, and push again to open and release the water.
General Cleaning
Bristan products are made from premium materials with hand-polished, electroplated, PVD, or EPD finishes. Clean regularly with warm water, a mild pH-neutral liquid soap, and polish with a soft cloth. Avoid using abrasive cloths, scouring pads, scrub sponges, steel wool, or household bleaches, as these can damage the surface finish.
Maintenance
Cartridge/Valve Replacement
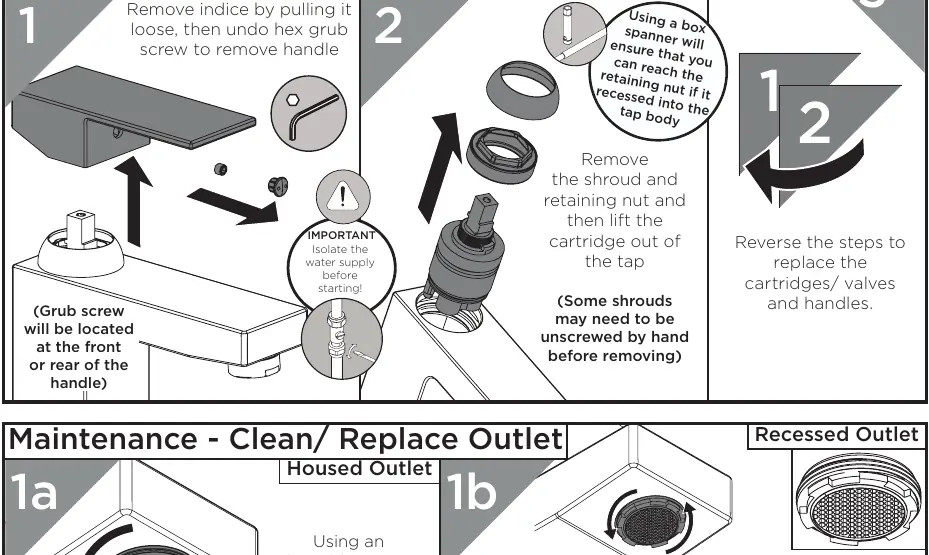
- Isolate the water supply.
- Remove the indice by pulling it loose, then undo the hex grub screw to remove the handle.
- Remove the shroud and retaining nut, then lift the cartridge out of the tap.
- Reverse the steps to reassemble.
Outlet Cleaning/Replacement
- Use an adjustable spanner to gently unscrew the outlet.
- Check all loose parts for damage and soak in a suitable solution to de-scale.
- Reverse the steps to replace the outlet.
Practical help
Common problems
Low Flow
Check if the isolation valve is partially closed, flush pipework to remove airlocks/debris, or clean the outlet.
No hot water or cycling hot and cold
Increase water flow rate or pressure through the system.
No Flow
Ensure isolation valves are open and mains water supply is turned on.
Temperatures not corresponding with taps
Swap the inlet tails around.
Before use
- Flush water supply to remove swarf and solder.
- Install isolation valves on inlet supplies.
- Ensure full access for future maintenance.
- Do not modify the product.
- Check all joints for leaks after installation.
Specs in practice
- Dynamic Water Pressure
- The pressure of water while the tap is running (1.0 - 5.0 bar).
- Maximum Static Pressure
- The maximum pressure the tap can withstand when closed (10.0 bar).
- Maximum Hot Water Temperature
- The highest safe temperature for the water supply (60°C).
Images and diagrams
- The manual includes diagrams for installation steps, waste fitting, and maintenance procedures.
- Specific diagrams show the correct orientation of flexible tails to avoid kinks or twists.
Model compatibility
- Requires 22mm compression flexible tails.
- Requires isolation valves for maintenance.

Manual page author
Emily Carter
User documentation editor
Prepares concise manual descriptions and highlights the most useful setup, operation, and maintenance information for readers.