Plumbing / Sinks Faucets
Installation Guide for Stonebaths Ramp D-Airblade 400 Basin
Comprehensive installation guide for the Stonebaths Ramp D-Airblade 400 Basin. Includes mounting instructions, technical specifications, and setup requirements for wall-hung installation.
Quick answers from the manual
Quick answer
- The Ramp D-Airblade 400 is a wall-hung basin. Installation involves marking and drilling pilot holes into wall studs, securing the basin with provided brackets and fasteners, and connecting the plumbing. p. 3
Key actions
- Secure the basin to the wall using 4 fasteners for basins up to 1500mm, or 6-8 for longer basins. p. 3
First start
- Connect supply hoses and waste, then turn on the water supply to check for any leaking. p. 3
Technical specifications
| Parameter | Value | Meaning | Pages |
|---|---|---|---|
| Weight | 70kg | Approximate net weight | p. 1 |
Where to find it in the PDF
- Technical Specifications p. 1
- Installation Guide p. 3
Table of contents
Manual images
Click an image to enlargeQuick guide from the manual
The Stonebaths Ramp D-Airblade 400 is a wall-hung basin. Installation requires securing the unit to wall studs or nogs using the provided brackets and screws. Ensure the basin is level during installation. For basins up to 1500mm, use 4 fasteners; longer basins require 6-8 fasteners. If using benchtop-mounted faucets, consider installing water pressure restrictors to reduce splashing.
Product specifications
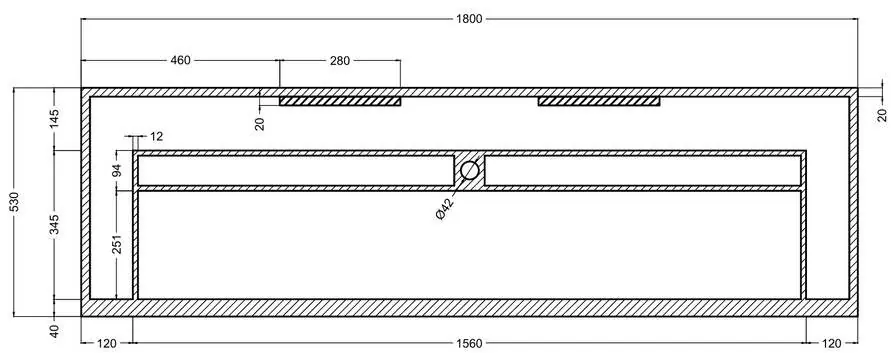
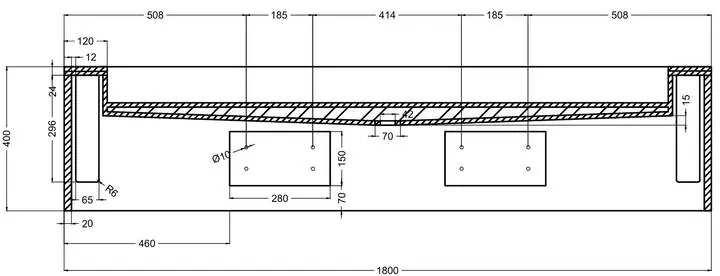
- Dimensions: 1800 x 530 x 400mm
- Net Weight: Approximately 70kg
- Waste Size: 40mm
- Composition: Matte White Solid Surface (12mm/20mm)
- Warranty: 10-year manufacturer's warranty
Installation instructions
- Prepare tools: Gather a drill, level, pencil, and screwdriver. Ensure brackets, screws, and fasteners are ready.
- Predrill: Bracket and screw holes are pre-drilled at the factory. If necessary, drill holes to match wall studs using a commercial drill and toughened drill bit at high speed.
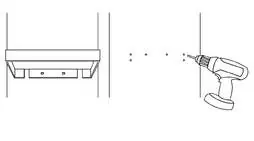
- Mark and drill pilot holes: Determine the desired height, ensuring alignment with internal wall studs. Place the basin against the wall, use a level to ensure it is straight, and mark the bracket and fastener hole locations. Drill pilot holes.
- Secure to wall: Use the mounting brackets and screws. Insert the first fastener and check the level. Once aligned, insert the remaining fasteners.
- Connect and finish: Connect supply hoses to the faucet and connect the waste. Turn on the water supply to check for leaks.
Customization and notes
Tap holes can be drilled on-site using a 35mm round cutout drill bit at high speed. Mark the position to the center of the back panel. The basin supports custom sizing and up to 3 wastes depending on the length.
Practical help
Common problems
Water splashing from faucet
If using benchtop mounted faucets, install water pressure restrictors to reduce splash.
Difficulty aligning with wall studs
Ensure the basin is placed against the wall and use a level to verify it is straight before marking and drilling pilot holes.
Before use
- Verify wall studs or nogs are located where the basin will be mounted.
- Ensure you have a drill, level, pencil, and screwdriver.
- Check that all brackets, screws, and fasteners are included.
- Determine the desired height for the basin installation.
Images and diagrams
- Technical drawings provide precise measurements for bracket placement and waste location.
- Installation steps illustrate the use of a level and drill for accurate mounting.
Model compatibility
- Suitable for wall-hung installation.
- Requires wall studs or nogs for secure mounting.
- Up to 3 wastes possible depending on basin length.

Manual page author
Emily Carter
User documentation editor
Prepares concise manual descriptions and highlights the most useful setup, operation, and maintenance information for readers.