Automotive / Jump Starters
User Manual for Buture BR800 Car Jump Starter
Quick guide for the Buture BR800 Car Jump Starter. Learn how to jump-start your vehicle, charge devices, understand indicator lights, and troubleshoot smart clamp protection modes.
Table of contents
Manual images
Click an image to enlargeQuick guide from the manual
The Buture BR800 is a 12V car jump starter. Before using it to start your vehicle, ensure the device is charged to at least 50% (3 or 4 indicator lights illuminated). This device is intended for 12V vehicles only. Always ensure the blue plug is securely fitted into the jump start socket before attempting to start the car.
Product overview
The jump starter features the following components:

- ON/OFF Button: Used to check battery capacity and turn on the device.
- Battery Indicator: Shows current charge level (25%, 50%, 75%, 100%).
- 5V/2.4A USB Output: Used for charging mobile devices like phones or tablets.
- Flashlight: Built-in light.
- USB C Input: Used to recharge the jump starter.
- Jump Starting Port: Connection point for the smart jumper cables.
Recharging the jump starter
The unit does not come with a wall charger. You can use a universal USB charger (5V/2A suggested). To recharge:
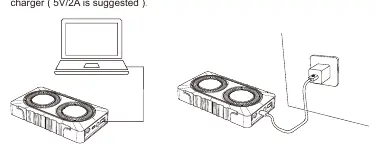
- Plug the USB cable into a USB wall adapter or car adapter.
- Connect the USB-C cable to the unit.
- It is recommended to recharge the unit every 3-4 months to maintain battery health.
Charging your devices
You can use the jump starter as a power bank:
- Connect your device's original USB cable to one of the USB output ports.
- Press the power button once to begin charging.
- The power level indicator will display the remaining battery capacity.
Jump starting your car
- Put the vehicle in Park (or Neutral for manual transmission) and engage the emergency brake.
- Insert the smart battery clamp plug completely into the jump starter.
- Check the clamp indicators: if green and red lights flash alternately, proceed.
- Connect the red clamp to the positive (+) terminal and the black clamp to the negative (-) terminal of the car battery.
- If the clamp indicator is solid green, start your car.
- If the car fails to start, disconnect the clamps, wait 30 seconds, and try again.
- Once the car is started, remove the clamps from the battery and the jump starter within 30 seconds.
Smart clamp protection
The smart clamp includes safety features. If the red light is always on, check for reverse connection or short circuits. If the red light flashes slowly, the car battery voltage is too high (>12.6V), meaning no jump starter is needed. If the red light flashes quickly, the clamp temperature is too high (exceeds 65°C); remove the clamp and let it cool.
Safety and maintenance
- Do not operate in explosive atmospheres (flammable liquid, gas, or dust).
- Do not modify or disassemble the product.
- If battery leakage occurs, take it to a local battery recycling center.
- Keep the product away from water.
Practical help
Common problems
Red light on smart clamp is always on
The clamp is either connected in reverse or short-circuited. Check the connection and ensure clamps are not touching each other or the same piece of metal.
Red light flashes slowly
Back charge protection is active because the car battery voltage is higher than 12.6V. No jump starter is needed.
Red light flashes quickly
The clamp temperature exceeds 65°C. Remove the clamp and wait until the red/green light flashes.
Green light flashes slowly
The voltage of the starter is too low. Charge the jump starter.
Before use
- Ensure the vehicle is a 12V model.
- Check that the jump starter has at least 3-4 indicator lights (above 50% charge).
- Put the vehicle in Park (or Neutral) and engage the emergency brake.
- Ensure the blue plug is securely fitted into the jump start socket.
- Locate the vehicle battery terminals.
Specs in practice
- Peak Current
- 800A maximum current for jump starting.
- Working Temperature
- -20°C to 60°C (-4°F to 140°F).
Images and diagrams
- The 'Know Your Product' diagram identifies the power button, battery indicators, USB ports, and the jump start port.
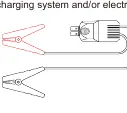
- The 'Smart Clamps' diagram shows the red (+) and black (-) cables and the plug connection.
Model compatibility
- This product is for 12V vehicles only.

Manual page author
Michael Turner
Technical manual editor
Reviews PDF manuals for structure, safety notes, and practical product details so readers can find the right information quickly.