Automotive / Car Audio
User Manual for Caliber HCG 019Qi Smart Alarm Clock
Quick guide for the Caliber HCG 019Qi smart alarm clock. Learn how to set the time, configure dual alarms, use the wireless charging pad, and adjust the night light and wake-up light features.
Table of contents
Manual images
Click an image to enlargeQuick guide from the manual
The Caliber HCG 019Qi is a smart alarm clock featuring Qi-certified wireless charging, a USB charging port, dual alarms, and a night light. To ensure optimal performance, use the provided power adapter. For fast wireless charging, a QC2.0 or QC3.0 adapter is required. The device includes a CR2032 backup battery to maintain clock settings during power outages.
Device controls and connections
The device features the following controls and ports:
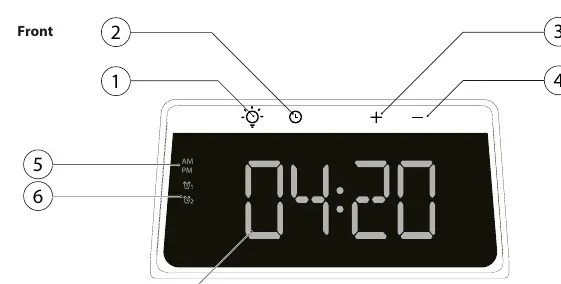
- Night light button (1): Press to switch color modes; press and hold to turn off.
- Clock button (2): Used for setting time, alarms, and toggling 12/24h display.
- Plus (+) button (3): Increases brightness, adjusts time forward, and toggles Alarm 1.
- Minus (-) button (4): Decreases brightness, adjusts time backward, and toggles Alarm 2.
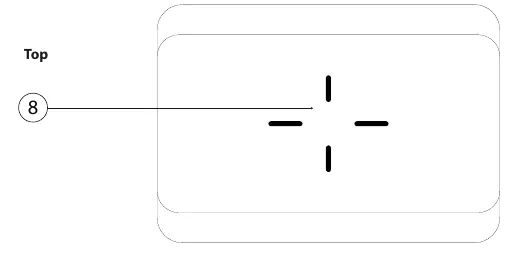
- Qi Wireless Charging surface (8): Place compatible devices here to charge.
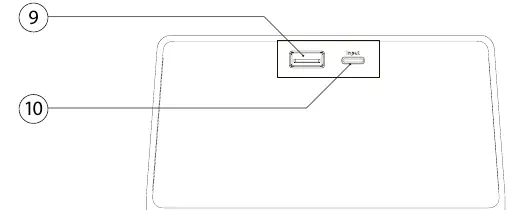
- USB-A port (9): Provides 5V/0.8A output for wired charging.
- DC power input (10): Connect the provided power adapter here.
Setting the time and alarm
Setting the time:
- Connect the adapter to a power outlet and the DC input.
- Press the Clock button (2) to enter time setting mode.
- The minutes will blink; use the +/- buttons (3/4) to adjust.
- Press the Clock button (2) again to set the hour.
- Press the Clock button (2) to confirm or wait 5 seconds.
Setting the alarm:
- Long press the Clock button (2) to enter alarm setting mode.
- The minutes will blink; use the +/- buttons (3/4) to adjust.
- Press the Clock button (2) to set the hour.
- Repeat the process for Alarm 2 if needed.
- Press the Clock button (2) to confirm or wait 5 seconds.
General settings:
- 12/24h format: Double press the Clock button (2).
- Activate/Deactivate alarms: Press and hold the + button for Alarm 1 or the - button for Alarm 2 for 2 seconds.
- Brightness: Short press +/- buttons to adjust. The display automatically dims between 0:00 and 6:00.
Charging functions
Wireless charging: Place your Qi-compatible device on the charging surface (8). Charging begins automatically if the device is within 8mm of the pad. If the device is fully charged or incompatible, no action occurs.
USB charging: Connect your device to the USB-A port (9). Note that the USB charger cannot be used simultaneously with the wireless charging surface when using the provided adapter.
Safety and maintenance
- Temperature: Ensure ambient temperature is between 0°C and +45°C.
- Cleaning: Use a soft, dry cloth. For stubborn stains, dampen the cloth with water only; do not use chemicals.
- Placement: Place on a flat surface with adequate ventilation. Keep away from heat sources and direct sunlight.
- Maintenance: Do not attempt to repair the unit yourself. Contact an authorized Caliber Europe BV dealer for service.
Manufacturer information
Caliber Europe
Practical help
Common problems
Wireless charging is not working
Ensure your device supports Qi wireless charging, check that it is properly aligned on the pad, and remove any thick cases. Ensure you are using a QC2.0 or QC3.0 adapter for fast charging.
Alarm is not sounding
Check if the alarm is activated. The alarm indicator (1 or 2) should be visible on the display. Press and hold the corresponding +/- button for 2 seconds to toggle the alarm.
Display is too bright at night
The display dims automatically between 0:00 and 6:00. You can also manually adjust the brightness using the +/- buttons.
Before use
- Connect the provided power adapter to a 100-240V outlet.
- Ensure the CR2032 backup battery is installed to save settings during power loss.
- Place the device on a flat, stable surface with sufficient ventilation.
- Verify the ambient temperature is between 0°C and +45°C.
Specs in practice
- Wireless output
- 10W/7.5W/5W - Supports fast charging for compatible devices.
- Charge distance
- 4-8mm - The maximum distance for wireless charging to work through phone cases.
Images and diagrams
- Front: Shows buttons for night light, clock, and brightness/alarm settings.
- Top: Indicates the Qi wireless charging surface.
- Rear: Shows the USB-A charging port and DC power input.
Model compatibility
- Compatible with any phone supporting the Qi wireless charging standard.
- Requires a QC2.0 or QC3.0 adapter for fast wireless charging.

Manual page author
Michael Turner
Technical manual editor
Reviews PDF manuals for structure, safety notes, and practical product details so readers can find the right information quickly.