Electronics / Cameras
Canon EOS 2000D Digital Camera User Manual
Comprehensive user guide for the Canon EOS 2000D digital SLR camera. Learn about setup, shooting modes, advanced settings, movie recording, and maintenance.
Quick answers from the manual
Quick answer
- The Canon EOS 2000D is a digital single-lens reflex camera. To start, insert the battery and card, attach a lens, and set the mode dial to 'Scene Intelligent Auto' (A+) for automatic settings. p. 6, 7
Key actions
- Insert battery and card p. 36
- Attach lens p. 44
- Set date/time p. 41
First start
- Charge battery p. 34
- Insert battery and card p. 36
- Set date/time p. 41
Problems and fixes
Camera does not operate
Check battery and card slot cover.
p. 286
Image out of focus
Check lens focus switch and camera shake.
p. 288Error codes
| Code | Meaning | Action | Pages |
|---|---|---|---|
| Err 01 | Communications between camera and lens is faulty. | Clean lens contacts. | p. 298 |
| Err 02 | Card cannot be accessed. | Reinsert/change card or format. | p. 298 |
Maintenance and reset
- Clear all camera settings p. 194
Technical specifications
| Parameter | Value | Meaning | Pages |
|---|---|---|---|
| Sensor | 24.1 megapixels | Effective pixels | p. 299 |
| Recording media | SD/SDHC/SDXC | Compatible cards | p. 299 |
Where to find it in the PDF
- Getting Started p. 33
- Basic Shooting p. 57
- Troubleshooting p. 286
Table of contents
Manual images
Click an image to enlargeQuick Guide from the Manual
To get started with your Canon EOS 2000D, follow these essential steps:
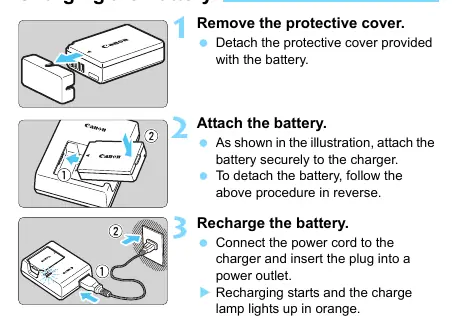
- Charge the battery: Use the provided battery charger LC-E10E.
- Insert battery and card: Open the compartment cover, insert the battery until it locks, and insert a compatible SD/SDHC/SDXC memory card.
- Attach the lens: Align the lens mount index with the camera's index and turn until it clicks.
- Power on: Set the power switch to ON.
- Set date/time: Follow the on-screen prompts to set the date, time, and zone.
- Shoot: Set the Mode Dial to 'Scene Intelligent Auto' (A+) for automatic settings, focus on your subject, and press the shutter button.
Getting Started
The camera requires a fully charged battery pack LP-E10. Ensure the memory card is properly inserted with the label facing the back of the camera. Before shooting, adjust the viewfinder clarity using the dioptric adjustment knob located near the viewfinder eyepiece.

Shooting Modes
The Mode Dial allows you to switch between different shooting styles:
- Basic Zone: Includes 'Scene Intelligent Auto', 'Flash Off', 'Creative Auto', and specific scene modes like 'Portrait', 'Landscape', 'Close-up', 'Sports', 'Food', and 'Night Portrait'. These modes handle settings automatically.
- Creative Zone: Includes 'Program AE' (P), 'Shutter-priority AE' (Tv), 'Aperture-priority AE' (Av), and 'Manual exposure' (M). These modes provide more control over camera settings.
Live View & Movie Shooting
You can shoot while viewing the image on the LCD monitor by pressing the Live View/Movie shooting button. For movies, set the Mode Dial to the movie icon. Note that continuous autofocusing is not possible during movie recording, and the camera may record lens operation sounds.
Playback & Post-Processing
Review your images by pressing the playback button. You can rotate images, protect them from accidental deletion, rate them, or apply creative filters like 'Grainy B/W' or 'Miniature effect'. You can also resize JPEG images directly in the camera.
Maintenance & Troubleshooting
If you encounter issues, consult the Troubleshooting Guide. Common solutions include checking battery levels, ensuring the card is not full, and verifying lens settings. For sensor cleaning, use a manual blower; do not touch the sensor directly.
Manufacturer information
Canon Inc.
Practical help
Common problems
Camera does not turn on
Check if the battery is charged and properly installed, and ensure the card slot/battery compartment cover is fully closed.
Focus indicator blinks
The subject may be difficult to focus on. Try focusing manually or on a different area with better contrast.
Flash does not fire
Ensure the flash is not disabled (e.g., in 'Flash Off' mode) and that it is fully raised.
Movie shooting stops automatically
This may occur if the card writing speed is too slow, or if the 4GB file size or 29 min 59 sec time limit is reached.
Before use
- Charge the battery pack LP-E10.
- Insert a compatible SD/SDHC/SDXC memory card.
- Attach a compatible EF or EF-S lens.
- Set the date, time, and zone.
- Format the memory card if it is new or used in another device.
Specs in practice
- Shutter Speed
- Controls how long the sensor is exposed to light. Faster speeds freeze action; slower speeds create motion blur.
Images and diagrams
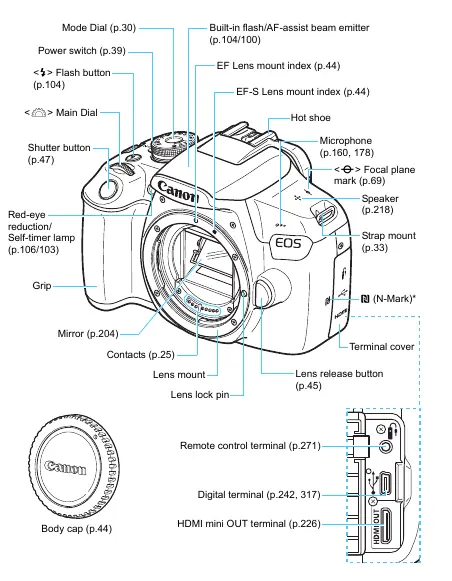
- The nomenclature diagrams (p. 26-27) identify all buttons and dials.
- The shooting function settings display (p. 28) shows current camera status.
Model compatibility
- Compatible with Canon EF and EF-S lenses.
- Not compatible with EF-M lenses.
- Requires SD/SDHC/SDXC memory cards.

Manual page author
Michael Turner
Technical manual editor
Reviews PDF manuals for structure, safety notes, and practical product details so readers can find the right information quickly.