Electronics / Cameras
User Manual for Canon Speedlite 188A
Comprehensive user guide for the Canon Speedlite 188A flash unit. Learn how to mount the flash, set ISO, select apertures, use automatic and manual flash modes, and troubleshoot exposure issues.
Quick answers from the manual
Quick answer
- The Canon Speedlite 188A is an automatic electronic flash unit for Canon SLR cameras. It features automatic and manual flash modes, ISO settings, and a guide number of 25 (ISO 100, meters). p. 2
Key actions
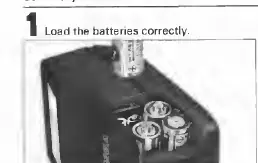
- Loading Batteries p. 6
- Mounting the Flash p. 10
- Setting ISO p. 7
First start
- Load 4 AA batteries, set ISO, mount on camera, turn on, wait for pilot lamp. p. 4, 6, 7, 10
Problems and fixes
Flash not firing
Check batteries and ensure pilot lamp is glowing.
p. 13, 29Maintenance and reset
- Remove batteries if not in use for 3 weeks. Wipe contacts. p. 6, 7, 29
Technical specifications
| Parameter | Value | Meaning | Pages |
|---|---|---|---|
| Guide Number | 25 (ISO 100, meters) | Flash power rating | p. 29 |
| Power Source | 4x AA batteries | Battery type | p. 31 |
Where to find it in the PDF
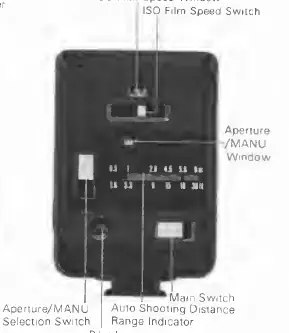
- Controls Overview p. 3
- Summary of Use p. 4, 5
- Specifications p. 29, 30, 31
Table of contents
Manual images
Click an image to enlargeQuick Guide
The Canon Speedlite 188A is an automatic electronic flash unit designed for Canon A-series SLR cameras (such as the AE-1, A-1) and the F-1. It offers automatic flash control and manual flash capabilities. To use, load four AA batteries, set the ISO film speed, mount the flash to the camera's hot shoe, and wait for the pilot lamp to glow before shooting.
Getting Started
Loading Batteries: Use four new AA alkaline-manganese or Ni-Cd batteries. Wipe battery contacts with a clean, dry cloth before insertion. Ensure correct polarity as indicated inside the battery chamber.

Mounting the Flash: Turn the flash main switch OFF. Loosen the lock nut, slide the flash into the camera's accessory shoe, and tighten the lock nut securely.
Flash Modes and Operation
Automatic Flash Mode: Set the Aperture/MANU selection switch to the upper (red) or middle (green) position. The aperture value will appear in the window. The flash automatically sets the shutter speed on compatible cameras.
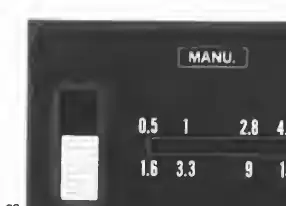
Manual Flash Mode: Set the Aperture/MANU selection switch to the lowest position (MANU). You must calculate the aperture using the guide number formula: Aperture = Guide Number / Shooting Distance. Set the calculated aperture manually on the lens.
Using the Wide Adaptor
The Wide Adaptor 188A widens the flash coverage to match a 28mm lens. To attach, hook the tab into one of the grooves on the flash head and push down until it snaps into place. Note that using the adaptor shortens the effective auto shooting distance range.

Troubleshooting and Precautions
- Flash not firing: Ensure the pilot lamp is glowing. If it is not, the flash is not charged.
- Exposure issues: If the subject is small with a dark background or very bright surroundings, automatic exposure may be inaccurate. Switch to manual flash mode in these cases.
- Battery care: Remove batteries if the flash will not be used for three weeks or longer. In cold temperatures (below 0°C), use fully charged Ni-Cd batteries.
- Confirmation: On the AE-1 PROGRAM, a flash mark in the viewfinder confirms sufficient illumination after the shot.
Specifications
Guide Number: 25 (ISO 100, meters) or 41 (ISO 25, feet).
Flash Coverage: Covers 35mm lens (28mm with Wide Adaptor).
Power Source: 4x AA batteries.
Recycling Time: Approx. 0.5-8 seconds depending on battery type.
Manufacturer information
Canon Inc.
Practical help
Common problems
Flash does not fire
Ensure the pilot lamp is glowing. If not, the flash is not fully charged or the main switch is OFF.
Incorrect exposure in auto mode
The subject may be outside the effective shooting distance range or the background is too bright/dark. Switch to manual flash mode.
Flash not charging
Check battery contacts for dirt or replace with fresh batteries.
Before use
- Insert four fresh AA batteries.
- Wipe battery contacts with a dry cloth.
- Set the ISO film speed on the flash.
- Mount the flash securely on the camera's hot shoe.
- Wait for the pilot lamp to glow before shooting.
Specs in practice
- Guide Number
- Indicates the flash power; higher numbers mean greater range.
- Aperture/MANU Window
- Displays the selected aperture for auto mode or 'MANU' for manual mode.
Images and diagrams
- Battery Chamber: Located on the side; ensure correct polarity.
- Aperture/MANU Selection Switch: Used to choose between auto (red/green) and manual modes.
Model compatibility
- Designed for Canon A-series (AE-1, A-1, etc.) and F-1 cameras.
- Can be used on other cameras with a hot shoe in manual mode.

Manual page author
David Miller
Documentation analyst
Organizes user manual content into clear summaries, with attention to model details, product context, and everyday usability.