Accessories / Mounts & Stands
Chief 051VCMU Heavy Duty Universal Projector Mount Installation Instructions
Installation guide for the Chief 051VCMU projector mount, including assembly of the VCM mount and HBU interface bracket, ceiling installation, and projector adjustments.
Table of contents
Manual images
Click an image to enlargeQuick guide from the manual
The Chief 051VCMU is a heavy-duty projector mounting system consisting of the VCM mount and the HBU universal interface bracket. Important Safety Warning: The mounting structure must be capable of supporting five times the combined weight of all equipment. The maximum weight capacity for the projector and mount is 250 lbs (113.4 kg). Do not use this product outdoors and never operate the system if it is damaged.
Installing the VCM ceiling mount
The VCM mount is designed to be attached to a 1-1/2 inch NPT or NPSM threaded extension column (Schedule 40, 0.154 inch minimum thickness) or a UL Listed Chief LPK-1 low profile mounting kit.
- Thread the VCM mount onto the existing 1-1/2 inch NPT pipe until tight, ensuring a minimum of four threads are engaged.
- Ensure the long edge of the VCM mount is parallel to the screen.
- Tighten the 5/16-18 x 3/8 inch set screw into the VCM mount threaded collar to prevent movement.
Installing the HBU interface bracket
The HBU interface bracket attaches directly to the projector.
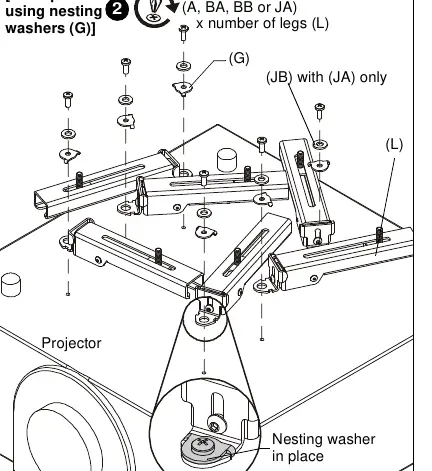
- Select the correct screws and washers based on the projector's mounting holes (refer to Table 1 in the manual for fastener sizes).
- Attach the HBU legs (L) to the projector using the selected fasteners and washers.
- Ensure at least three legs are used for M5 or larger fasteners, and at least four legs for M4 fasteners.
- Lower the HB plate (K) onto the legs and fasten using one 5/16 inch lock nut (FA) and one 5/16 inch flat washer (FB) on each leg.
Final assembly and projector mounting
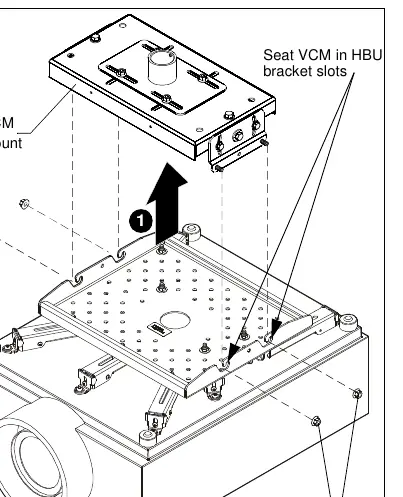
- With the help of assistants, lift the HBU bracket with the attached projector and install it onto the four studs extending from the VCM ceiling mount.
- Ensure the VCM ceiling mount is properly seated in the slots on the HBU bracket.
- Fasten the assembly using four 5/16 inch flange nuts (H) and tighten securely.
Adjustments
Mounting hardware should be loosened only enough to allow for necessary movement. Over-loosening may result in equipment damage.
- Horizontal Adjustments: Loosen the four nuts holding the top slide bracket, adjust the mount up to 1-1/2 inches in any direction, and re-tighten.
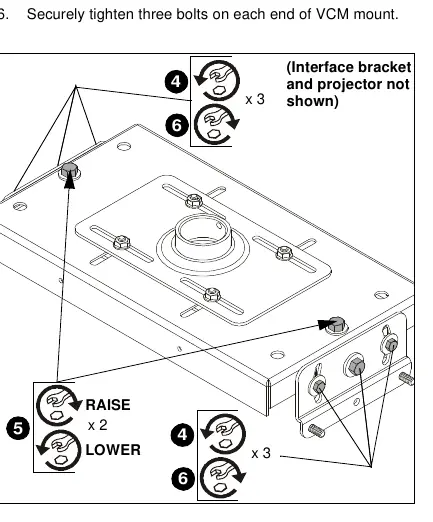
- Roll (Horizontal Tilt): Loosen the three bolts on each end of the VCM mount. Turn the adjustment bolts at each end (clockwise to raise, counterclockwise to lower) and re-tighten the bolts.
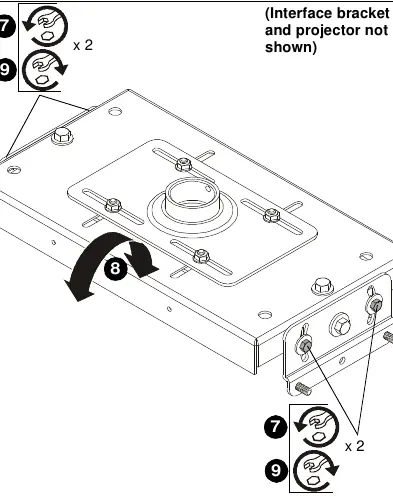
- Pitch (Vertical Elevation): Loosen the two outside bolts on each end of the VCM mount, tilt the projector to the desired angle, and re-tighten the bolts.
Manufacturer information
Chief
Practical help
Common problems
Projector falling or structural failure
Ensure the ceiling structure can support five times the combined weight of all equipment. Do not exceed the 250 lbs (113.4 kg) weight limit.
Improper installation or hardware damage
Use only the hardware provided by the manufacturer. Do not substitute screws or washers.
Mounting to ceiling
Requires a 1-1/2 inch NPT/NPSM threaded pipe or a Chief LPK-1 low profile mounting kit.
Before use
- Verify the ceiling structure can support 5x the combined weight of the projector and mount.
- Confirm the projector weight does not exceed 250 lbs (113.4 kg).
- Ensure you have the required tools: 1/2 inch wrench and a Phillips screwdriver.
- Check that the VCM mount is seated correctly in the HBU bracket slots.
- Ensure all flange nuts are tightened securely after final assembly.
Specs in practice
- Weight Capacity
- Maximum 250 lbs (113.4 kg) for the combined projector and mount system.
Images and diagrams
- Figure 1 (HBU): Shows the attachment of legs to the projector using nesting washers.
- Figure 4 (HBU): Illustrates seating the VCM mount into the HBU bracket slots.
- Figure 5 (VCM): Shows the roll adjustment bolts and the direction to turn for raising or lowering.
Model compatibility
- Requires 1-1/2 inch NPT or NPSM threaded extension column or Chief LPK-1 low profile mounting kit.

Manual page author
David Miller
Documentation analyst
Organizes user manual content into clear summaries, with attention to model details, product context, and everyday usability.