Electronics / Microphones
User Manual for Chord XU-series Wireless System
Quick guide for the Chord XU-series PLL Diversity UHF Wireless System. Learn how to set up, tune frequencies, connect outputs, and operate your wireless microphone system.
Quick answers from the manual
Quick answer
- To tune the Chord XU-series, use the MENU knob on the receiver to select the Group (GR), Channel (CH), and Colour (COL). Confirm settings with the MENU knob, then perform an IR sync by pressing the channel volume control and holding the transmitter's IR receiver facing the receiver's IR sync transmitter. p. 6, 7
Key actions
- Powering on p. 5
- IR Synchronization p. 7
First start
- Initial setup p. 4
Problems and fixes
Feedback/Howling
Point microphones away from speaker cabinets.
p. 4, 5Maintenance and reset
- Cleaning p. 2
Technical specifications
| Parameter | Value | Meaning | Pages |
|---|---|---|---|
| Wireless range | Up to 60m | Maximum operating distance | p. 7 |
| Power supply | 12-18Vdc, 500mA (1000mA for XU4) | Required power input | p. 7 |
Where to find it in the PDF
- Front Panel Controls p. 3
- Rear Panel Connections p. 3
- Transmitter Setup p. 4
- Tuning Instructions p. 6
Table of contents
Manual images
Click an image to enlargeQuick guide from the manual
The Chord XU-series is a professional PLL UHF wireless system. To get started, ensure the receiver is placed within line of sight of the transmitters. Connect the antennas to the BNC connectors on the rear panel. Insert AA batteries into the transmitters, observing correct polarity. Connect the power adapter to the receiver and turn channel levels down before powering on. To tune the system, use the menu-driven interface on the receiver to select the Group (GR), Channel (CH), and Channel Colour (COL), then perform an IR sync by holding the transmitter near the receiver's IR sync transmitter.
Receiver Controls
Front Panel:
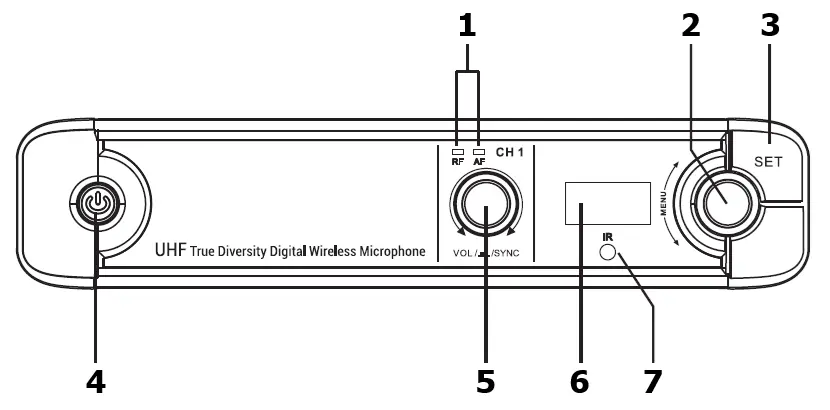
- AF and RF indicator LEDs: Signal status.
- MENU rotary knob: Navigate and select settings.
- SET button: Confirm settings and navigate tabs.
- Power on/standby switch: Toggle power.
- Channel volume/sync control: Adjust volume and initiate sync.
- TFT display: Shows current frequency and status.
- IR sync transmitter: Used to sync settings to the transmitter.
Rear Panel:
- DC power input jack: 12-18V power supply.
- Antenna connections (BNC): For antenna attachment.
- 6.3mm jack output: Mixed output of all channels.
- Balanced XLRM output: Individual channel output.
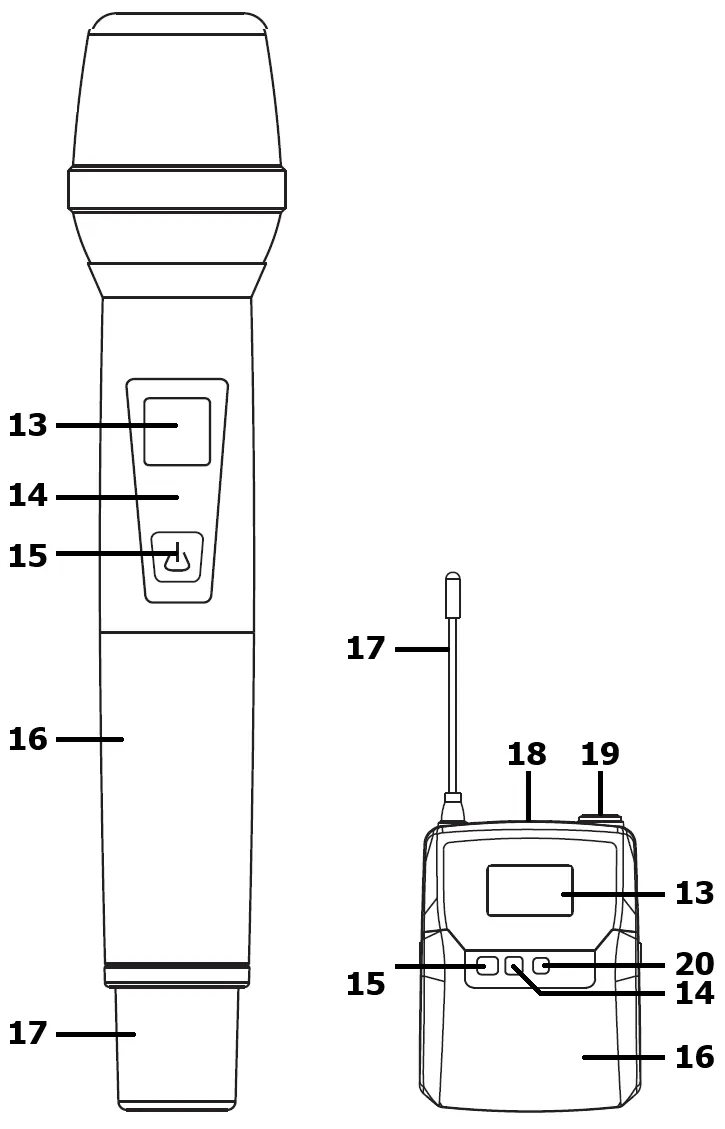
Transmitter Setup
For handheld transmitters, unscrew the base to access the battery compartment. For bodypack transmitters, squeeze and flip the front cover. Ensure batteries are inserted with correct polarity. Connect the neckband or lavalier microphone to the Mini XLR connector on the bodypack until it clicks. Use the Mute button on the bodypack to temporarily disable the microphone without turning it off.

Operation and Tuning
The system is pre-tuned out of the box. If interference occurs, re-tuning is required. Press the SET button to view current settings. Use the MENU knob to highlight GR (Group), CH (Channel), and COL (Colour). Confirm each selection by pressing the MENU knob. Once set, perform an IR sync by pressing the rotary volume control on the receiver and holding the transmitter's IR receiver part facing the receiver's IR sync transmitter.

Safety and Maintenance
- Keep components away from rain, moisture, and heat sources.
- Do not place heavy objects on the receiver.
- Use a soft cloth with a neutral detergent for cleaning.
- Remove batteries if the system is not used for long periods.
- Avoid pointing microphones towards speakers to prevent feedback.
Manufacturer information
Chord
Practical help
Common problems
Damaging feedback (loud whistle or howling noise)
Do not point microphones towards speakers; aim them away from speaker cabinets.
Interference during testing
Re-tune the system using the menu-driven interface on the receiver.
No sound output
Check that the bodypack is not set to MUTE and ensure channel volume levels are increased on the receiver and sound equipment.
Before use
- Insert 2 x AA batteries into each transmitter.
- Connect both antennas to the BNC connectors on the rear panel.
- Connect the power adapter to the receiver and mains outlet.
- Turn channel levels down on the receiver before powering on.
- Ensure the receiver is within line of sight of the transmitters.
Specs in practice
- Wireless range
- Up to 60m line of sight.
- Carrier frequencies
- 823-832MHz (regulated) or 863-865MHz (license-free).
- Power supply
- 12-18Vdc, 500mA (1000mA for XU4).
Images and diagrams
- The receiver front panel features a MENU knob for tuning and a SET button for navigation.
- The rear panel provides both mixed 6.3mm jack output and individual balanced XLR outputs.
- Transmitters feature an LCD display, power/mute switch, and IR sync receiver.
Model compatibility
- Replacement transmitters must be genuine Chord XU series transmitters to match the receiver.
- CH.70 band (863.1-864.9MHz) is license-exempt in UK/EU.
- CH.65 band (823-832MHz) requires a PMSE license.

Manual page author
Emily Carter
User documentation editor
Prepares concise manual descriptions and highlights the most useful setup, operation, and maintenance information for readers.