Electronics / PA Systems
User Manual for Citronic Monolith II Sub + Column Array
Quick guide for the Citronic Monolith II Sub + Column Array. Learn how to assemble the telescopic pole, connect audio inputs, adjust crossover settings, and operate the system safely.
Quick answers from the manual
Quick answer
- The Monolith II is an active sub + column array system. Setup involves mounting the column on the telescopic pole, connecting the SPK lead to the satellite output, and plugging in audio sources via XLR or RCA. p. 3
Key actions
- Assemble the pole and column p. 3
- Adjust crossover frequency p. 3, 4
First start
- Powering on the system p. 4
Problems and fixes
Mains fuse blows
Refer the unit to qualified service personnel.
p. 2Technical specifications
| Parameter | Value | Meaning | Pages |
|---|---|---|---|
| Power supply | 230Vac, 50Hz | Standard mains power requirement. | p. 4 |
| Amplifier Power | Sub: 450W, Column: 150W | RMS output power for the subwoofer and column. | p. 4 |
Where to find it in the PDF
- Rear Panel Controls p. 3
- Specifications p. 4
Table of contents
Quick guide from the manual
The Citronic Monolith II is an active subwoofer and column array system designed for high-quality sound reinforcement. This guide covers the essential setup, operation, and safety procedures required to use the system effectively.
Package Contents
Before beginning, ensure all items are present and in good condition:
- Active subwoofer
- Full range satellite column speaker
- Telescopic 35mm diameter mounting pole
- Speaker connection lead (SPK)
- IEC mains power lead
Safety and Placement
To ensure safe operation and longevity of the equipment:
- Placement: Keep the unit away from direct sunlight, heat sources, moisture, and dusty environments.
- Electrical Safety: Ensure the supply voltage is correct before connecting to mains. Do not expose the unit to rain or water.
- Maintenance: There are no user-serviceable parts inside. Do not remove the cover. If the mains fuse blows, refer to qualified service personnel.
- Cleaning: Use a soft cloth with a neutral detergent. Do not use solvents.
Setting Up
- Pole Assembly: Insert the threaded end of the telescopic speaker pole into the socket on top of the subwoofer and turn clockwise until tightened. Adjust to the desired height and lock with the attached pin.
- Mounting: Mount the column speaker onto the 35mm pole and orient it towards the listeners.
- Connections: Connect the satellite speaker output on the subwoofer to the column speaker using the supplied SPK lead.
- Audio Input: Connect your line-level audio source to the balanced XLR input or the unbalanced RCA sockets.
- Daisy Chaining: If using additional Monolith II sets or active speakers, connect them via the XLR line output.
- Power: Connect the subwoofer to the mains using the supplied IEC lead.
Operation
Follow these steps to operate the system safely:
- Ensure volume controls (Full Range and Subwoofer) are turned fully down before switching on the power.
- Switch on the power.
- Play audio and gradually turn up the Full Range volume control to check for output.
- Increase the volume to the desired level, then adjust the Subwoofer volume to achieve the correct frequency balance.
- Adjust the subwoofer crossover frequency (typically between 70Hz and 120Hz) to suit the program material.
- Always turn down volume controls before powering down the unit.
Practical help
Common problems
No sound from the column speaker
Ensure the SPK lead is securely connected between the subwoofer output and the column speaker. Check that the Full Range volume control is turned up.
Subwoofer sounds muddy or lacks definition
Adjust the crossover frequency dial (7) between 70Hz and 120Hz. Lower frequency settings may require higher Subwoofer volume compensation.
Before use
- Verify all package contents are present.
- Ensure the mains supply voltage matches the unit requirements.
- Check that the mains lead is in good condition.
- Place the unit on a stable surface away from heat and moisture.
- Ensure volume controls are at minimum before powering on.
Specs in practice
- Crossover Frequency
- The point at which the subwoofer rejects mid and treble frequencies; adjustable to suit audio content.
- Class D bi-amp
- An efficient amplifier design that powers the subwoofer and column speaker independently.
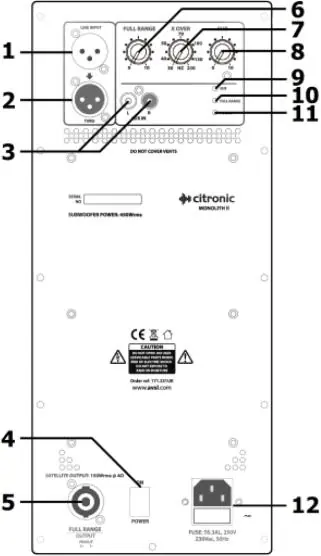
Images and diagrams
- The rear panel contains inputs (XLR, RCA) and outputs (XLR, Speakon).
- Controls include separate volume knobs for Full Range and Subwoofer, plus a crossover frequency dial.
- Indicators show power status and clipping for both Full Range and Subwoofer channels.
Model compatibility
- Compatible with line-level inputs (0dB = 0.775Vrms).
- Supports daisy-chaining additional active speakers via the XLR line output.

Manual page author
Michael Turner
Technical manual editor
Reviews PDF manuals for structure, safety notes, and practical product details so readers can find the right information quickly.