Electronics / PA Systems
User Manual for Citronic X-PAD Portable Audio Device
Quick guide for the Citronic X-PAD portable audio device. Learn how to connect microphones, set up PC/OTG modes, use vocal effects, and manage battery charging.
Quick answers from the manual
Quick answer
- The Citronic X-PAD is a portable audio device for recording and playback. It functions as a USB sound card and audio processor with vocal effects, suitable for PCs and smartphones. p. 1, 4
Key actions
- Powering on p. 4
- Recording User Sounds p. 6
- Pairing Bluetooth p. 5
First start
- Charge the unit for at least 2 hours before first use. p. 4
Problems and fixes
Microphone volume low
Adjust using the Data entry dial when MIC is selected.
p. 5
Music volume too loud while speaking
Use the Override function to duck music when speaking.
p. 6Maintenance and reset
- Delete all recorded User sounds p. 6
Technical specifications
| Parameter | Value | Meaning | Pages |
|---|---|---|---|
| Battery | 3000mAh Li-ion | Internal power source | p. 7 |
| Dimensions | 162 x 78 x 21mm | Physical size | p. 7 |
Where to find it in the PDF
- Control Panel Layout p. 4
- Audio Connections p. 3
Table of contents
Manual images
Click an image to enlargeQuick Guide
The Citronic X-PAD is a portable audio device designed for digital audio recording and playback. Before first use, it is advised to charge the internal battery for a minimum of 2 hours using a 5V 2A USB charger connected to the USB-C Charge input. The device features a 3000mAh Li-ion battery and can also be powered via USB while in use.
Connections
The device features two USB-C ports on the bottom edge:
- Charge: For charging the internal battery (5V 2A).
- PC/OTG: For data connection to a PC, laptop, or smartphone.
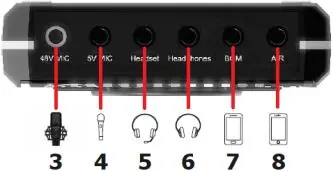
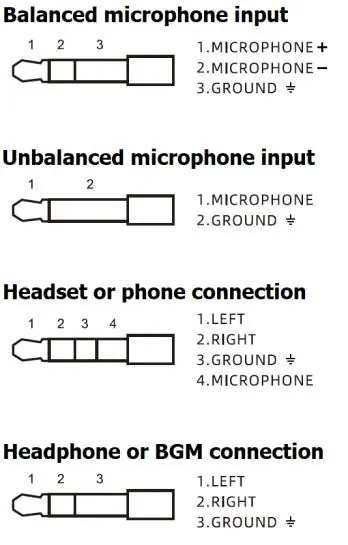
Audio connections are located on the top edge and use 3.5mm jacks:
- Mic Inputs: Includes balanced +48V phantom power (Jack 1) and +5V phantom power (Jack 2).
- Headset/Headphones: Dedicated jacks for monitoring and communication.
- BGM Input: Stereo line input for background music playback.
- On-AIR: Connection for smartphones to enable live recording and 2-way audio.
Control Panel Layout
The control panel allows for real-time adjustments:
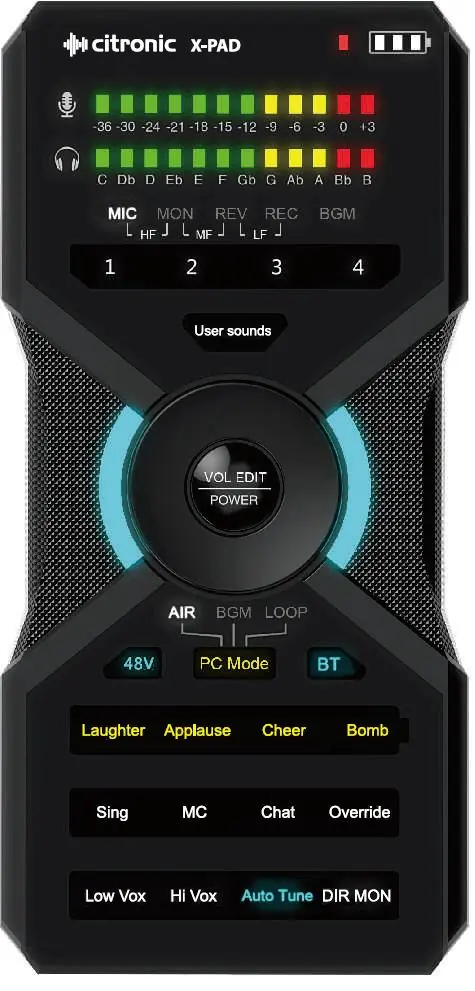
- Data Entry Dial: Used to adjust levels (Mic, Monitor, Reverb, Recording, BGM) when the corresponding mode is selected.
- Mode Selector: Switches between AIR (live broadcast), BGM (playback), and LOOP (overdub) modes.
- Vocal Processing: Dedicated keys for effects like Sing, MC, Chat, Low Vox, High Vox, and Auto Tune.
- User Sounds: Four numbered keys to record and trigger custom sound samples.
Operation
The X-PAD functions as a plug-and-play USB sound card. To power on, press and hold the VOL/EDIT/POWER button. Use the PC Mode key to switch between connection modes:
- AIR Mode: For live broadcast; microphones and BGM are routed to the host device.
- BGM Mode: Uses the host device as a playback source; microphone inputs are not routed to the host.
- LOOP Mode: Routes all audio (mics + BGM) to the host device, then back to the headphones, enabling overdubbing.
Vocal Effects: You can apply effects like reverb (Sing, MC) or pitch shifting (Low/High Vox). The Auto Tune function shifts vocal pitch to the nearest musical note in a selected key.
Safety and Maintenance
- Do not open the case; there are no user-serviceable parts inside.
- Keep the device away from moisture, rain, and direct heat sources.
- Clean the housing with a soft cloth and neutral detergent; do not use solvents.
- Use a soft brush to clear debris from between controls.
Practical help
Common problems
Device will not power on
Ensure the internal battery is charged for at least 2 hours using a 5V 2A USB charger.
Microphone not working
Check if +48V phantom power is enabled for condenser microphones or if the correct input jack is used.
Bluetooth pairing fails
Press the BT key until it flashes quickly to enter pairing mode, then search for 'X-PAD' on your sending device.
Before use
- Charge the battery for at least 2 hours
- Ensure all audio connections are secure
- Verify phantom power requirements for your microphone
- Select the appropriate PC mode (AIR, BGM, or LOOP)
Specs in practice
- 48V Phantom Power
- Required for professional studio condenser microphones.
Images and diagrams
- USB-C ports for charging and data
- 3.5mm jack inputs for microphones and headsets
- Control panel with level meters and effect keys
Model compatibility
- Compatible with PC, Mac, smart phones, and tablets via USB-C
- Supports dynamic and condenser microphones
- Requires 5V 2A power supply for charging

Manual page author
David Miller
Documentation analyst
Organizes user manual content into clear summaries, with attention to model details, product context, and everyday usability.