Electronics / Speakers & Soundbars
Citronic USB2+1 Audio Interface User Manual
Quick guide for the Citronic USB2+1 audio interface. Learn how to connect microphones and instruments, set up phantom power, adjust input levels, and use the direct monitoring feature.
Quick answers from the manual
Quick answer
- The Citronic USB2+1 is a USB-powered audio interface. Connect it to your computer via USB-C, select it in your audio software, and adjust input levels using the top panel controls. Use the +48V switch for condenser mics and the Direct Monitor switch to avoid latency. p. 2, 3
Key actions
- Connect a condenser microphone p. 2
- Adjust input levels p. 3
- Use Direct Monitoring p. 3
First start
- Ensure all level controls are turned down initially. p. 3
- Connect to computer via USB-C. p. 2, 3
Problems and fixes
CLIP LED lighting persistently
Reduce the level control until it is only lit for an instant.
p. 3Technical specifications
| Parameter | Value | Meaning | Pages |
|---|---|---|---|
| Power supply | 5Vdc (from USB) | Powered via USB connection | p. 3 |
| Frequency response | 10Hz - 30kHz (-0.5dB) | Audio frequency range | p. 3 |
| Sampling format | 48kHz, 16-bit | Digital audio resolution | p. 3 |
Where to find it in the PDF
- Front & Rear Panels p. 2
- Operation & Specs p. 3
Table of contents
Manual images
Click an image to enlargeQuick guide from the manual
The Citronic USB2+1 is a USB-powered audio interface designed for computer-based recording. It requires no external power supply, drawing energy directly from the USB connection. For the best results, ensure all level controls are turned down before connecting equipment and disconnect other USB audio devices during the initial setup.
Front & rear panels
The device features various inputs and controls:
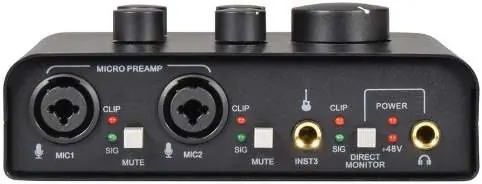
- Microphone inputs (1 & 2): Support 6.3mm jack or XLR connections.
- Instrument input (3): 6.3mm jack for guitars, bass, or keyboards.
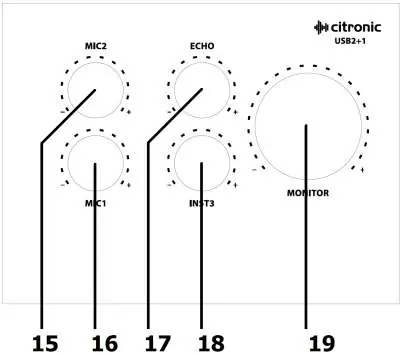
- Controls: Dedicated level controls for Mic 1, Mic 2, Instrument 3, Echo, and Monitor.
- Monitoring: Includes a Direct Monitor switch for zero-latency monitoring and a headphone output.
- Phantom Power: +48V switch on the rear panel for condenser microphones.
- Outputs: L+R RCA monitor outputs and a 6.3mm stereo headphone jack.
Connection
Follow these steps to connect your equipment:
- Microphones: Connect to MIC1 or MIC2 inputs. Enable +48V on the rear panel if using a condenser microphone.
- Instruments: Connect to the Instrument 3 input using a 6.3mm plug.
- Headphones: Connect to the front panel output (recommended 32 Ohm).
- Monitors: Connect studio monitors to the L+R Monitor Out RCA sockets on the rear panel.
- Computer: Connect the USB type-C port on the rear panel to your Mac or PC.
Operation
Once connected, ensure the system recognizes the device as a generic USB audio interface in your computer's audio settings. Select it as your input/output device in your recording software. To record, select the channel in your software and increase the level control on the interface. Monitor the CLIP LED; it should not light persistently. If it does, reduce the level. Use the DIRECT MONITOR switch to hear inputs directly without computer processing delay. You can also add an inbuilt echo effect using the ECHO rotary control.
Technical specifications
- Power supply: 5Vdc (from USB)
- Connection: USB type-C
- Frequency response: 10Hz - 30kHz (-0.5dB)
- Sampling format: 48kHz, 16-bit
- Input impedance: 1M Ohm (instrument), 3k Ohm (mic/line)
- Dimensions: 160 x 110 x 57mm
- Weight: 529g
Practical help
Common problems
Clipping or distortion during recording
Reduce the input level control until the CLIP LED only lights momentarily, not persistently.
No sound from condenser microphone
Ensure the +48V phantom power switch on the rear panel is enabled.
Latency (delay) while recording
Press the DIRECT MONITOR switch to route inputs directly to the monitoring section, bypassing computer processing.
Before use
- Disconnect other USB audio devices for initial setup.
- Turn down all level controls before connecting equipment.
- Connect headphones (recommended 32 Ohm) to the front panel.
- Connect studio monitors to the L+R Monitor Out RCA sockets.
- Ensure the computer recognizes the device in audio settings.
Specs in practice
- Phantom power (+48V)
- Required power for condenser microphones; switchable on the rear panel.
- Direct Monitor
- Allows hearing inputs directly without computer processing delay.
- Sampling format
- 48kHz, 16-bit audio quality for digital recording.
Images and diagrams
- Front panel: Contains microphone/instrument inputs, signal/clip LEDs, mute switches, direct monitor switch, and headphone output.
- Top panel: Contains rotary controls for Mic 1, Mic 2, Echo, Instrument 3, and Monitor levels.
- Rear panel: Contains monitor outputs (RCA), USB-C port, and +48V phantom power switch.
Model compatibility
- Compatible with Mac and PC computers via USB-C.
- Supports condenser microphones requiring +48V phantom power.
- Supports instruments like electric guitar, bass, or keyboards.

Manual page author
Emily Carter
User documentation editor
Prepares concise manual descriptions and highlights the most useful setup, operation, and maintenance information for readers.