Industrial / Cleaning Systems
User Manual for Clarke 200L Collapsible Water Butt WB200
Quick guide for the Clarke 200L Collapsible Water Butt WB200. Includes assembly instructions, operation, maintenance, and technical specifications.
Quick answers from the manual
Quick answer
- The Clarke WB200 is a 200L collapsible water butt. Assembly involves installing the taps and overflow pipe using the provided O-rings and screw caps, then inserting the support poles into the external loops. p. 1, 3, 4, 5
Key actions
- Install taps and overflow pipe p. 4, 5
- Insert support poles p. 5
First start
- Place on level ground and add a small amount of water to stabilize. p. 6
Problems and fixes
Rip in tank
Use the included repair patch, testing adhesive first.
p. 7Technical specifications
| Parameter | Value | Meaning | Pages |
|---|---|---|---|
| Volume | 200 Litres | Capacity | p. 2 |
| Weight (Full) | 202.05kg | Total weight when full | p. 2 |
Where to find it in the PDF
- Overview p. 3
- Assembly p. 4, 5
- Operation & Maintenance p. 6, 7
Table of contents
Manual images
Click an image to enlargeQuick guide from the manual
The Clarke 200L Collapsible Water Butt (Model WB200) is designed for rainwater collection. This guide covers the assembly of the taps, overflow pipe, and support structure, as well as operation and maintenance procedures to ensure the longevity of the product.
Overview of components
Before starting assembly, ensure all parts are present:
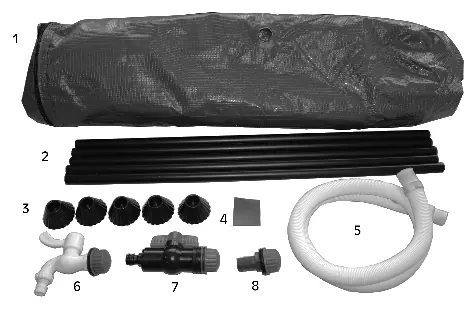
- 1: 200Lt Ripstop PVC Water Tank
- 2: Support Poles (x5)
- 3: Feet (x5)
- 4: Ripstop PVC Repair Patch
- 5: 32mm x 1.2m Hose
- 6: High Outlet Tap
- 7: Low Drain Tap
- 8: Overflow Pipe
Assembly
Installing Taps:
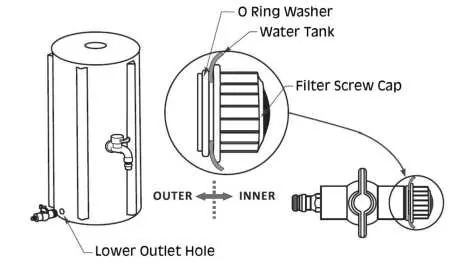

- Unscrew the filter caps and O-ring washers from the outlet/drain taps.
- Insert the main body of the tap through the outlet holes in the tank exterior.
- Replace the O-ring and filter screw cap on the inside of the tank to secure the tap.
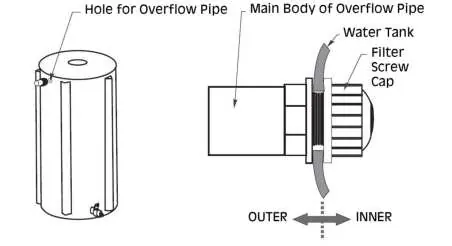
Installing Overflow Pipe:
- Unscrew the filter screw cap from the overflow pipe.
- Insert the main body of the overflow pipe through the designated outlet hole in the tank exterior.
- Secure it by replacing the filter screw cap on the inside of the tank.
Installing Support Poles:
- Attach the feet to the support poles.
- Slide the poles into the loops located on the outside of the water tank.
Operation
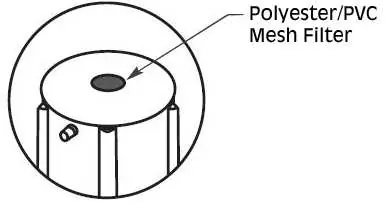
- Access: The lid features a dual zip for easy access to the water.
- Filtration: The lid includes a polyester/PVC mesh filter to prevent large debris like leaves from entering.
- Overflow: The 1.2m hose can be attached to the overflow pipe to direct excess water away from the tank area.
- Positioning: Place the tank on level, solid ground to ensure stability.
- Stabilization: Once in place, pour a small quantity of water into the tank to stabilize it.
- Connection: The lower tap is compatible with standard female hosepipe connectors (not supplied) for connecting garden tools or pressure washers.
Maintenance
- Cleaning: Clean the tank after each use with a stiff-bristled brush.
- Storage: Always dry the tank thoroughly before storing and keep it in a frost-free environment.
- Inspection: Regularly check all fittings and materials for damage or leaks.
- Repairs: If a rip occurs, use the provided repair patch. Always test the adhesive on a small section of the patch first, as some adhesives may melt the PVC material.
Manufacturer information
Clarke International
Practical help
Common problems
Leakage at tap or overflow
Check that O-ring washers are correctly positioned and filter screw caps are tightened securely from the inside.
Tank instability
Ensure the tank is placed on level, solid ground and add a small amount of water immediately after assembly to stabilize it.
Rip in material
Use the provided repair patch. Always test the adhesive on a small section of the patch first to ensure it does not damage the PVC.
Before use
- Verify all parts are present (Tank, 5 poles, 5 feet, taps, hose, overflow pipe).
- Ensure the ground surface is level and solid.
- Check that O-ring washers are in place on taps and overflow pipe before installation.
- Ensure the tank is clean before initial use.
Specs in practice
- Temperature Range
- -35°C to 80°C (suitable for outdoor use).
Images and diagrams
- The assembly involves inserting the tap/overflow bodies through the tank holes and securing them with O-rings and screw caps from the inside.
- Support poles are inserted into the loops on the outside of the tank, with feet attached at the bottom.
Model compatibility
- The lower tap is compatible with standard female hosepipe connectors (not supplied).

Manual page author
Michael Turner
Technical manual editor
Reviews PDF manuals for structure, safety notes, and practical product details so readers can find the right information quickly.