Tools / Saws
User Manual for Clarke CFP Pro 20DS Floor Machine
Comprehensive user guide for the Clarke CFP Pro 20DS floor machine. Includes safety instructions, operating procedures, handle assembly steps, maintenance tips, and detailed parts diagrams.
Quick answers from the manual
Quick answer
- The Clarke CFP Pro 20DS is a dual-speed floor machine. To operate, ensure it is plugged into a grounded outlet, select the speed (185rpm or 330rpm) while the power is off, press the red safety button, and squeeze the operating triggers. p. 3
Key actions
- Adjusting Handle Height p. 3
- Changing Speed p. 3
First start
- Attach pad driver or brush p. 3
Problems and fixes
Damaged cord or plug
Replace power cord immediately.
p. 3Maintenance and reset
- Motor cleaning p. 3
Technical specifications
| Parameter | Value | Meaning | Pages |
|---|---|---|---|
| Low Speed | 185 rpm | Operating speed setting | p. 3 |
| High Speed | 330 rpm | Operating speed setting | p. 3 |
Where to find it in the PDF
- Handle Release Assembly p. 3
- Parts List - Handle p. 8, 9
- Parts List - Base p. 10, 11
Table of contents
Manual images
Click an image to enlargeQuick Guide from the Manual
The Clarke CFP Pro 20DS is a commercial floor machine designed for indoor use. Before operating, ensure you are trained and authorized. Always inspect the power cord for damage before use and never use an extension cord. To operate, ensure the machine is unplugged, attach the pad driver or brush, adjust the handle to a comfortable height, select the desired speed (low or high), and use the safety button and triggers to start.
Safety Precautions
- Commercial Use Only: Designed for indoor environments.
- Electrical Safety: Must be grounded. Use only on a nominal 120-Volt circuit. Never use an adapter.
- Operation Restrictions: Do not operate in flammable/explosive areas, outdoors, in standing water, or with a damaged cord.
- Handling: Do not run over the cord, pull by the cord, or handle the plug with wet hands.
Operation
General Use
- Clear the area of obstructions.
- With the machine unplugged, tilt it back to attach the pad driver or brush by placing the clutch plate over the gearbox hub and turning 1/4 turn.
- Return the machine to an upright position and plug into a grounded outlet.
- Adjust handle height by lifting the compression handle on the right side of the tube, setting the height, and locking it back down.
- Select speed (Low: 185rpm or High: 330rpm) using the motor-mounted switch. Never change speed while the machine is running.
- To start, press the red safety button on the upper switch housing, then squeeze the operating triggers.
- To steer, gently raise the handle to go right, or lower it to go left.
- Release the triggers to stop the machine.
Handle Release Assembly
If the handle requires assembly, follow these steps:
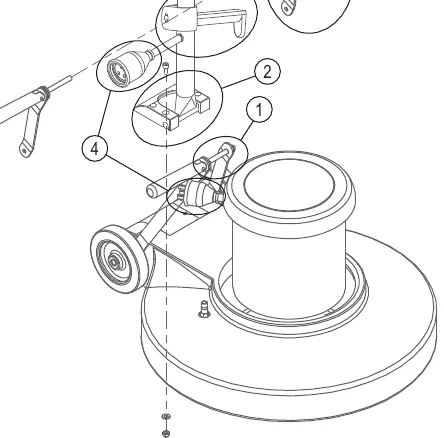
- Step 1: Remove the nut and spacer from the handle bracket assembly. Push the two handle brackets backward so they lay on the floor.
- Step 2: Remove the Handle Clamp Blocks (5mm hex head). Place the handle assembly into the blocks and re-attach to the base.
- Step 3: Ensure the cord wrap faces left when standing behind the machine. Assemble hardware: spacer, left handle bracket, nylock nut. Do not overtighten.
- Step 4: Connect the power cords and the power cord covers.
Maintenance and Storage
- Unplug: Always disconnect from the power source before maintenance.
- Cleaning: Clean the exterior with a mild cleaner.
- Lubrication: Lubricate wheels with water-resistant lubricant monthly.
- Motor Care: If used in dusty environments, remove the motor cover and blow out with compressed air to ensure ventilation.
- Storage: Unplug, wrap the cord on the handle, remove the pad driver/brush, and store in an upright position in a dry area.
Manufacturer information
Clarke International
Practical help
Common problems
Machine will not start
Ensure the machine is plugged in, the safety button is depressed before squeezing the triggers, and the power cord is not damaged.
Machine pulls to the side
Adjust the handle height or angle; raising the handle steers right, lowering it steers left.
Cord damage
If any damage is detected on the power cord, replace it immediately.
Before use
- Clear the area of all obstructions.
- Ensure the machine is unplugged before attaching the pad driver or brush.
- Verify all safety devices are in place.
- Check the power cord and plug for any signs of damage.
- Ensure the machine is on a grounded 120V circuit.
Images and diagrams
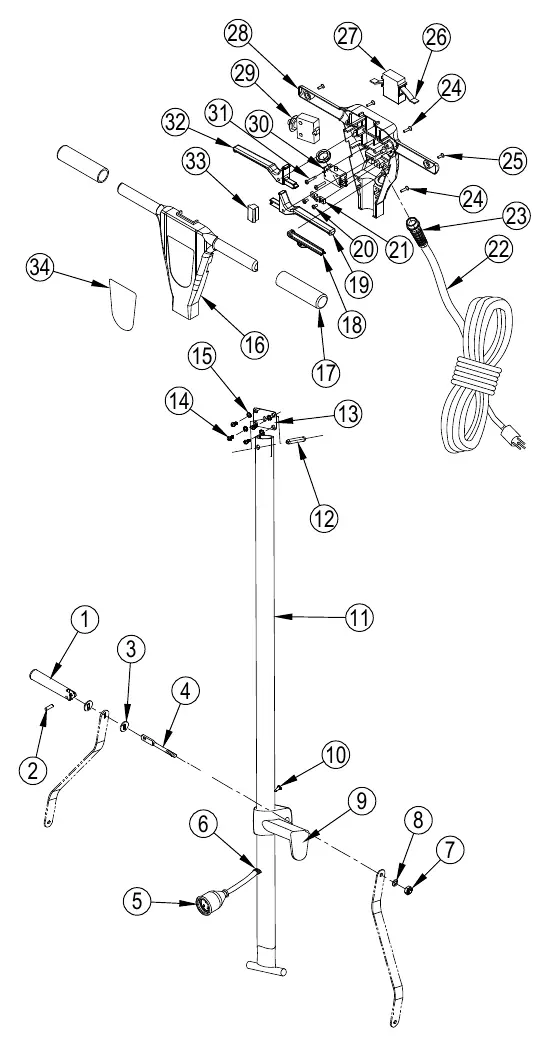
- Handle Assembly: Exploded view showing the handle tube, levers, and mounting hardware.
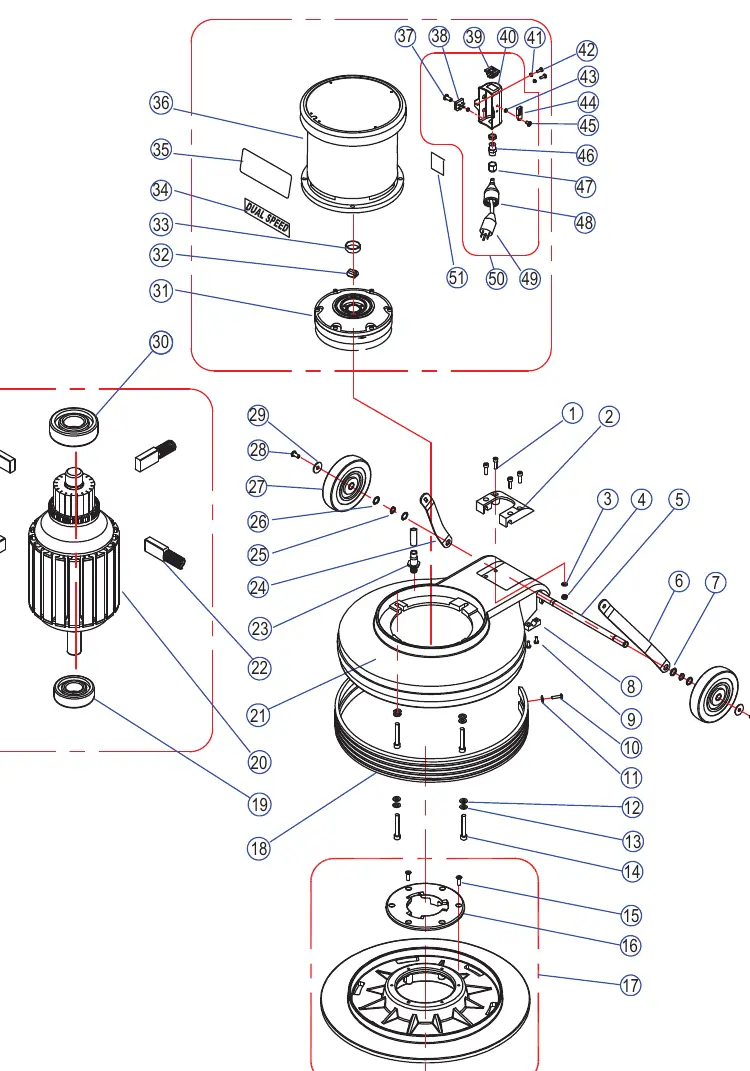
- Base Assembly: Exploded view showing the motor, gearbox, wheels, and pad holder attachment.
- Wiring Diagram: Shows the connection between the power supply, switch housing, and motor.
Model compatibility
- Use only manufacturer-supplied or approved replacement parts.
- Do not use extension cords.
- Use only recommended accessories.

Manual page author
David Miller
Documentation analyst
Organizes user manual content into clear summaries, with attention to model details, product context, and everyday usability.