Industrial / Cleaning Systems
User Manual for Clarke CTS800C 8-inch Table Saw
Quick guide for the Clarke CTS800C 8-inch table saw. Includes assembly, operation, safety instructions, maintenance, and troubleshooting steps.
Quick answers from the manual
Quick answer
- The Clarke CTS800C is an 8-inch table saw for wood cutting. Always use the blade guard and push stick, and ensure the riving knife is aligned with the blade. p. 1, 14
Key actions
- Changing the blade p. 18
- Aligning the riving knife p. 19
First start
- Ensure the saw is on a flat surface, check all locking levers, verify blade alignment, and wear appropriate PPE. p. 13, 14
Problems and fixes
Saw will not start
Plug in the machine, replace fuse, or have cable replaced.
p. 20Maintenance and reset
- Remove dust regularly with a fine brush. Keep teeth sharp with a half-round file. p. 18
Technical specifications
| Parameter | Value | Meaning | Pages |
|---|---|---|---|
| Voltage | 230V - 50 Hz | Power supply requirement | p. 2 |
| Power input | 500 W | Motor power | p. 2 |
Where to find it in the PDF
- Specifications p. 2
- Assembly p. 12
- Operation p. 14
- Maintenance p. 18
Table of contents
Manual images
Click an image to enlargeQuick guide from the manual
The Clarke CTS800C is an 8-inch (200mm) table saw designed for ripping, cross-cutting, bevelling, and mitering wood. Before use, ensure the machine is placed on a flat, firm surface and that you are wearing appropriate personal protective equipment (goggles, ear protection, dust mask). Always use the blade guard and push stick during operation to prevent injury.
Component Overview
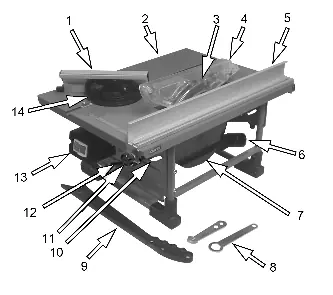
- Mitre guide/cross cut fence
- Work table
- Blade and Blade Guard
- Fence assembly
- Dust extract duct
- Start/stop switch
- Tilt adjusting lever
Assembly
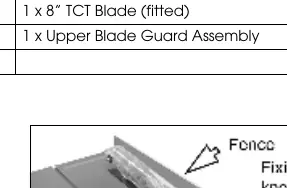
Fitting the Parallel Fence: The fence is secured to the table with two knob head screws acting on clamp plates at the front and rear. It can be placed on either side of the blade. Do not over-tighten the knobs.

Fitting the Mitre Assembly: Slide the bolt heads into the channel in the fence and attach thumb nuts. Drop the assembly into the groove on the table top.
Operation
Switching On/Off: Press the green button 'I' to start. Wait for the blade to reach maximum speed before cutting. Press the red button '0' to stop. Note that the blade will spin for several seconds after switching off.

Cutting Tips: Always use the parallel fence for ripping cuts. Never stand in line with the blade. Use a push stick for narrow workpieces to keep thumbs away from the blade. Always lower the guard over the workpiece before cutting.
Adjustments
Blade Angle: Release the bevel locking handle, tilt the motor assembly to the desired angle, and tighten the handle to lock.
Parallel Fence: Use the scale on the table to set the distance from the blade and lock the knobs at each end.
Maintenance
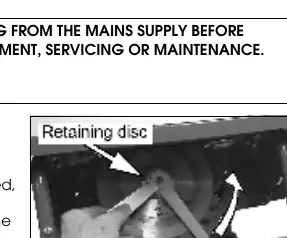
Changing the Blade: Remove the side cover by unscrewing the two securing screws. Use the provided wrenches to hold the spindle and undo the securing nut. Remove the outer retaining disc and the blade. Replace in reverse order, ensuring the teeth face forward (downwards at the front of the table).
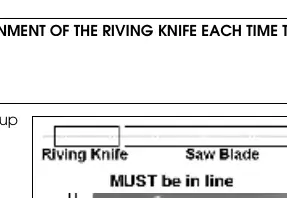
Riving Knife Alignment: If the riving knife is not aligned with the blade, remove the blade guard and table insert. Loosen the screws holding the riving knife, adjust it to the center, and retighten.
Troubleshooting
If the saw will not start, check the power connection, fuse, and cable. If the material pinches the blade, check the fence alignment. If the machine vibrates, ensure it is on a flat surface or replace a damaged blade.
Manufacturer information
Clarke International
Practical help
Common problems
Saw will not start
Check if the machine is plugged in, check the fuse, or inspect the power cable for damage.
Material pinches blade
Check fence alignment and ensure the wood is not warped.
Machine vibrates
Ensure the saw is standing securely on a flat surface or replace a damaged blade.
Saw makes unsatisfactory cuts
Replace a dull blade, clean the table, or ensure the blade is mounted correctly.
Before use
- Check if the saw blade is firmly tightened.
- Ensure all locking levers are firmly locked.
- Verify the riving knife is aligned with the saw blade.
- Check that the blade guard is fitted.
- Ensure fences are not touching the saw blade.
- Wear protective goggles, ear protection, and a dust mask.
Specs in practice
- No-load speed
- 2950 rpm
- Max cut depth @ 90°
- 40 mm
- Max cut depth @ 45°
- 22 mm
Images and diagrams
- Component overview showing the location of the fence, blade, guard, and switches.
- Parts diagram illustrating the assembly of the motor, table, and blade mechanism.
Model compatibility
- Use only 8 inch (200mm) carbide tipped blades.
- Not suitable for cutting timber greater than 40mm.
- Not suitable for metal, stone, rubber, plastic, or logs.

Manual page author
David Miller
Documentation analyst
Organizes user manual content into clear summaries, with attention to model details, product context, and everyday usability.