Electronics / Two-Way Radios
Cobra 19MINI Ultra Compact CB Radio
Quick guide for the Cobra 19MINI CB radio. Learn how to operate the radio, adjust squelch, use VOX, manage channels, and configure menu settings.
Table of contents
Manual images
Click an image to enlargeQuick Guide for Cobra 19MINI
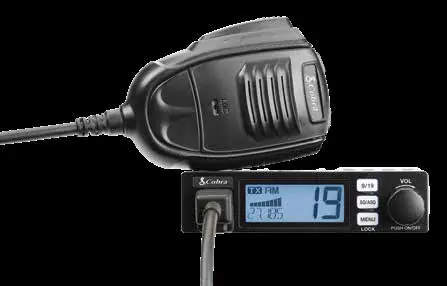
The Cobra 19MINI is an ultra-compact recreational CB radio designed for vehicle mounting. This guide provides essential instructions for operation, menu configuration, and basic troubleshooting.
Device Overview
The radio features a front-facing LCD display and control buttons, with rear connections for the antenna and an external speaker. Key controls include:
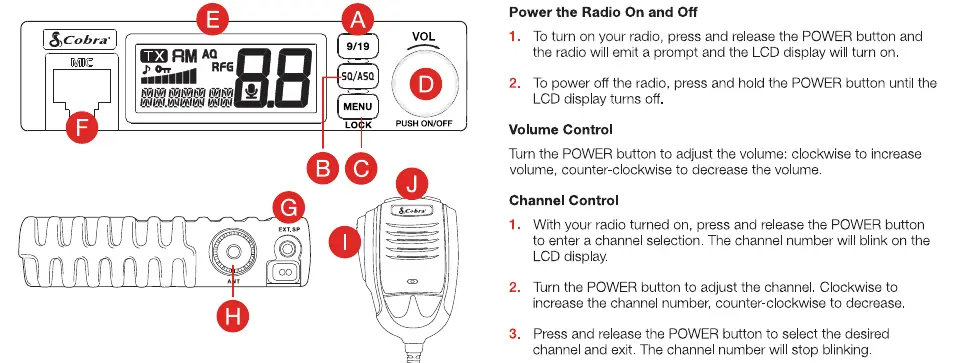
- Power/Volume Knob: Turn to power on/off and adjust volume.
- 9/19 Button: Quick access to emergency channels 9 and 19.
- SQ/ASQ Button: Access Squelch and Automatic Squelch control.
- Menu/Lock Button: Access the menu system and lock the keypad.
- Channel Up/Down Buttons: Located on the microphone for quick channel changes.
Operating Instructions
Power and Volume
To turn the radio on, press and release the POWER button. To turn it off, press and hold the POWER button until the LCD display turns off. Rotate the POWER button to adjust the volume.
Channel Control
With the radio on, press the POWER button to enter channel selection. The channel number will blink. Rotate the POWER button to change the channel, then press it again to confirm. Channels can also be changed using the UP/DN buttons on the microphone.
Squelch and ASQ Control
You can manually adjust the squelch level (1-34) or use the Automatic Squelch (ASQ) feature. Press and release the SQ/ASQ button to adjust squelch; press and hold to access ASQ settings. Use the microphone UP/DN buttons to change levels.
VOX Operation
To activate or deactivate the VOX (hands-free) function, press and hold the PTT switch on the microphone, then press and hold the MENU button. A microphone icon will appear on the LCD when active.
Keypad Lock
Press and hold the MENU button for 3 seconds to lock the keys. A key icon will appear on the display. Repeat the process to unlock.
Menu Options
Press and release the MENU button to enter the menu list. Use the POWER button or microphone UP/DN buttons to navigate and select settings. Press the POWER button to confirm your selection.
- KEY BP: Beep sound (on/off).
- ROG BP: Roger Beep sound (on/off, tones 01-06).
- VOX L: VOX Sensitivity level (01-09).
- VOX T: VOX Delay time (01-09).
- RF.GAIN: RF Gain control (03, 06, 09, 48, or off).
- TOTSET: Time Out Timer (01-10 minutes).
- PURRAUTO: Automatic Power On setting (on/off).
- FU VER: Displays firmware version.
- RESET: Reset to factory default.
Reset to Factory Default
- Press and hold the MENU button to enter the menu list.
- Rotate the POWER button to select the RESET setting.
- Press and hold the POWER button to select. RESET will blink on the display.
- Press and hold the POWER button until RESET stops blinking.
- Release the POWER button; the radio will automatically reset.
External Speaker
The radio supports an external 8 Ohm speaker with a 3.5mm mono connector. Warning: The external speaker output is a Bridge Tied Load (BTL) design. Do not short the speaker wires to ground, as it may damage the speaker amplifier.
Official resources from the manual
Manufacturer information
Cobra Electronics
Practical help
Common problems
Radio does not turn on
Ensure the power source is properly connected to the unit.
Cannot hear incoming signals
Adjust the Squelch (SQ) or ASQ level. If the level is too high, it may block incoming signals.
Keypad is unresponsive
Check if the Keypad Lock is active (indicated by a key icon on the LCD). Press and hold the MENU button for 3 seconds to unlock.
Before use
- Connect the antenna to the Antenna Jack on the rear panel.
- Ensure the microphone is securely connected to the Microphone Jack.
- Verify the power source is connected.
- Check that the external speaker (if used) is an 8 Ohm speaker with a 3.5mm mono connector.
Images and diagrams
- Front Panel: Contains the LCD display, 9/19 emergency button, SQ/ASQ button, Menu/Lock button, and Power/Volume knob.
- Rear Panel: Features the Antenna Jack and External Speaker Jack.
- Microphone: Includes the PTT (Push-to-Talk) switch and Channel Up/Down buttons.
Model compatibility
- External Speaker: Must be an 8 Ohm speaker with a 3.5mm mono connector.
- Warning: The external speaker output is a Bridge Tied Load (BTL) design; do not short wires to ground.

Manual page author
David Miller
Documentation analyst
Organizes user manual content into clear summaries, with attention to model details, product context, and everyday usability.