Tools / Saws
Owner's Manual for Craftsman 10-Inch Band Saw 113.244513
Comprehensive owner's manual for the Craftsman 113.244513 10-inch band saw. Includes detailed instructions for assembly, blade installation, tensioning, tracking, maintenance, and troubleshooting.
Table of contents
Manual images
Click an image to enlargeQuick guide from the manual
This band saw is designed for cutting wood, wood-like products, and plastic. Before operating, ensure the machine is properly mounted to a workbench, the blade is correctly tensioned and tracked, and all safety guards are in place. Always wear safety goggles and keep hands away from the blade during operation.

Safety instructions
General Safety: Always wear safety goggles (ANSI Z87.1 compliant). Keep the work area clean and well-lit. Do not wear loose clothing, gloves, or jewelry. Disconnect the power before servicing or changing accessories. Never leave the tool running unattended.
Band Saw Specific: Ensure blade teeth point downward toward the table. Adjust the upper blade guide to just clear the workpiece. Use a push stick for narrow ripping operations. If the saw makes unfamiliar noises or vibrates, stop immediately and investigate.
Electrical requirements
This machine is equipped with a 1725 RPM motor and is wired for 120V, 60Hz AC operation. Do not convert to 230V. The tool must be properly grounded using a 3-conductor cord and a 3-prong grounding-type plug. If using an extension cord, ensure it is a 3-wire cord with a grounding plug, sized appropriately for the length (e.g., No. 16 gauge for 0-25 feet).
Assembly
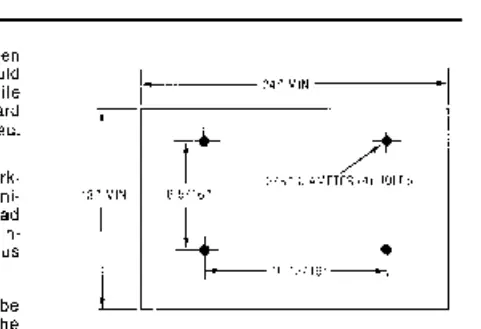
Mounting to Workbench: The saw should be bolted securely to a firm workbench using 5/16" diameter machine screws, lockwashers, and hex nuts. Alternatively, mount it to a 3/4" thick plywood board (minimum 18" x 24") and clamp the board to the workbench.
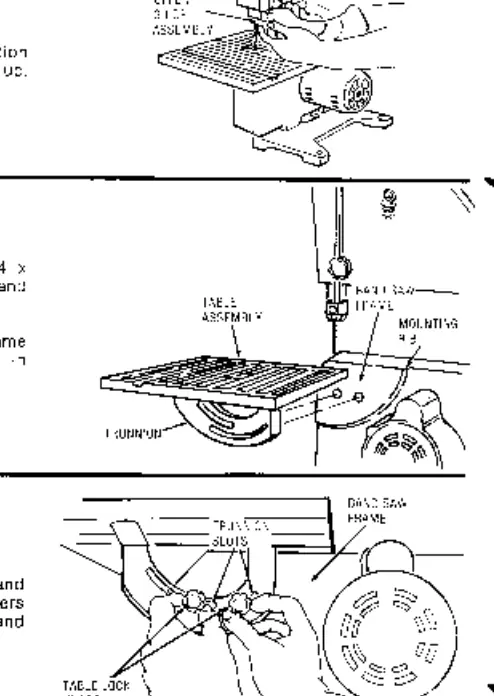
Installing the Table: Apply a coat of automobile wax to the table top and trunnion surfaces. Position the table assembly onto the frame, align with the trunnion, and secure using the table lock knobs and washers.
Adjustments
Tensioning the Blade: The band saw features a self-limiting tension device. Turn the tension adjustment knob until it contacts the washer and sleeve; do not turn further once resistance is felt. This is the correct setting for a 1/4" blade.
Tracking the Blade: With the saw unplugged, turn the upper wheel by hand. If the blade moves away from the center of the tires, adjust the tracking adjustment screw. Turn clockwise to move the blade toward the front, or counterclockwise to move it toward the back.
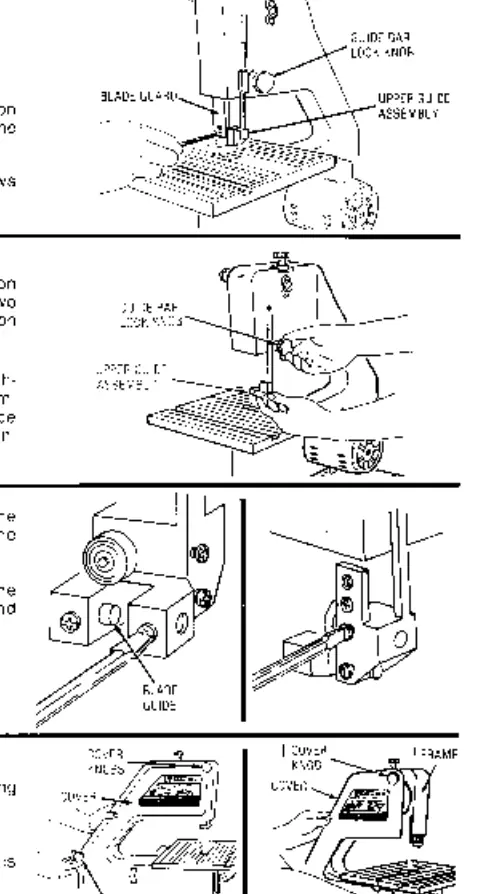
Blade Guides: Adjust the upper and lower blade guides so they are approximately 1/32" from the blade, ensuring they support the blade without pinching it.
Operation
For general scroll cutting, follow pattern lines by pushing and turning the workpiece simultaneously. Do not force the work; allow the blade to cut at its own rate. For intricate curves, use relief cuts to avoid binding the blade.
Maintenance
Keep the band saw clean by removing sawdust frequently. Clean pitch from the table, blade insert, and guides using a gum and pitch remover. Apply a thin coat of automobile wax to the table to ensure smooth workpiece movement. Ball bearings are permanently lubricated and require no further maintenance.
Troubleshooting
If the motor fails to run, check the switch, power cord, and motor. If the blade does not track properly, adjust the tracking screw. If the saw slows down during cutting, stop feeding and back up the material, or check for a dull blade. If blades break frequently, check for excessive tension or kinks caused by cutting too small a radius.
Manufacturer information
CRAFTSMAN
Practical help
Common problems
Motor will not run
Check the On-Off switch, power cord, and motor. If defective, consult Sears Service.
Blade does not run in the center of the upper wheel
Adjust the tracking adjustment screw until the blade runs in the center of the tires.
Band saw slows down when cutting
Stop feeding and back up the material slightly until the saw speeds up. Check if the blade is dull and replace if necessary.
Blades breaking
Reduce blade tension. Ensure you are not cutting too small a radius or turning the material too fast.
Motor sounds under load when not cutting
Check for excessive blade or belt tension and adjust accordingly.
Before use
- Ensure blade teeth point downward toward the table.
- Verify blade tracking and thrust bearings are adjusted.
- Check and correctly adjust blade tension.
- Ensure all guards are in place and properly aligned.
- Clear the work area of debris.
- Wear safety goggles (ANSI Z87.1 compliant).
Specs in practice
- 1/4 inch blade
- Standard blade size included with the saw.
Images and diagrams
- Wiring diagram: Located on the repair parts page, showing power cord connections.
- Parts diagram: Exploded view of the band saw for identifying replacement parts.
Model compatibility
- Use only for cutting wood, wood-like products, and plastic.
- Do not use in damp or wet locations.

Manual page author
Michael Turner
Technical manual editor
Reviews PDF manuals for structure, safety notes, and practical product details so readers can find the right information quickly.