Tools / Saws
User Manual for Craftsman 10-in. Table Saw 137.218070
Quick guide for the Craftsman 137.218070 10-inch table saw. Includes assembly instructions, safety guidelines, blade alignment, operation procedures, and troubleshooting.
Table of contents
Manual images
Click an image to enlargeQuick Guide from the Manual
This manual provides essential instructions for the safe assembly, operation, and maintenance of the Craftsman 10-inch Table Saw (Model 137.218070). Before operating, ensure the saw is properly mounted, the blade is correctly installed, and all safety guards are in place. Always wear eye protection and follow the specific cutting procedures outlined for ripping and crosscutting.
Safety Instructions
- Eye Protection: Always wear ANSI Z87.1 compliant safety goggles.
- Work Area: Keep the area clean, well-lit, and free of clutter.
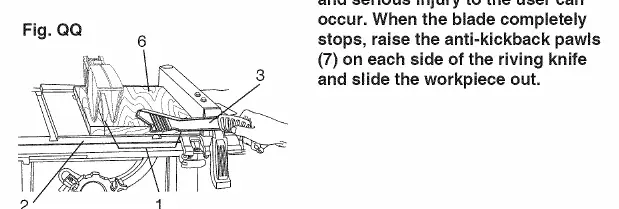
- Kickback Prevention: Never perform freehand operations. Always use the rip fence or miter gauge. Keep the riving knife and anti-kickback pawls in place.
- Electrical Safety: Ensure the tool is grounded. Use a 110-120V / 15 Ampere time-delay fuse or circuit breaker.
- Operation: Never leave the saw running unattended. Do not cut metals or masonry.
Assembly and Setup
The saw requires assembly of the stand, roller wheels, and table extensions. Ensure all bolts are tightened securely but do not overtighten. The saw must be mounted to a sturdy workbench or the provided stand. If using a workbench, a hole must be cut under the saw to allow sawdust to fall through.
Adjustments
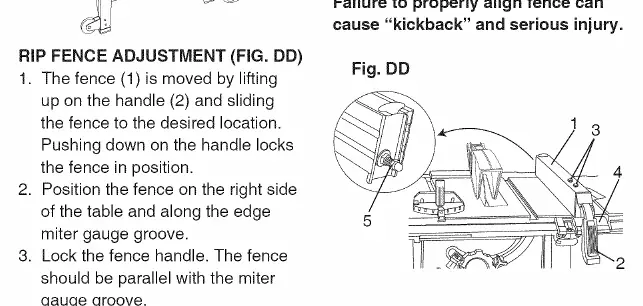
- Rip Fence: Ensure the fence is parallel to the miter gauge groove. Adjust using the bolts on the fence bracket.
- Blade Alignment: The blade must be parallel to the miter gauge groove. Adjustments can be made using the screws located above the blade height adjusting handwheel.
- Positive Stops: The saw features positive stops for 90° and 45° angles. Use a combination square to verify and adjust these stops if necessary.
- Laser Line: The Laser Trac guide can be adjusted by loosening the set screws and shifting the laser unit until it is parallel with the blade.
Operation
Ripping: Use the rip fence. Keep hands away from the blade path. Use a push stick for narrow stock (less than 2 inches wide).
Crosscutting: Use the miter gauge. Never use the rip fence and miter gauge simultaneously.
Dado Cuts: Only use stackable dado blades (max 1/2 inch width, 6 inch diameter). Remove the blade guard and riving knife for this operation, then reinstall them immediately after.
Maintenance
- Cleaning: Frequently remove sawdust from the cabinet and motor.
- Lubrication: Use graphite or silicone on pivot points and threaded rods. Do not use oil or grease as they attract sawdust.
- Carbon Brushes: Replace brushes when they have less than 1/4 inch of carbon remaining.
Troubleshooting
If the saw fails to start, check the power connection, fuse, or debris in the switch. If the saw makes unsatisfactory cuts, check for a dull blade, incorrect blade mounting, or gum/pitch buildup on the blade.
Manufacturer information
CRAFTSMAN
Practical help
Common problems
Saw will not start
Check power connection, fuse/circuit breaker, or debris in the on/off switch.
Material pinched when ripping
Check rip fence alignment or select a different piece of wood.
Material binds on riving knife
Check and align the riving knife with the blade.
Machine vibrates excessively
Tighten all mounting hardware or reposition on a flat, level surface.
Before use
- Ensure the blade is tightened to the arbor.
- Verify the bevel angle lock knob is tight.
- If ripping, ensure the fence is locked and parallel to the miter gauge groove.
- Confirm the blade guard is in place and working properly.
- Wear safety glasses.
Specs in practice
- Blade Diameter
- 10 inches.
- Rip Capacity
- 24 inches (Right & Left).
- Max Cut Depth @ 90°
- 3 inches.
Images and diagrams
- Assembly diagrams show stand construction, roller wheel installation, and table saw mounting.
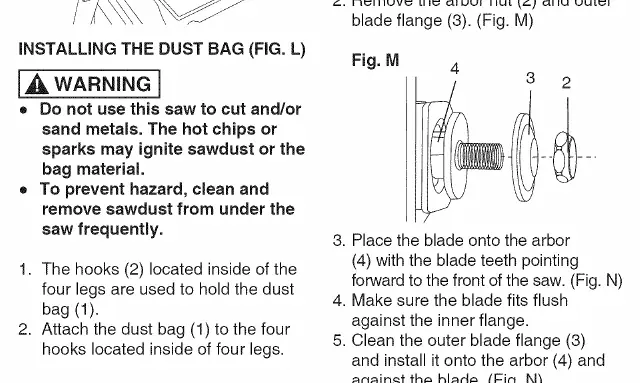
- Blade installation diagrams detail arbor nut and flange placement.
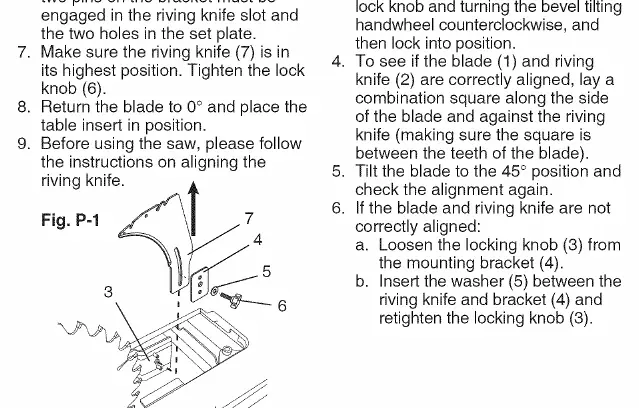
- Adjustment diagrams illustrate rip fence, miter gauge, and riving knife alignment.
Model compatibility
- Use only stackable dadoes (max 1/2 in. width, 6 in. diameter).
- Do not use adjustable (wobble) type dadoes.
- Do not use molding head sets.

Manual page author
Michael Turner
Technical manual editor
Reviews PDF manuals for structure, safety notes, and practical product details so readers can find the right information quickly.