HVAC / Heating Cables
Installation Guide for Danfoss ECiceguard 18 Readymade Heating Cable
Comprehensive installation guide for the Danfoss ECiceguard 18 Readymade self-limiting heating cable. Includes safety instructions, technical specifications, installation steps for roof and gutter frost protection, and thermostat...
Table of contents
Manual images
Click an image to enlargeQuick guide from the manual
The Danfoss ECiceguard 18 Readymade is a self-limiting heating cable designed for ice and snow melting on roofs, gutters, and downpipes. This document provides essential installation and safety guidelines. Always ensure the system is installed by an authorized electrician in accordance with local regulations. Key safety requirements include the use of a Residual Current Device (RCD) with a maximum trip rating of 30 mA and proper earthing of the cable screen.
Product description
ECiceguard 18 is a self-limiting cable featuring a temperature-dependent resistant element between two parallel copper conductors. As the ambient temperature rises, the resistance value increases, causing the current to decline and reducing the heating effect. This self-limiting capability prevents overheating, even if cables touch or cross. It is recommended to use a thermostat to disconnect the mains when heating is not required to save energy.

Technical specifications
- Application: Roof, gutters, downpipes
- Voltage: 230 V
- Effect: 18 W/m at 10°C (approx. 36 W/m in ice)
- Dimensions: 11.3 x 5.8 mm
- Min. installation temperature: -50°C
- Min. start-up temperature: -40°C
- Max. temperature ON/OFF: 65/85°C
- Cold-lead length: 5 m, 2 x 1.5 mm2, screened
General installation instructions
Before beginning the installation, ensure all necessary materials are present and the site is prepared. Follow these critical steps:
- Measure the insulating resistance of the heating cable immediately before and after installation.
- Remove any sharp objects or irregularities on the pipe system to prevent cable damage.
- Ensure finished or painted pipes are completely dry before installation.
- The bending diameter must not be less than 50 mm; bend only on the flat side.
- Protect the cable against excess strain and tension.
- The presence of a heating cable must be made evident by caution signs in the fuse box, distribution board, or at power connection fittings.
Frost protection of roofs
For effective ice and snow melting, follow these installation guidelines:
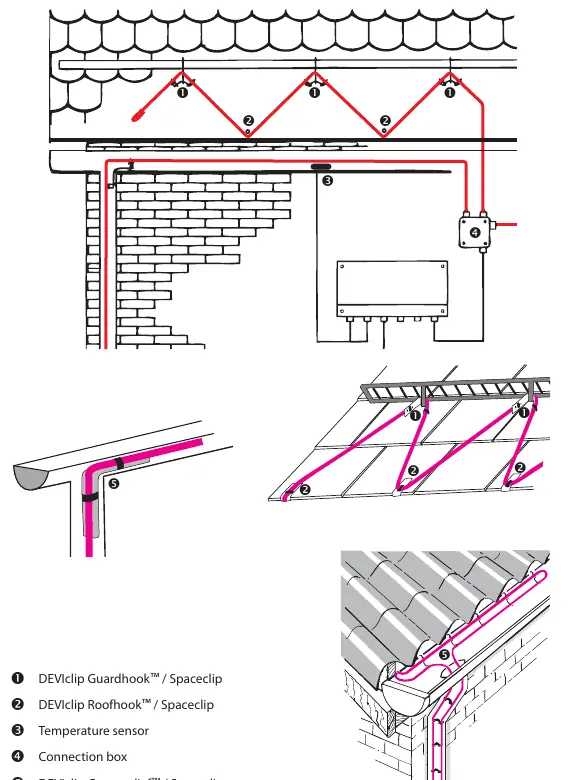
- Spacing: Typically, install cables with a C-C distance of approximately 15 cm. Use spacing clips to maintain this distance.
- Roof Slope: For low-slope roofs, installation in the gutter and downpipe is often sufficient. For high-slope roofs, install the cable on the lowest section of the roof.
- Valleys: Mount the cable in the valley, ensuring the C-C distance does not exceed 15 cm.
- Downpipes: If the cable length in the pipe exceeds 25 cm, use relief measures. The cable should continue to frost-proof depth under the ground surface (approx. 1 m).
- Pattern: Cables on the roof must be positioned upwards/downwards, not along the roof. A zigzag pattern is recommended.
Regulation and thermostats
To optimize energy consumption, Danfoss recommends using electronic thermostats. Compatible models include ECtemp 316, 330, 610, and 850. These thermostats provide effective regulation based on temperature and/or moisture conditions.
Storage and maintenance
Store heating cables and connecting leads in a clean, dry place. Avoid contact with chemicals and petrochemical products. Do not expose cables to mechanical strain. Storage temperatures must remain between -40°C and +60°C. If stored in moist rooms or at building sites, protect the cables against moisture.
Manufacturer information
Danfoss A/S
Practical help
Common problems
Cable is stiff and difficult to work with at low temperatures.
Connect the cable briefly to the mains to warm it up.
High mechanical load or impact risk in the installation area.
Use M2 classified cables.
Need to reduce energy consumption.
Use an ECtemp thermostat to disconnect the cable when heating is not required.
Before use
- Measure insulation resistance before installation.
- Ensure all surfaces are clean, dry, and free of sharp objects.
- Verify RCD protection (max 30 mA) is installed.
- Ensure an isolation switch is available for all-pole disconnection.
- Check that the bending diameter is at least 50 mm.
Specs in practice
- Min. installation temperature
- The lowest ambient temperature at which the cable can be installed (-50°C).
- Max. temperature ON/OFF
- The temperature limits for the cable's operation (65°C / 85°C).
Images and diagrams
- Cable construction: Outer sheath, screen, insulation, self-limiting heating element, and bus wires.
- Installation: Zigzag pattern on roof surfaces to ensure even coverage.
- Strain relief: Use spacing clips when the cable crosses edges or enters downpipes.
Model compatibility
- Compatible with ECtemp 316, 330, 610, and 850 thermostats.
- Requires M2 classified cables for areas with high mechanical loads.

Manual page author
Emily Carter
User documentation editor
Prepares concise manual descriptions and highlights the most useful setup, operation, and maintenance information for readers.