HVAC / Heating Cables
Installation Guide for Danfoss Heating Cables
Quick installation guide for Danfoss heating cables. Includes safety instructions, installation guidelines, mechanical class specifications, and warranty information.
Table of contents
Manual images
Click an image to enlargeQuick guide from the manual
This document provides installation instructions for various Danfoss heating cables. It covers safety requirements, installation guidelines, mechanical classifications, and warranty terms. Always consult local building regulations and wiring rules before installation.
Safety instructions
- De-energize all power circuits before installation and service.
- Residual current device (RCD) protection is required with a max trip rating of 30 mA.
- The screen from each heating cable must be earthed in accordance with local electricity regulations.
- Heating cables must be connected via a switch providing all-pole disconnection.
- The heating cable must be equipped with a correctly sized fuse or circuit breaker.
- It is strongly recommended to use the heating cable with an appropriate thermostat to prevent overheating.
- Do not use M1 classified cables in areas subject to high mechanical loads or impact (e.g., outdoor applications, steel reinforcing grids, concrete with sharp stones, roofs, and gutters).
- The presence of a heating cable must be clearly marked in the fuse box, distribution board, and along the circuit line.
Installation guidelines
- Do not install heating cables at temperatures below -5°C.
- The bending diameter of the heating cable must be at least 6 times the cable diameter.
- Do not bend the connections.
- The free end of the cold lead must be protected by the installer to prevent water ingress.
Mechanical classes
M1: For applications with low risk of mechanical damage (e.g., installed on even surfaces and embedded in screeds without sharp objects).
M2: For applications with high risk of mechanical damage.
C: High mechanical strength according to IEC 60800:1992.
MMM: Marking for high mechanical protection class according to NF C 32-330:2002.
Warranty information
Danfoss offers various warranty periods (5, 10, or 20 years) depending on the product type. The warranty covers repair or replacement costs and, for full-service products, installation and floor material damage. The warranty is valid only if the Warranty Certificate is correctly filled out, stamped, and signed by an authorized installer. Keep the certificate and proof of purchase for the entire warranty period.
Application overview
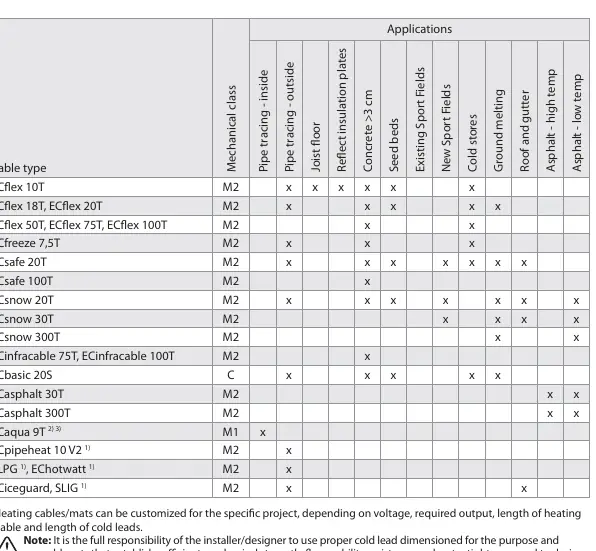
The manual includes a detailed application table (page 6) that specifies which cable type is suitable for various applications, such as pipe tracing, concrete embedding, roof and gutter heating, and asphalt applications.
Manufacturer information
Danfoss A/S
Practical help
Common problems
Overheating
Use an appropriate thermostat to control the heating cable.
Mechanical damage
Do not use M1 classified cables in areas with high mechanical loads or sharp objects.
Water ingress
Ensure the free end of the cold lead is properly protected by the installer.
Before use
- De-energize all power circuits.
- Ensure RCD protection (max 30 mA) is installed.
- Verify that the cable type is suitable for the intended application using the application table.
- Check that the bending diameter is at least 6 times the cable diameter.
- Ensure the cable is equipped with a correctly sized fuse or circuit breaker.
Images and diagrams
- The application table on page 6 is essential for selecting the correct cable for specific environments like pipe tracing, concrete, or roof heating.
Model compatibility
- Cables are not approved for installation inside water pipes unless specifically stated.
- Always verify the mechanical class (M1/M2) against the installation environment.

Manual page author
David Miller
Documentation analyst
Organizes user manual content into clear summaries, with attention to model details, product context, and everyday usability.