Home Appliances / Air Fryers
Quickstart Guide for Dash 10L Compact Air Fryer Oven
Get started with your Dash 10L Compact Air Fryer Oven. This guide covers essential cooking functions like air frying, baking, toasting, and broiling, along with setup instructions, rotating basket usage, and safety tips.
Table of contents
Manual images
Click an image to enlargeQuick Start Guide
This guide provides essential instructions for operating your Dash 10L Compact Air Fryer Oven. Always ensure the Drip Tray is placed at the bottom of the oven, below the heating element, before cooking.
Controls and Functions
The oven features three main dials on the control panel:
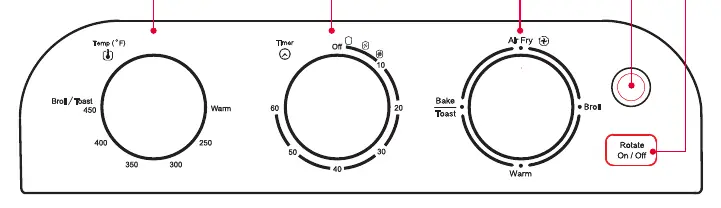
- Temperature Dial: Sets the desired temperature from "Warm" up to 450°F. Includes a specific Broil/Toasting setting.
- Timer Dial: Sets the cooking time up to 60 minutes. Note: To set a time under 20 minutes, turn the dial up to 20 first, then back to your desired time.
- Function Dial: Selects the cooking method (Air Fry, Bake, Toast, Broil, Warm).
- Rotate Button: Turns the Rotating Basket on or off.
Cooking Functions
Follow these steps for specific cooking modes:
- Air Fry: Place the Air Fry Basket on the Oven Rack in Position 2. Set the Function Dial to Air Fry, set the temperature, and set the timer. For items that drip (e.g., meat), place the basket on top of the Baking Pan in Position 1.
- Bake: Place the Baking Pan on the Oven Rack in Position 1. Set the Function Dial to Bake and set the temperature. Preheat for 5 minutes before adding food. Note that convection baking is faster than standard baking.
- Toast: Place the Oven Rack in Position 2. Set the Function Dial to Toast and turn the Timer Dial to your preferred shade.
- Broil: Place the Air Fry Basket and Baking Pan on the Oven Rack in Position 1. Set the Function Dial to Broil and the Temperature Dial to Toast/Broil.
- Warm: Place the Baking Pan on the Oven Rack in Position 1. Set the Function Dial and Temperature Dial to Warm.
Using the Rotating Basket
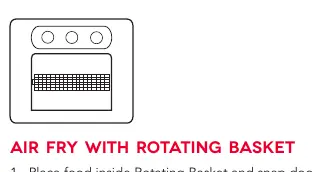
- Place food inside the Rotating Basket and snap the door closed.
- Secure the left side of the basket to the gear on the interior side of the oven, then place the right side into the hook.
- Close the oven door, set the Function Dial to Air Fry, and set the temperature and time.
- Press the Rotate On/Off Button. If the basket does not rotate, turn the timer to OFF and re-adjust the gear alignment.
- When finished, use the Removal Tool to hook underneath the basket arms and lift it out. Always use the Removal Tool and kitchen gloves as the basket will be hot.
Helpful Hints and Safety

- If you need to stop the oven before the time elapses, turn the Timer Dial to OFF.
- Be careful when removing or inserting the Drip Tray to avoid scraping the heating element.
- Larger items like chicken cutlets should be flipped halfway through cooking. Fries can be shaken halfway through to ensure even cooking.
- It is normal to see moisture on the oven door during certain cycles.
- Do not place the Air Fry Basket or Baking Pan directly on the bottom heating element.
Manufacturer information
Dash
Practical help
Common problems
Rotating basket is not turning
Turn the timer to OFF and re-adjust the gear alignment on the interior side of the oven.
Drips falling on the heating element
Place the Air Fry Basket on top of the Baking Pan in Position 1 to catch drips.
Food not cooking evenly
Flip larger items or shake fries halfway through the cooking process.
Before use
- Place the Drip Tray at the bottom of the oven below the heating element.
- Ensure the oven is on a heat-resistant surface.
- Check that the interior is clean and free of packaging.
- Verify the gear alignment if using the rotating basket.
Images and diagrams
- The control panel includes three dials: Temperature, Timer, and Function, plus a Rotate button.
- The rotating basket installation requires hooking the left side into the gear and the right side into the hook.
Model compatibility
- Convection baking is faster than standard baking; check food periodically to prevent overcooking.

Manual page author
David Miller
Documentation analyst
Organizes user manual content into clear summaries, with attention to model details, product context, and everyday usability.