Computers / Mobile Computers
Datalogic Magellan 2300HS Barcode Scanner Quick Reference Guide
Quick reference guide for the Datalogic Magellan 2300HS barcode scanner. Includes connection diagrams, scanning operation, volume/tone settings, LED status indicators, and safety information.
Quick answers from the manual
Quick answer
- The Magellan 2300HS is a high-performance barcode scanner designed for flush-mount countertop installation. This guide provides instructions for connection, basic operation, button functions, and LED status indicators. p. 1, 7, 8
Key actions
- Wake scanner from Sleep Mode p. 9
- Adjust speaker volume p. 9
- Adjust beeper tone p. 9
First start
- Ensure the scanner is mounted flush with the countertop and connected to the appropriate power source (DC Brick). p. 7, 8
Show 4 more answers Show less
Problems and fixes
FRU Warning (Fatal failure)
Call systems support for service.
p. 10
Host Disabled
Check host connection; host has disabled scanning.
p. 10Maintenance and reset
- Scanner Reset (System support only) p. 9
Technical specifications
| Parameter | Value | Meaning | Pages |
|---|---|---|---|
| Input | 100 - 240 VAC ±10% | Power supply input requirement | p. 35 |
| Output | 10 - 12 VDC ±10% | Power supply output requirement | p. 35 |
| Max Current | 1.5 A | Maximum current draw | p. 35 |
Where to find it in the PDF
- Connections p. 7
- Operation p. 8
- Button Functions p. 9
- LED Indicators p. 10
Table of contents
Manual images
Click an image to enlargeQuick guide from the manual
This guide provides essential information for operating the Datalogic Magellan 2300HS barcode scanner. It covers basic setup, scanning techniques, button functions, and status indicators. For advanced programming and installation details, please refer to the full Product Reference Guide.
Connection
The scanner features multiple ports for various configurations. Ensure all connections are secure:
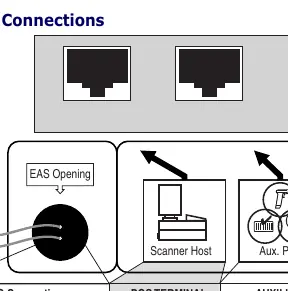
- Scanner Host: Connects to the POS terminal for label data and application downloads.
- Auxiliary Port: Used for test ports, on-screen programming, auxiliary RS-232 label data output, and handheld scanner input.
- Power: Connects to the DC brick input.
- EAS Connection: Optional port for Electronic Article Surveillance systems.
Operation
The scanner is designed to be mounted flush with the countertop, maximizing workspace and allowing items to be slid over the surface. To scan items:
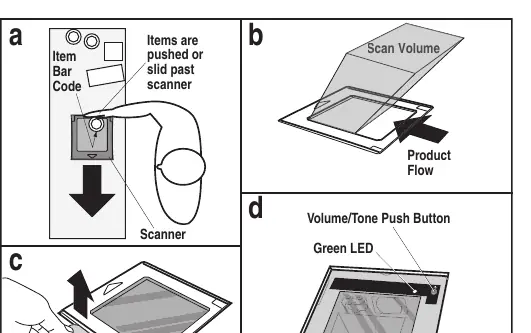
- Sweep the bar code through the zone projected from the scan window.
- Facing bar code labels toward the scan window optimizes the scan rate.
- The arrow on the scanner's top cover indicates the direction items should be moved.
Volume/Tone Push Button
The Volume/Tone button, located under the top cover, allows for adjustments. Note that changes made here are lost when the scanner is powered down; use programming labels for permanent changes.
- Wake Scanner: Press momentarily when the scanner is in Sleep Mode.
- Increase Volume: Press momentarily when the scanner is awake. Four volume levels are available.
- Increase Tone: Hold for approximately 2 seconds until the beeper sounds, then release.
- Scanner Diagnostics: Hold for 4 seconds.
- Reset Scanner: Hold for 8 seconds (only for system support personnel).
Green LED Indicator
The green LED provides status updates:
- Steady and dim: Scanner Active (Normal Mode).
- Bright flash: Good Read Indication.
- Continuous flashing: Program Mode.
- Slow flashing: Sleep Mode (due to inactivity).
- 1-second off, 1/10-second on: Host Disabled.
- Audible low tone, continuous flash: Field Replaceable Unit (FRU) Warning (Fatal failure).
Safety and Warranty
The scanner is a Class I/IIa laser product. Do not attempt to open or service the optics cavity; this is a factory-only repair item. The product includes a 1-year warranty against defects in materials and workmanship from the date of shipment.
Practical help
Common problems
Scanner not reading
Check if the scanner is in Sleep Mode. Wake it by moving an object through the scan zone or pressing the Volume/Tone button.
Volume settings reset
Volume changes made via the button are lost on power-down. Use special programming labels from the Product Reference Guide for permanent changes.
FRU Warning (Fatal failure)
Indicated by an audible low tone and continuous LED flashing. Call systems support for service.
Before use
- Ensure the scanner is mounted flush with the countertop.
- Verify the power supply (DC Brick) is connected.
- Check if an auxiliary scanner or EAS system is required for your setup.
- Ensure the scanner is in Active Mode (steady dim green LED).
Show more Show less
Specs in practice
- Input Voltage
- 100 - 240 VAC ±10%
- Output Voltage
- 10 - 12 VDC ±10%
Images and diagrams
- Figure 1: Illustrates the connection ports (EAS, POS, Aux, Power).
- Figure 2: Demonstrates the correct scanning technique (sliding items over the flush-mounted window).
- Figure 2d: Shows the location of the Volume/Tone button and Green LED.
Model compatibility
- Requires a Listed class II or class III power source with a Limited Power Source (LPS).
- Class III input power sources must be IEC/EN60950-1 approved.

Manual page author
Emily Carter
User documentation editor