Automotive / Motorcycle Accessories
Installation Instructions for Honda Lower Air Deflector 08R73-MKC-A01
A comprehensive installation guide for the Honda Lower Air Deflector (P/N 08R73-MKC-A01). This manual provides step-by-step instructions for drilling, mounting, and securing the deflector on GL1800 series motorcycles, including tool...
Table of contents
Manual images
Click an image to enlargeQuick guide from the manual
This document provides the necessary steps to install the Lower Air Deflector (P/N 08R73-MKC-A01) on Honda GL1800 series motorcycles. Before beginning, ensure the engine, exhaust system, and radiator have cooled down to prevent burns.
Tools and supplies required
- Hex wrench (5 mm)
- Electric drill
- Drill bits (3 mm and 9.5 mm)
- Torque wrench
Parts list
Before starting the installation, verify that all components are present:
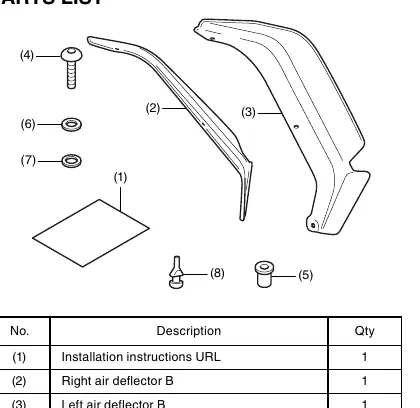
- Right air deflector B
- Left air deflector B
- 5 mm screws (6)
- Well nuts (6)
- Washers, White (6)
- Washers, Black (6)
- Cushions (6)
Installation procedure
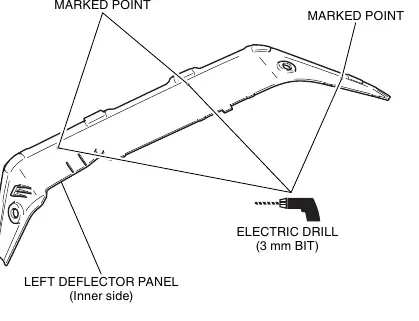
- Remove the left deflector panel: Carefully remove the panel as shown in the diagram.
- Drill 3 mm holes: Drill at the marked points on the left deflector panel. Ensure you remove any burrs from the edge of the hole after drilling.
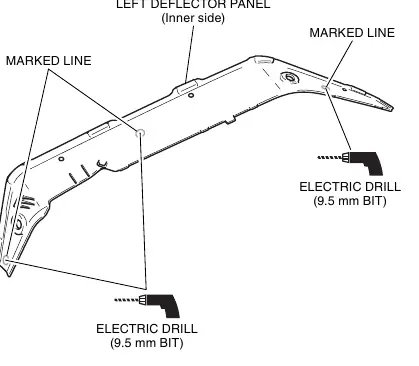
- Drill 9.5 mm holes: Drill at the marked lines on the left deflector panel. Drill holes at the center of the marked lines and remove any burrs.
- Install cushions: Attach the cushions to the inner side of the left deflector panel.
- Reinstall panel: Install the left deflector panel in the reverse order of removal.
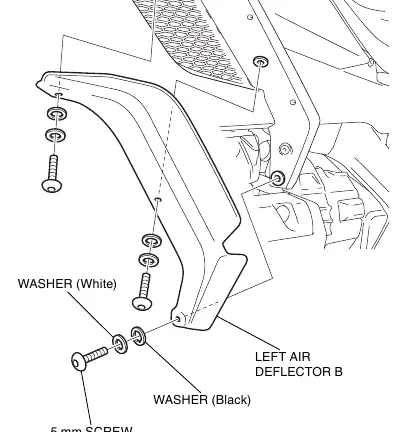
- Install well nuts: Insert the well nuts into the designated positions.
- Install air deflector B: Secure the left air deflector B using the provided screws and washers. Repeat the entire process for the right side of the motorcycle.
Torque specifications
Tighten all screws, bolts, and nuts to their specified torque values. For the 5 mm screws included in this kit, the torque value is 0.4 N·m (0.04 kgf·m, 0.3 lbf·ft). Refer to the motorcycle's Service Manual for torque values of any removed parts.
Manufacturer information
Honda Motor Co., Ltd.
Practical help
Common problems
Burrs on drilled holes
Always remove any burrs from the edge of the hole after drilling to ensure a proper fit.
Engine heat
Allow the engine, exhaust system, and radiator to cool completely before starting the installation to prevent burns.
Before use
- Verify all parts from the parts list are present
- Ensure you have a 5 mm hex wrench and an electric drill
- Have 3 mm and 9.5 mm drill bits ready
- Allow the motorcycle to cool down
- Have a torque wrench available for final tightening
Specs in practice
- 5 mm screw torque
- 0.4 N·m (0.04 kgf·m, 0.3 lbf·ft)
Images and diagrams
- The manual includes an exploded view of the parts list to identify hardware.
- Drilling diagrams show specific marked points and lines on the inner side of the deflector panel.
- Assembly diagrams illustrate the order of washers and screws during final mounting.
Model compatibility
- Compatible with GL1800/D/DA and GL1800B/BD models.

Manual page author
David Miller
Documentation analyst
Organizes user manual content into clear summaries, with attention to model details, product context, and everyday usability.