Electronics / Audio
User Guide for DigiTech SP-7 Stereo Phaser Pedal
Comprehensive user guide for the DigiTech SP-7 Stereo Phaser pedal. Learn about setup, phaser types, tap tempo, battery replacement, and pedal interface controls.
Table of contents
Quick guide from the manual
The DigiTech SP-7 Stereo Phaser is a digital effect pedal. Because digital signal processors require constant power, 9-Volt alkaline batteries are recommended primarily for demonstration and practice. For optimal performance, use a compatible Harman power supply. If the LED brightness changes or the pedal fails to switch between Bypass and Effect, replace the battery or connect a power adapter.
Included items
- HardWire SP-7 Stereo Phaser
- StompLock
- Foot Switch Glow Sticker
- Hook-and-loop Pedalboard Pad
- Online Warranty Registration Information Card
Setup
Amplifier Setup: Connect your guitar to the pedal input and the pedal output to your amplifier. If using a single amplifier, use Input 1 (Mono) and Output 1 (Mono).
Effects Loop Setup: Connect the pedal between the Amp Send and Amp Return. If your amplifier's effects loop has a mix control, set it to 100% full wet.
Pedal interface
The pedal features several controls for shaping your sound:
- Speed Knob: Controls the LFO speed of the phaser effect. Clockwise increases speed.
- Depth Knob: Controls the intensity of the phaser effect. Clockwise creates a deeper sound.
- Modify Knob: Adjusts specific parameters depending on the selected phaser type.
- Type Knob: Selects one of the 7 available phaser types.
- Input/Output Jacks: Use Input 1 (Mono) for standard operation. Use Input 2 and Output 2 for true stereo operation.
- Foot Switch: Toggles the effect on/off and accesses Tap Tempo.
Stereo phaser types
- 2 Stage: Subtle phase effect with adjustable bias control.
- 4 Stage: Classic 4 Stage vintage phaser.
- Modern: Deep phaser with enhanced feedback and modulation.
- Boutique: Unique 6 Stage phaser with deep feedback control.
- 10 Stage: Modern multi-stage phaser with flexible feedback/depth controls.
- Envelope: Triggered phaser where the LFO start point can be retriggered with playing dynamics.
- Dynamic: Phaser where the Depth is controlled using playing dynamics.
Tap tempo
To set the modulation speed during a live performance:
- Press and hold the Foot Switch for 3 seconds until the LED flashes blue.
- Tap the Foot Switch at least two times to set the desired modulation speed.
- The function will time out after 4 seconds of inactivity.
- To exit, press and hold the Foot Switch for 3 seconds until the LED stops flashing.
Performance accessories
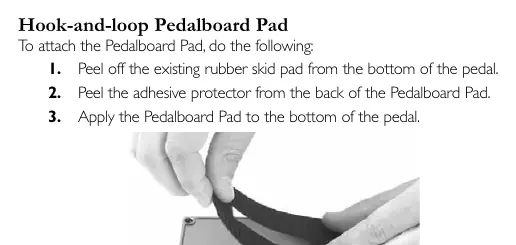
- Hook-and-loop Pedalboard Pad: Attach to the bottom of the pedal after removing the rubber skid pad.
- Foot Switch Glow Sticker: Apply to the top of the foot switch for visibility on dark stages.
- StompLock: Push over the knobs to secure your preferred settings.
Battery operation
To replace the battery:
- Use the tip of a 1/4 inch guitar cable to push in the release pins on either side of the foot switch.
- Remove the foot switch from the chassis.
- Disconnect the old battery and connect a new 9V alkaline battery.
- Ensure the battery cable does not interfere with the spring or switch arm.
- Reattach the foot switch by aligning it with the pins.
Specifications
- Input Impedance: >1 MΩ (stereo), >500 kΩ (mono)
- Output Impedance: 1 kΩ
- Power Supply: 9V Alkaline battery or Harman power supply (e.g., PS200R)
- Current Draw: 75 mA (typical at 9 VDC)
- Dimensions: 5.25 inch (L) x 3.5 inch (W) x 2.15 inch (H)
- Weight: 1.3 lbs
Practical help
Common problems
LED brightness changes or pedal won't switch from Bypass to Effect
The battery is low. Replace with a new 9V alkaline battery or use a power adapter.
Tap Tempo mode not activating
Ensure you hold the Foot Switch for a full 3 seconds until the LED begins flashing blue.
Pedal not powering on
Ensure a cable is connected to Input 1 (Mono), as this activates the battery power.
Before use
- Use only unbalanced mono instrument cables.
- If using a single amplifier, connect to Input 1 (Mono) and Output 1 (Mono).
- If using an effects loop, set the amp's mix control to 100% full wet.
- Ensure the power supply matches your local mains line voltage.
- Remove the rubber skid pad before applying the hook-and-loop pedalboard pad.
Specs in practice
- Input Impedance
- Affects signal integrity; >1 MΩ for stereo, >500 kΩ for mono.
- Current Draw
- 75 mA typical at 9 VDC; ensures you use a power supply capable of handling this load.
- Power Supply Polarity
- Center negative polarity is required for the power adapter.
Images and diagrams
- Pedal Interface: Identifies the location of the four control knobs (Speed, Depth, Modify, Type) and the input/output jacks.
- Battery Replacement: Shows the internal components and the release pins used to open the pedal chassis.
Model compatibility
- Requires Class II power adapter conforming to EN60065, EN60742, or equivalent.
- Compatible with PS200R or PS0913DC series power supplies depending on region.

Manual page author
Michael Turner
Technical manual editor
Reviews PDF manuals for structure, safety notes, and practical product details so readers can find the right information quickly.