Home / Window Treatments
Installation Instructions for SelectBlinds 2-Inch Classic Wood Blinds
A comprehensive installation guide for SelectBlinds 2-Inch Classic Wood blinds. Includes tools required, bracket placement, assembly steps, and operating instructions.
Quick answers from the manual
Quick answer
- This guide provides installation steps for SelectBlinds 2-Inch Classic Wood blinds, including bracket mounting, valance and wand assembly, and operation. p. 1
Key actions
- Mount brackets p. 1
- Attach valance p. 1
- Assemble wand p. 1
First start
- Raise or lower the blind by lifting or lowering the bottom rail. Turn the wand to open or close the slats. p. 1
Technical specifications
| Parameter | Value | Meaning | Pages |
|---|---|---|---|
| Height tolerance | +6 inches to +10 inches | Blinds may be longer than ordered; this is normal. | p. 1 |
Where to find it in the PDF
- Installation and Operation p. 1
Table of contents
Manual images
Click an image to enlargeQuick Guide for Installation
This document provides instructions for installing SelectBlinds 2-Inch Classic Wood blinds. Ensure you have the necessary tools and verify all parts are present before beginning. Note that the product may be manufactured with additional height, which is normal.
Tools Required
- Rechargeable drill with 1/4 inch hex bit
- Phillips screwdriver
- Pencil
- Tape measure
Unpacking and Parts
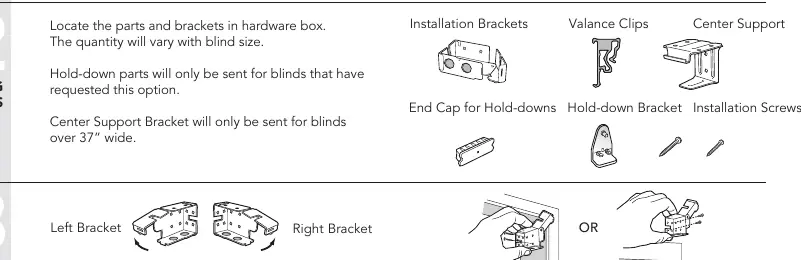
Locate the parts and brackets in the hardware box. Note that quantities vary by blind size. Specific parts include:
- Installation Brackets
- Valance Clips
- Center Support (only for blinds over 37 inches wide)
- End Caps for Hold-downs
- Hold-down Brackets (only if requested)
- Installation Screws
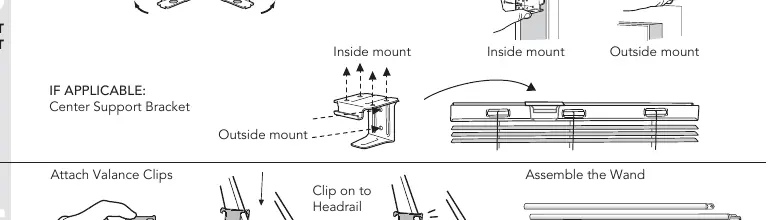
Bracket Placement
Determine if you are performing an inside mount or an outside mount. Secure the left and right brackets accordingly. If your blind is over 37 inches wide, install the Center Support Bracket.
Assembly and Installation
Valance Clips and Wand: Attach the valance clips to the headrail. Assemble the wand by snapping the parts together.
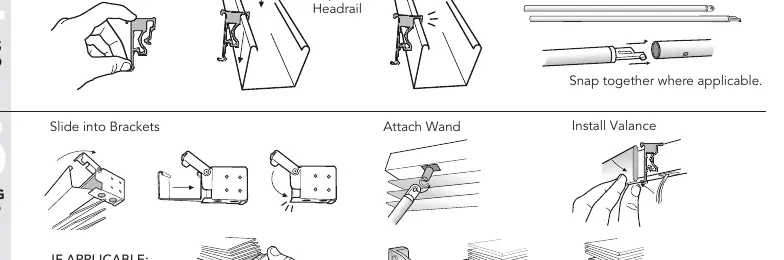
Finishing Up: Slide the blind into the brackets. Attach the wand to the mechanism. Install the valance onto the clips. If applicable, attach the hold-down brackets.
Operating Instructions
To raise or lower the blind, lift or lower the bottom rail to the desired height. To open or close the slats, turn the wand until the desired amount of light is achieved.
Note on Height: This product is manufactured with up to 6 inches of additional height. Blinds over 84 inches may include up to 10 inches of additional height. This is normal and not a manufacturing defect.
Practical help
Common problems
Blind height is longer than ordered
This is normal for this product (+6 inches or +10 inches for blinds over 84 inches) and is not a manufacturing defect.
Before use
- Rechargeable drill with 1/4 inch hex bit
- Phillips screwdriver
- Tape measure
- Verify all parts (brackets, valance clips, wand) are present
Specs in practice
- Height variance
- Blinds may be up to 6 inches longer than ordered; blinds over 84 inches may be up to 10 inches longer.
Images and diagrams
- Bracket placement shows both inside and outside mount options.
- Valance clip attachment shows clipping onto the headrail.
- Finishing steps show sliding the blind into brackets and attaching the wand.
Model compatibility
- Center Support Bracket is only included for blinds over 37 inches wide.
- Hold-down parts are only included if requested.

Manual page author
David Miller
Documentation analyst
Organizes user manual content into clear summaries, with attention to model details, product context, and everyday usability.