Home / Window Treatments
Installation Guide for allen + roth Drapery Rod Set
Quick installation guide for the allen + roth Drapery Rod Set. Includes step-by-step mounting instructions, troubleshooting tips, and maintenance advice.
Table of contents
Manual images
Click an image to enlargeQuick guide from the manual
This drapery rod set is designed for a 30-minute assembly. Before starting, ensure you have all parts and the necessary tools: a drill with a 1/4-inch bit, a tape measure, a level, a screwdriver, and a ladder. For wider windows, it is recommended to have a second person assist with the installation.
Package contents
- 3 Rods (A)
- 2 Brackets (B)
- 1 Center Bracket (CC)
- Hardware: 6 screws (AA), 6 anchors (BB)
Installation
- Remove rods: Take the rods out of the brackets.
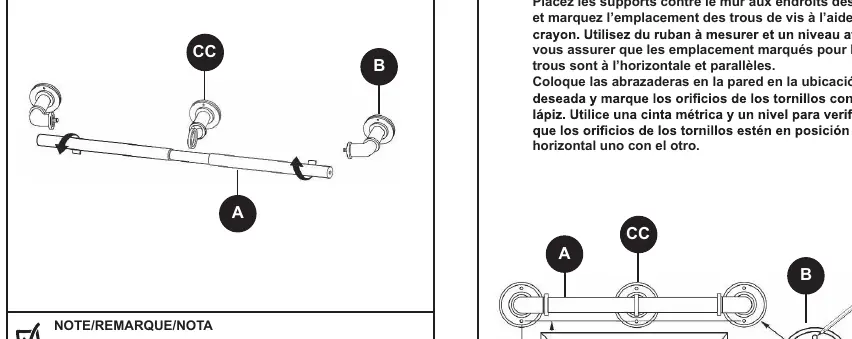
- Mark locations: Place brackets against the wall. Use a tape measure and level to ensure the screw holes are horizontal and parallel. Mark the holes with a pencil.
- Drill and anchor: For drywall or paneling, drill pilot holes using a 1/4-inch bit. Insert anchors (BB) into the holes. Secure the brackets using screws (AA). Note: If mounting to wood or studs, anchors are not required.
- Assemble rods: Repeat the mounting process for the center and left brackets. Slide the telescoping rod through the center bracket.
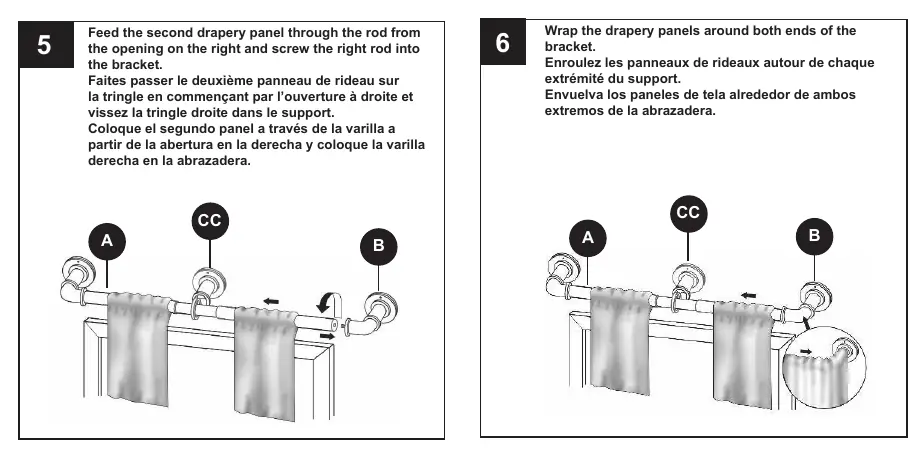
- Add panels: Feed the drapery panels through the rod from the openings on the left and right. Screw the rods into the brackets.
- Finish: Wrap the drapery panels around both ends of the bracket for a clean look.
Troubleshooting
- Rod not level: Ensure brackets are installed horizontally using a level.
- Rod is loose: Ensure hooks are anchored correctly to wall studs. If not possible, use the provided anchors and screws.
Care and maintenance
Clean the rod with a soft cloth. Do not use abrasive cleaning agents, solvents, or polishes, as these may damage the finish.
Practical help
Common problems
Drapery rod not level
Ensure brackets are installed horizontally using a level.
Drapery rod is loose
Ensure hooks are anchored correctly to wall studs. If not possible, use the provided anchors and screws.
Before use
- Check all parts against package contents list.
- Gather required tools: drill, 1/4 in. drill bit, tape measure, level, screwdriver, ladder.
- Ensure you have a helper for wider windows.
- Verify if mounting surface is wood/studs (no anchors needed) or drywall (anchors required).
Specs in practice
- Estimated Assembly Time
- 30 minutes.
- Drill bit size
- 1/4 inch for pilot holes.
Images and diagrams
- Step 1: Remove rods from brackets.
- Step 2: Mark screw holes using a level.
- Step 3: Drill pilot holes and install anchors.
- Step 4: Secure brackets and slide rod.
- Step 5: Feed drapery panels.
Model compatibility
- Anchors (BB) are not required for mounting to wood or studs.

Manual page author
Michael Turner
Technical manual editor
Reviews PDF manuals for structure, safety notes, and practical product details so readers can find the right information quickly.