Electronics / Networking
User Manual for DrayTek VigorAP 1060C Access Point
Quick start guide for the DrayTek VigorAP 1060C 802.11ax ceiling-mount access point. Includes installation instructions for wooden, plasterboard, and suspended ceilings, wall mounting, web configuration, and technical specifications.
Table of contents
Manual images
Click an image to enlargeQuick guide from the manual
The DrayTek VigorAP 1060C is an 802.11ax ceiling-mount access point designed for professional networking environments. This guide provides essential steps for physical installation, initial configuration, and system management. Ensure you have all components from the package before beginning installation. The device can be powered via a 12V power adapter or PoE (Power over Ethernet).
Package contents
- VigorAP 1060C Main Unit
- Mount Base (for wall mounting)
- Ceiling Mount Base (for 9/16" and 15/16" T-Rails)
- Screw Set (for wall and ceiling mounting)
- RJ-45 Ethernet Cable
- Quick Start Guide
Panel explanation
The device features the following interfaces:
- LEDs: Indicate system status (boot-loader, TFTP mode, ready).
- Ethernet Port: Connects to LAN or router; supports PoE and Gigabit (2.5Gbps).
- Power Jack: 12V 2.5A input.
- Factory Reset: Use a paperclip to press and hold for 5 seconds to restore factory defaults.
- Security Hole: For anti-theft lock installation.
Installation
The VigorAP 1060C supports multiple mounting scenarios:
Wooden ceiling
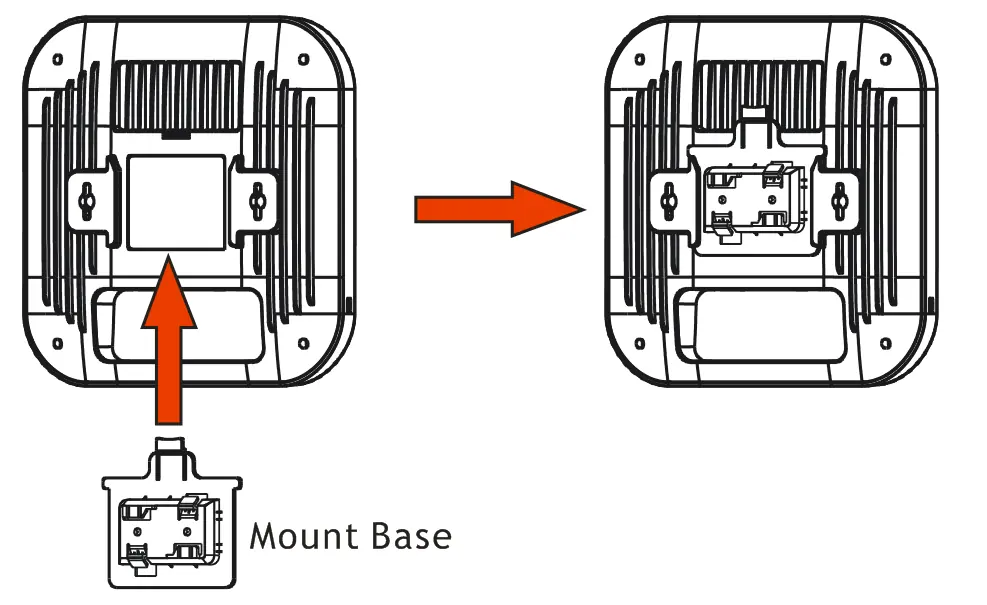
Mark the location for two holes, drill them, and hammer in the bolts. Fasten the mount base to the ceiling with screws, then slide the AP into the mount base slot.
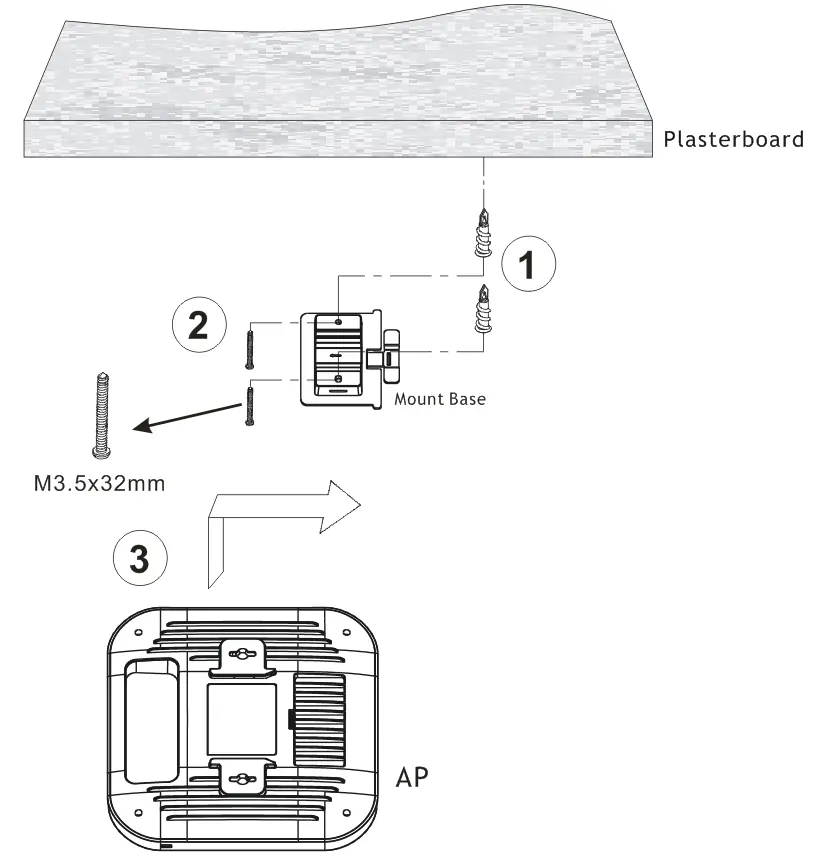
Plasterboard ceiling
Insert two turnbuckles into the plasterboard. Attach the mount base using the screws provided, ensuring they pass through the base into the turnbuckles for a secure hold. Slide the AP into the mount base.
Suspended ceiling (Lightweight steel frame)
Slide the mount base into the AP slot. Hold the AP against the T-Rail ceiling frame, rotate, and hook the stationary end of the mount base onto the T-Rail.
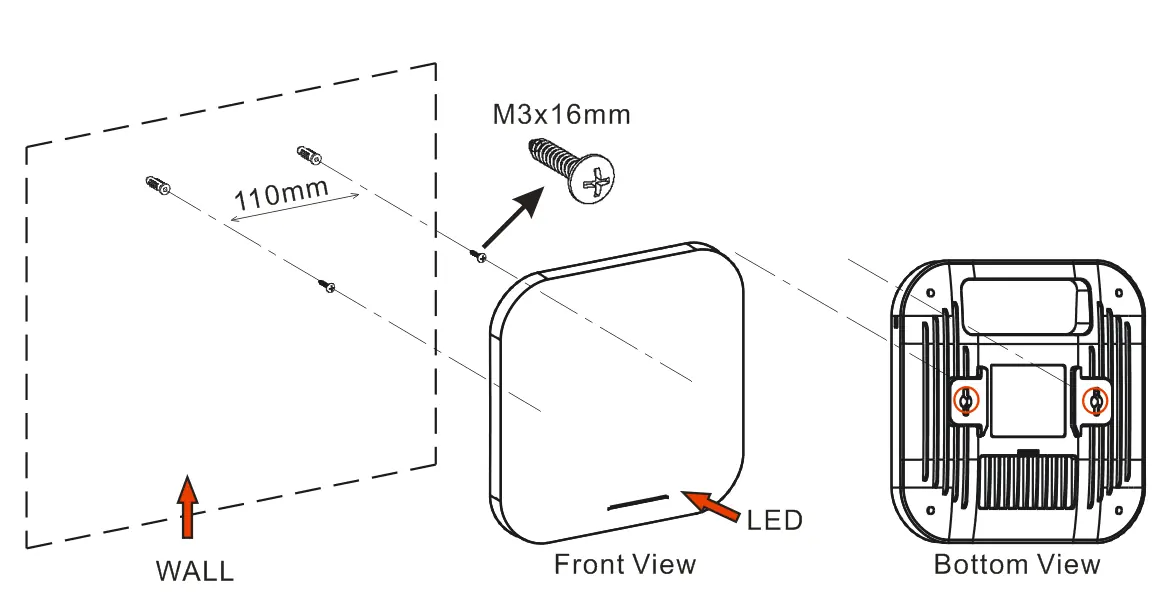
Wall-mounted
Drill two holes (recommended 6.5mm diameter) and insert anchors. Screw the anchors until flush with the wall, then mount the AP using the keyhole slots on the underside.
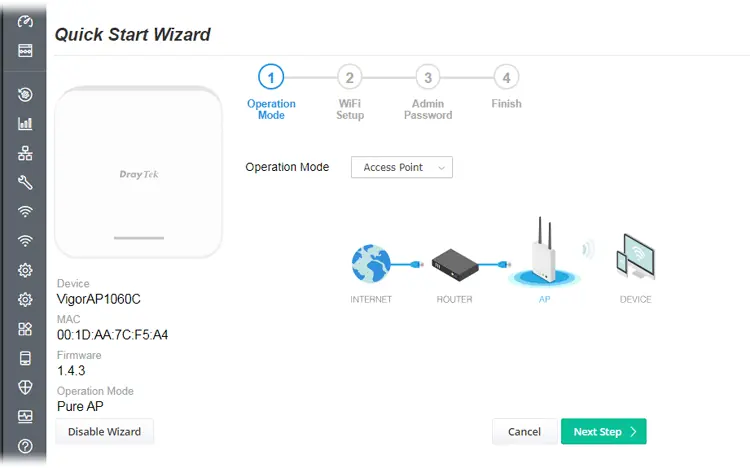
Connection and configuration
The device can be configured in several ways:
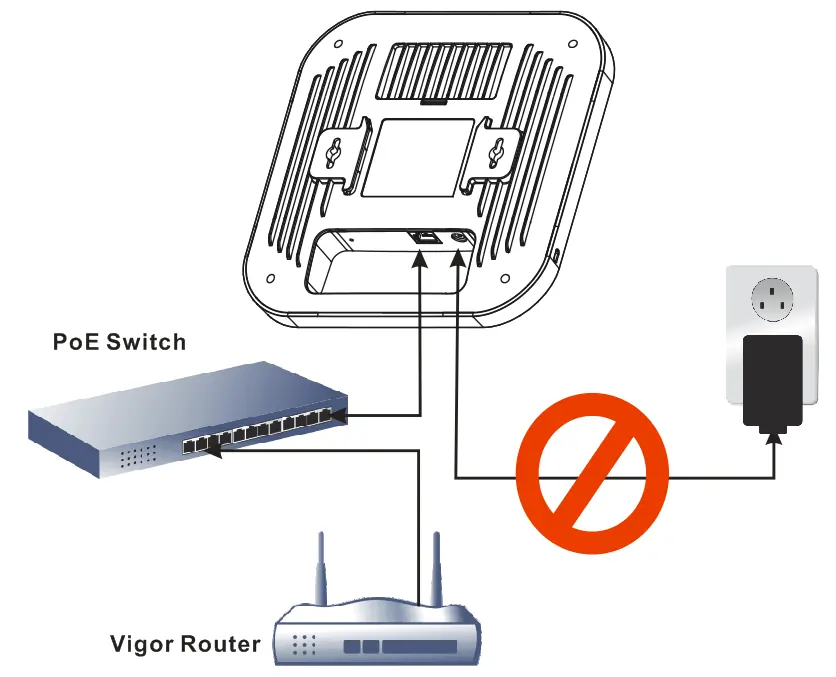
- AP Management: Connect the VigorAP to a PoE switch connected to a compatible Vigor router (e.g., Vigor2865 or Vigor2927). Access the router's web interface (Central Management > AP > Status) to manage the AP.
- Web Configuration: Connect via a web browser. If no DHCP server is present, the default IP is 192.168.1.2. Use the default credentials (admin/admin) to log in.
- Mesh Node: Configure the AP as a mesh node via a remote Mesh Root (e.g., VigorAP 903).
Technical specifications
- Power Input: 12V 2.5A or PoE 54V 0.6A
- Total Rated Power Consumption: 21 Watts
- Frequency Bands: 2.4GHz and 5GHz WLAN
Safety and support
Do not attempt to repair the device yourself. Keep the device in a sheltered area (0 to +40 Celsius). For technical support, contact [email protected] or register your device at https://myvigor.draytek.com.
Official resources from the manual
Manufacturer information
DrayTek Corporation
Practical help
Common problems
Device not working correctly
Contact your dealer or DrayTek support immediately.
Forgotten password or configuration issues
Perform a factory reset by inserting a paperclip into the Factory Reset hole and holding for 5 seconds.
Cannot access web interface
If no DHCP server is available, the device defaults to 192.168.1.2. Ensure your computer is in the same subnet.
Before use
- Verify all package contents are present and undamaged.
- Ensure you have a PoE switch or a 12V power adapter.
- Identify the mounting surface (wood, plasterboard, or T-rail).
- Have a web browser ready for initial configuration.
- Check that your router supports AP management if using that feature.
Specs in practice
- Power Consumption
- The device consumes 21 Watts during operation.
- Ethernet Port
- Supports Gigabit speeds up to 2.5Gbps and PoE power.
Images and diagrams
- Panel layout: Identifies the Ethernet port, Power jack, and Factory Reset hole.
- Installation diagrams: Show specific mounting steps for wood, plasterboard, and T-rail ceilings.
- Connection diagram: Illustrates the correct setup using a PoE switch and Vigor router.
Model compatibility
- Compatible with Vigor routers supporting AP management (e.g., Vigor2865, Vigor2927).
- 5.15-5.35GHz band is restricted to indoor use only.

Manual page author
David Miller
Documentation analyst
Organizes user manual content into clear summaries, with attention to model details, product context, and everyday usability.