Electronics / Networking
Quick Start Guide for Arris X6042 Mesh Extender
Get started with your Arris X6042 Mesh Extender. This guide covers installation, LED status indicators, wired and wireless setup, and connecting your devices.
Table of contents
Manual images
Click an image to enlargeQuick guide from the manual
This guide provides instructions for setting up the Arris X6042 Mesh Extender. The package includes the Mesh Extender, a power supply, and an Ethernet cable. Ensure the device is placed indoors, away from water, direct sunlight, and heat sources. Do not place the device on soft furnishings or carpets.
LED Status Indicators
The LED on the front of the device indicates the status of the connection:
- Power: Fast blinking green (Starting up), Slow blinking green (Up, not connected to network).
- Wired: Solid green (Fast network speed), Solid yellow (Limited network speed), Solid red (Slow network speed).
- WPS: Blinking yellow (Process ongoing), Fast blinking green for 10 seconds (Pairing successful), Fast blinking red for 10 seconds (Pairing unsuccessful).
- Wireless: Solid green (Good position), Solid yellow (Far from router/gateway), Solid red (Too far from router/gateway).
Installation
Wired Connection (Non-HomeAssure)
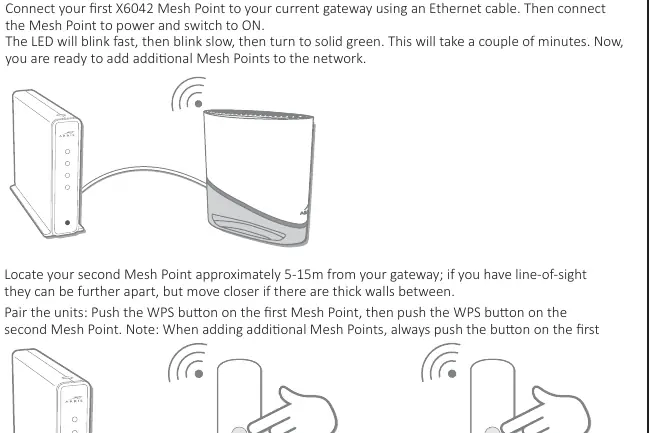
- Connect the first X6042 Mesh Point to your gateway using an Ethernet cable.
- Connect the Mesh Point to power and switch it ON. Wait for the LED to turn solid green.
- To add additional Mesh Points, push the WPS button on the first Mesh Point, then push the WPS button on the new Mesh Point.
- The LED on the new Mesh Point will flash green quickly when pairing is successful.
HomeAssure Enabled Connection
- Place the first X6042 Mesh Point 5-15m from your gateway. If there are thick walls, move it closer.
- Connect the Mesh Point to power and switch it ON.
- Pair the gateway and the Mesh Point by pushing the WPS button on the gateway, then the WPS button on the Mesh Point.
- The LED will flash green quickly when paired successfully.
- To add more Mesh Points, repeat the process by pushing the WPS button on the existing Mesh Point first, then the new one.
Connecting Clients
You can connect your devices to the network using two methods:
- Wi-Fi Credentials: Use the Wi-Fi name (SSID) and password printed on the label on the Mesh Point.
- WPS: Use the WPS button on the front of the Mesh Point and the WPS Push-button configuration (PBC) functionality on your device.
Safety and Compliance
This device is for indoor use only. It must be installed with at least 20-22 cm of separation between the radiator and your body. Do not use the device in environments exceeding 40°C (104°F). Use only the provided power supply.
Practical help
Common problems
LED is solid red (Wireless)
The extender is too far from the router/gateway. Move it closer.
WPS pairing unsuccessful
The LED will fast blink red for 10 seconds. Ensure you are pressing the buttons on the correct units in the correct order.
Power LED is slow blinking green
The device is powered on but not connected to the network.
Before use
- Ensure the device is placed 5-15m from the gateway.
- Do not place the device on soft furnishings or carpets.
- Use only the provided power supply.
- Ensure the device is kept away from water and heat sources.
- Verify the device is for indoor use only.
Specs in practice
- Operating Temperature
- Maximum 40°C (104°F)
- Placement Distance
- 5-15m from gateway for optimal pairing
Images and diagrams
- Front View: Shows the LED indicator location.
- Rear View: Shows the Power socket, Ethernet ports, and WPS button.
Model compatibility
- Compatible with HomeAssure enabled gateways.
- Indoor use only.
- Not for use on oil platforms, cars, trains, or boats.

Manual page author
Emily Carter
User documentation editor
Prepares concise manual descriptions and highlights the most useful setup, operation, and maintenance information for readers.