Home Appliances / Range Hoods
Drija Rectángulo 76/90 Black Range Hood User Manual
User manual for the Drija Rectángulo 76/90 Black wall-mounted range hood, covering installation, operation, maintenance, and troubleshooting.
Table of contents
Manual images
Jump to the sectionProduct Overview
The Drija Rectángulo 76/90 Black is a wall-mounted range hood designed for domestic use. It features a touch control panel with an LED display, offering three speed settings and a timer function. The unit is designed to extract grease, fumes, and odors from the kitchen environment.
Safety Instructions
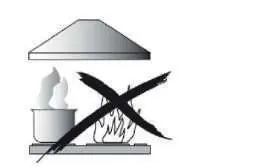
Important: Always disconnect the power supply before installation, maintenance, or bulb replacement. Do not use the range hood without grease filters or if they are excessively greasy. Never leave frying pans unattended, as overheated fats can catch fire. Do not flambé under the hood. Ensure a minimum distance of 76 cm between the cooking surface and the hood when installed above a gas appliance. The unit must be installed by a qualified professional.
Installation
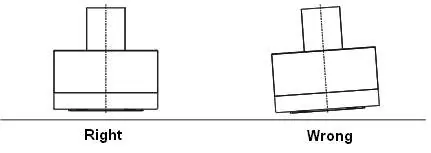
The range hood should be installed 65-75 cm above the cooking surface. Ensure the exhaust duct is short, straight, and has no bends sharper than 90 degrees. The ducting must be fire-retardant and comply with local standards. The unit must be level after installation to prevent grease accumulation.

Operation
The touch control panel includes four buttons: Power, Speed, Timer, and Lamp. Pressing the Power button activates the motor at low speed (level 1). The Speed button cycles through low, medium, and high speeds. The Timer function, when activated, runs for one hour before automatically turning off the hood and light.
Maintenance and Cleaning
Regular cleaning is essential for performance and safety. Clean stainless steel surfaces with a soft cloth, following the grain to avoid scratches. Grease mesh filters should be soaked in warm water with mild detergent for about 3 minutes and brushed gently. Carbon filters should be replaced periodically if the unit is used in recirculation mode. Use only neutral detergents; avoid harsh chemicals or abrasives.

Troubleshooting
If the motor does not work, check the fan switch position or contact a service center. If the unit has insufficient suction, ensure the installation height is correct. For oil leakage, check the seals on the one-way valve and chimney connections. Always disconnect power before attempting any repairs.
Practical help
Common problems
Motor does not work while light is on
Check if the fan switch is in the off position. If the switch or motor is faulty, contact a service center.
Oil leakage
Ensure the one-way valve and outlet are tightly sealed. Check chimney and cover connections for leaks and reseal if necessary.
Insufficient suction
Verify that the distance between the hood and the cooking surface is within the recommended 65-75 cm range.
Hood is tilted
Tighten the hanging screws to ensure the unit is perfectly horizontal.
Before use
- Ensure the power supply is disconnected before any installation or maintenance.
- Verify that the installation height is 65-75 cm above the cooking surface.
- Check that the exhaust duct is short, straight, and not restricted.
- Ensure all screws and fixing devices are installed according to the manual.
- Confirm that the grease filters are properly installed.
- Use a surge protector to maintain the warranty.
Specs in practice
- Minimum Distance (Gas)
- 76 cm from the cooktop to the bottom of the hood.
- Duct Diameter
- 150 mm interior diameter for extraction duct.
Images and diagrams
- Pic 1: Recommended installation height (65-75 cm).
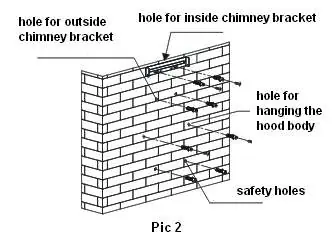
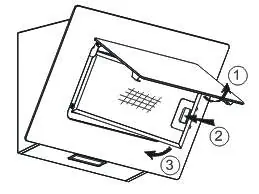
- Pic 2: Drilling template for wall mounting brackets and safety holes.
- Pic 3: V-flap and expansion pipe installation.
- Pic 6: Final assembly of chimneys and ducting.
- Control Panel: Layout of Power, Speed, Timer, and Lamp touch buttons.
Model compatibility
- Not for use with high-level grills.
- Must be installed by a qualified electrician or competent person.
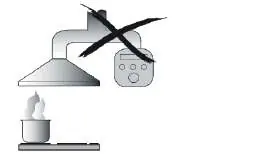
- Do not connect to existing ventilation systems used for other appliances (e.g., gas heaters).

Manual page author
David Miller
Documentation analyst
Organizes user manual content into clear summaries, with attention to model details, product context, and everyday usability.