Toys / RC Models & Drones
E-flite UMX Air Tractor Instruction Manual
Comprehensive user guide for the E-flite UMX Air Tractor. Includes transmitter setup, binding procedures, flight mode explanations, battery installation, center of gravity specifications, and troubleshooting steps.
Table of contents
Manual images
Click an image to enlargeQuick guide from the manual
The E-flite UMX Air Tractor is a sophisticated hobby aircraft. Before your first flight, ensure the transmitter is properly set up, the receiver is bound, and the control surfaces are centered. Always perform a control direction test before flying. The aircraft features SAFE Select and AS3X flight modes. Always hand launch in SAFE mode into the wind at 100% power.
Specifications
- Wingspan: 27.6" (702mm)
- Length: 17.8" (451mm)
- Weight: 4.9 oz (138g) without battery; 6 oz (169g) with recommended 3S 300mAh battery
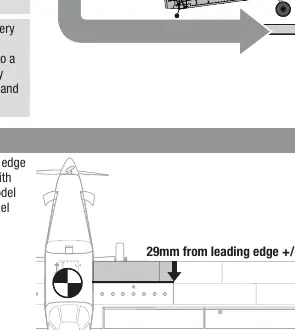
- Center of Gravity (CG): 29mm ± 2mm behind the leading edge of the wing
Transmitter Setup
The manual provides specific setup steps for Spektrum NX, DX, and iX series transmitters. Key settings include:
- Wing Type: 1 Ail 1 Flap
- Tail Type: Normal
- Dual Rates/Expo: Aileron and Elevator set to High (100%, 10% Expo) and Low (70%, 5% Expo)
- Flap System: Switch D (POS 0: -100%, POS 1: 0%, POS 2: 100%)
- Throttle Cut: Switch H, Position -100%
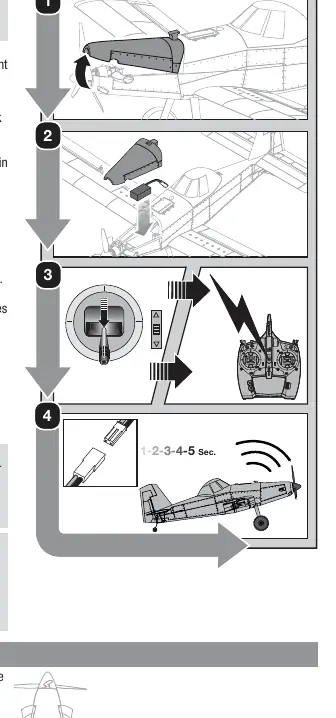
Binding Procedure
- Ensure the flight battery is disconnected and the transmitter is powered off.
- Place the aircraft on a level surface away from wind.
- Connect the flight battery; the receiver LED will flash rapidly.
- Put the transmitter into bind mode.
- After 5-10 seconds, the receiver LED will turn solid, indicating a successful bind.
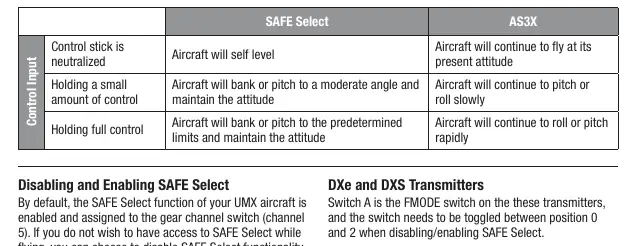
SAFE Select and AS3X Technology
The aircraft uses Channel 5 to switch between flight modes. Position 0 is SAFE mode (self-leveling), and Position 1 is AS3X only. When flying in SAFE mode, the aircraft will return to level flight when controls are neutral. Always return controls to neutral before switching from SAFE to AS3X mode.
ESC/Receiver Arming and Battery Installation
- Open the battery hatch by lifting from the front.
- Attach the battery to the hook and loop strip in the battery cavity.
- Power on the transmitter and enable throttle cut.
- Connect the battery to the ESC. Keep the aircraft immobile for 5 seconds to allow the AS3X system to initialize.
Control Direction Test
Always perform this test with throttle cut enabled:
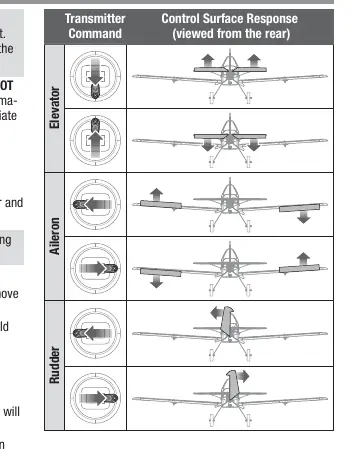
- Elevator: Pull stick back, elevator moves up. Push stick forward, elevator moves down.
- Ailerons: Move stick left, left aileron moves up. Move stick right, right aileron moves up.
- Rudder: Move stick left, rudder moves left. Move stick right, rudder moves right.
Maintenance and Repairs
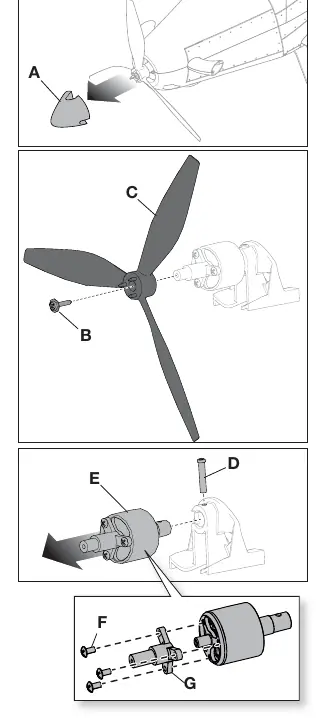
The propeller and spinner are glued together. To disassemble, gently rock the spinner to break the adhesive. Use a Phillips screwdriver to remove the propeller screw. When reassembling, ensure the two dimples in the propeller hub face forward.
Troubleshooting
If the aircraft does not respond to throttle, reset controls with the throttle stick and trim at the lowest setting. If the receiver LED flashes rapidly and will not bind, ensure the transmitter is not too close to the aircraft and that the bind switch is held long enough. If the aircraft flies inconsistently, ensure it was kept immobile for 5 seconds after plugging in the battery.
Manufacturer information
E-flite
Practical help
Common problems
Aircraft will not respond to throttle
Reset controls with throttle stick and throttle trim at lowest setting; check motor connection to receiver.
LED on receiver flashes rapidly and will not bind
Move transmitter further away from the aircraft; ensure bind switch is held long enough; check battery charge.
Controls oscillate in flight
Check for unbalanced propeller or loose propeller screw; rebalance or tighten as needed.
Reduced flight time
Ensure battery is fully charged; check if propeller is installed backwards; ensure battery is warm before use.
Before use
- Ensure transmitter is bound to the receiver.
- Verify battery is fully charged.
- Check that control surfaces are centered.
- Perform a control direction test.
- Enable throttle cut before approaching the aircraft.
- Ensure the aircraft is kept immobile for 5 seconds after connecting the battery.
Specs in practice
- Center of Gravity (CG)
- 29mm ± 2mm behind the leading edge of the wing; check with model inverted.
Images and diagrams
- Transmitter setup diagrams detail switch assignments for Aileron, Elevator, and Flaps.
- Binding procedure diagram illustrates the connection sequence.
- CG diagram shows the balance point relative to the wing leading edge.
- Service diagrams show propeller and motor disassembly steps.
Model compatibility
- Requires a full-range Spektrum DSM2/DSMX transmitter.
- Compatible with 3S 300mAh LiPo batteries.

Manual page author
David Miller
Documentation analyst
Organizes user manual content into clear summaries, with attention to model details, product context, and everyday usability.