Power / Batteries & Chargers
User Manual for ECO-WORTHY Battery Monitor
Quick guide for the ECO-WORTHY Battery Monitor. Learn how to wire the sensor, set up auto/manual modes, configure alarms, and troubleshoot common capacity measurement issues.
Quick answers from the manual
Quick answer
- The ECO-WORTHY Battery Monitor measures battery status (voltage, amperage, power, capacity) using a sensor ring. It supports auto-mode for easy setup and manual-mode for professional configuration. p. 1, 2
Key actions
- Wire the sensor ring correctly. p. 1, 2
- Zero the battery capacity. p. 2
First start
- Wire the sensor, discharge the battery to empty, zero the capacity, then charge to full. p. 2
Problems and fixes
Sensor direction issues
If current is negative when charging, turn the sensor ring front side back.
p. 2Maintenance and reset
- Reset to default settings using option 14DF. p. 1
Technical specifications
| Parameter | Value | Meaning | Pages |
|---|---|---|---|
| Test Voltage Range | 9-100V | Operating voltage range | p. 2 |
| Test Current Range | 0-150A | Maximum measurable current | p. 2 |
Where to find it in the PDF
- Product Introduction and Settings p. 1
- Operations and FAQ p. 2
Table of contents
Manual images
Click an image to enlargeQuick guide from the manual
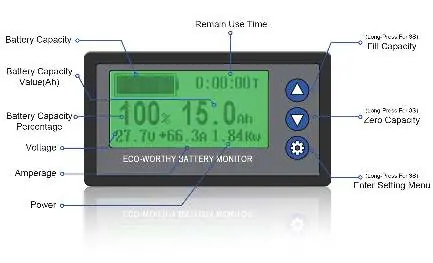
The ECO-WORTHY Battery Monitor is a professional coulomb meter designed to measure battery status, including voltage, amperage, power, real-time capacity, and remaining use time. It features two-direction current detection and auto-memory for capacity values.
- Wiring: All wires from the battery's positive or negative pole must pass through the sensor ring.
- Auto-mode: Recommended for most users. Requires wiring and a full discharge/charge cycle to calibrate.
- Manual-mode: For professionals requiring high accuracy; allows manual setting of battery capacity and full capacity voltage.
Wiring and Installation
To ensure accurate readings, the monitor must be installed correctly:
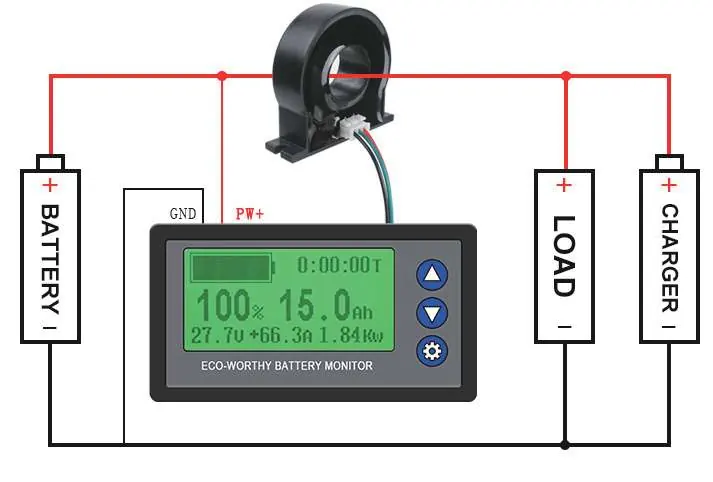
- Thread all wires from the battery's positive or negative pole through the sensor ring.
- Check the amperage on the monitor. It should be positive when charging and negative when discharging.
- If the monitor shows the opposite, turn the sensor ring front side back.
- Ensure both charge and discharge circuits go through the sensor.
Operations
Auto-mode (Suggested)
- Wire the sensor as described above.
- Discharge the battery until empty.
- Press the ▼ button for 3 seconds to zero the capacity.
- Charge the battery until full. The capacity should read 100%. If not, press the ▲ button for 3 seconds while the charger is attached to fill the capacity.
Manual-mode (Professional)
- Wire the sensor as described above.
- Press the ⚙ button for 3 seconds to enter the setting menu.
- Use ▼ or ▲ to navigate to 11CA (Battery Actual Capacity) and 12FV (Full Capacity Voltage).
- Press ⚙ to select, adjust values with ▼ or ▲, and press ⚙ to confirm.
- Charge the battery to full to complete the setup.
Settings Menu
There are 14 setting objects available. Access the menu by holding the ⚙ button for 3 seconds.
- 01ZV (Zero Capacity Voltage): Sets capacity to 0% when voltage is below this value.
- 02OV (Over Voltage Alarm): Triggers alarm when voltage exceeds this value.
- 03OC (Over Amperage Alarm): Triggers alarm when amperage exceeds this value.
- 04LV (Low Voltage Alarm): Triggers alarm when voltage drops below this value.
- 05LB (Low Capacity Alarm): Triggers alarm when capacity drops below this value.
- 06HT (High Temperature Alarm): Triggers alarm when temperature exceeds this value.
- 07VC/08CC/09CZ/10TC: Fine-tuning settings for voltage, amperage, and temperature.
- 11CA: Battery's actual capacity.
- 12FV: Full capacity voltage (for manual mode).
- 13LK: Menu lock (LOCK/UNLOCK).
- 14DF: Reset to default settings.
Precautions
- Do not expose the monitor to strong sunlight or extreme environments below -10°C (14°F).
- The monitor and sensor ring are strictly matched; do not change them.
- The monitor is covered by a 1-year warranty.
Manufacturer information
ECO-WORTHY
Practical help
Common problems
Capacity drops when discharging but does not rise when charging.
Ensure the main positive or negative wire is threaded through the sensor ring. Both charge and discharge circuits must pass through it.
Amperage is not 0 when the battery is empty.
Adjust the amperage manually using setting '09CZ' in the setting menu.
Monitor shows negative current when charging.
The sensor is wired in the wrong direction. Turn the sensor ring front side back.
Before use
- Thread all wires from the battery pole through the sensor ring.
- Verify positive current when charging and negative when discharging.
- Discharge battery to empty.
- Zero the capacity by holding the ▼ button for 3 seconds.
- Charge battery to full.
Specs in practice
- Test Voltage Range
- 9-100V
- Test Current Range
- 0-150A
Images and diagrams
- The wiring diagram shows the battery, load, and charger connected in a circuit where the main wire passes through the sensor ring.
- The sensor ring connects to the monitor unit via a small cable.
Model compatibility
- Compatible with Lead-acid, Lithium-iron, Lithium iron phosphate, and Ni-MH batteries.

Manual page author
Michael Turner
Technical manual editor
Reviews PDF manuals for structure, safety notes, and practical product details so readers can find the right information quickly.