Power / Solar Charge Controllers
Eco-Worthy Solar Power Controller User Manual
Quick guide for the Eco-Worthy Solar Power Controller. Learn how to connect your system, configure battery types, understand display settings, and troubleshoot common error codes.
Quick answers from the manual
Quick answer
- To connect the controller, always connect the battery first, then the solar module, and finally the consumer load. Reverse this order for disconnection. p. 1
Key actions
- Restart the controller p. 1
- Restore factory settings p. 1
First start
- Ensure battery voltage is sufficient for recognition and connect in the correct order (Battery -> Solar -> Load). p. 1
Problems and fixes
Solar panel not charging
Check wiring, ensure no reverse polarity, and verify PV voltage is higher than battery voltage.
p. 1Error codes
| Code | Meaning | Action | Pages |
|---|---|---|---|
| E01 | Battery low voltage warning | Output automatic disconnect; press button to ignore for one time. | p. 1 |
| E02 | Battery high voltage warning | Output automatic disconnect; press button to ignore for one time. | p. 1 |
| E03 | Output over current warning | If it does not resume within 60 seconds, it turns into E04. | p. 1 |
| E04 | Output short-circuit warning | Output automatic disable; will resume after 10 seconds. | p. 1 |
| E05 | High temperature warning | Controller enters stand-by mode until temperature falls to 70°C. | p. 1 |
| E06 | PV over-voltage warning | Charging automatic stop when PV voltage exceed 50V. | p. 1 |
Maintenance and reset
- Restart controller (F01) or Factory Reset (F02) using long key presses. p. 1
Technical specifications
| Parameter | Value | Meaning | Pages |
|---|---|---|---|
| System Voltage | 12V/24V auto, 48V | Operating voltage range | p. 1 |
| Max PV Input | <50V / <100V | Maximum solar panel voltage | p. 1 |
| Working Temp | -20~+60 ℃ | Operating temperature range | p. 1 |
Where to find it in the PDF
- Manual Overview p. 1
Table of contents
Manual images
Click an image to enlargeQuick guide from the manual
This controller is designed for solar power systems. The most critical step is the connection sequence: always connect the battery first to the regulator, followed by the solar module, and finally the consumer (load). When disconnecting, reverse this order to avoid damaging the controller.
Safety instructions
- Ensure your battery has sufficient voltage for the controller to recognize the battery type before the first installation.
- Keep battery cables as short as possible to minimize power loss.
- The regulator is compatible with lead-acid, lithium-ion, and LiFePO4 batteries.
- Only connect solar modules to the charge regulator; do not connect other charging sources.
System connection
Follow this sequence strictly to prevent damage:
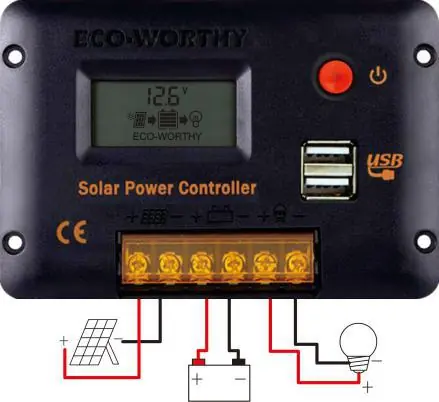
- Connect the battery to the charge regulator (plus and minus).
- Connect the solar module to the regulator (plus and minus).
- Connect the consumer to the charge regulator (plus and minus).
Key functions
- On/Off: When battery voltage is normal, click the key to turn the load on or off.
- Menu Access: Press and hold the key for 2 seconds to enter the menu.
- Adjusting Settings: In the menu, press and hold for 2 seconds until the number blinks, click to adjust, then press and hold again to save.
- Restart: Long press for more than 10 seconds until F01 appears.
- Factory Reset: Press and hold for more than 20 seconds until F02 appears.
Display settings and configuration
The controller features an LCD display for various parameters:
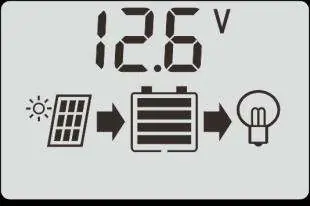
- System Voltage (NO.1): Default is 12V (u12v). Can be set to 24V (u24v).
- Battery Type (NO.2): Select from B01 (Lead-acid), B02 (Li-ion), B03 (LiFePO4), B04 (AGM), B05 (GEL), B06 (Flooded).
- Load Timer (NO.3): Options include 24H (always on), 0H (Dusk to Dawn), or 1-23H (timer after sunset).
- Output Mode (NO.14): Configure LC1-LC4 for different load behaviors based on sunrise/sunset.
Troubleshooting and error codes
If the controller displays an unusual code, refer to the following:
- E01: Battery low voltage warning.
- E02: Battery high voltage warning.
- E03: Output over-current warning.
- E04: Output short-circuit warning.
- E05: High temperature warning (exceeds 80°C).
- E06: PV over-voltage warning (exceeds 50V).
Technical specifications
- System Voltage: 12V/24V auto, 48V.
- Max PV Input:
- Rated Current: 10A, 20A, 30A.
- USB Output: 5V/2A.
- Working Temperature: -20°C to +60°C.
Manufacturer information
ECO-WORTHY
Practical help
Common problems
Controller not showing charging
Check if solar panel wires are connected correctly and there is no reverse polarity. Ensure PV voltage is higher than battery voltage.
Charging current is very small
Ensure sufficient sunlight and use more solar panels if needed. Check for shadows on the panel. If the battery is high, it may be in float charging mode.
Consumer is off during the day
Check if the working mode is set to D2D (Dusk to Dawn) or if the battery is in a low-voltage disconnect (LVD) state.
Battery drains quickly
The battery may be old or damaged. Perform a test: if voltage rises quickly during charge and drops quickly during discharge, the battery likely needs replacement.
Before use
- Ensure battery has enough voltage for recognition.
- Keep battery cables as short as possible.
- Verify battery type (Lead-acid, Li-ion, LiFePO4, etc.).
- Connect battery first, then solar panel, then load.
- Ensure PV voltage does not exceed 50V (for 12/24V systems).
Images and diagrams
- The wiring diagram shows the correct connection order: Solar Panel -> Controller -> Battery -> Consumer.
- The LCD display icons indicate the flow of power from the solar panel to the battery and then to the load.
Model compatibility
- Compatible with 12V/24V/48V systems.
- Suitable for lead-acid, lithium-ion, and LiFePO4 batteries.
- Not suitable for non-solar charging sources.

Manual page author
Michael Turner
Technical manual editor
Reviews PDF manuals for structure, safety notes, and practical product details so readers can find the right information quickly.