Lighting / Stage Lighting
User Manual for Elation Professional SIXBAR 1000 Lighting Fixture
Comprehensive user guide for the Elation Professional SIXBAR 1000 lighting fixture. Includes installation instructions, DMX setup, menu navigation, channel modes, and maintenance procedures.
Table of contents
Manual images
Click an image to enlargeQuick guide from the manual
The SIXBAR 1000 is a professional lighting fixture designed for indoor use. This manual provides essential information for safe installation, DMX configuration, and maintenance. Always ensure the fixture is properly grounded and kept away from moisture. For initial setup, ensure the unit is connected to a compatible power source and that all DMX cables are properly terminated.
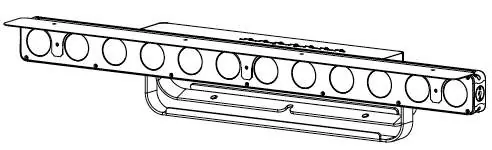
Fixture Overview
The rear panel of the fixture contains the following connections and controls:

- 3-pin and 5-pin DMX IN/OUT ports
- powerCON IN/OUT ports
- RJ45 NET IN/OUT ports
- LCD Menu Control Display
- Mode, Up, Down, and Enter buttons
Fixture Installation
Proper installation is critical for safety and performance.
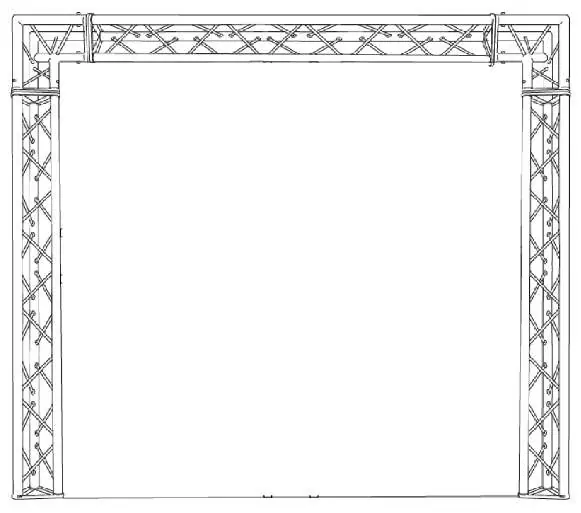
- Mounting: Use the integrated dual floor stand/rigging yokes. When mounting to a truss, secure with appropriately rated clamps using an M10 screw.
- Safety: Always use a secondary safety cable when installing in a suspended environment.
- Clearance: Allow approximately 6 inches (15cm) of space around the fixture for proper cooling.
- Power Linking: Do not exceed 6 units at 110V or 15 units at 240V.
DMX Setup
To ensure reliable data transmission:
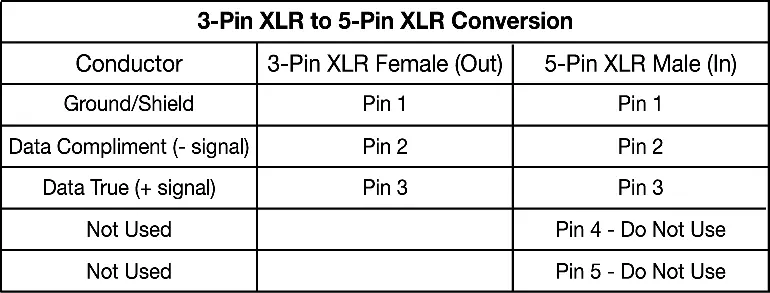
- Use a standard 3-pin or 5-pin XLR DMX cable.
- Always use a 120-ohm DMX terminator on the last fixture in the chain to prevent erratic behavior.
- Do not split DMX lines with Y-connectors unless using an approved DMX splitter.
- Set the starting DMX address via the control menu.
Fixture Menu and Operation
The LCD control panel allows for full configuration of the fixture.
- Accessing Menu: Press the MODE button to access the main menu. Use UP/DOWN to navigate and ENTER to select.
- Lockout: The display locks after 30 seconds of inactivity. Press and hold the MODE button for 10 seconds to unlock.
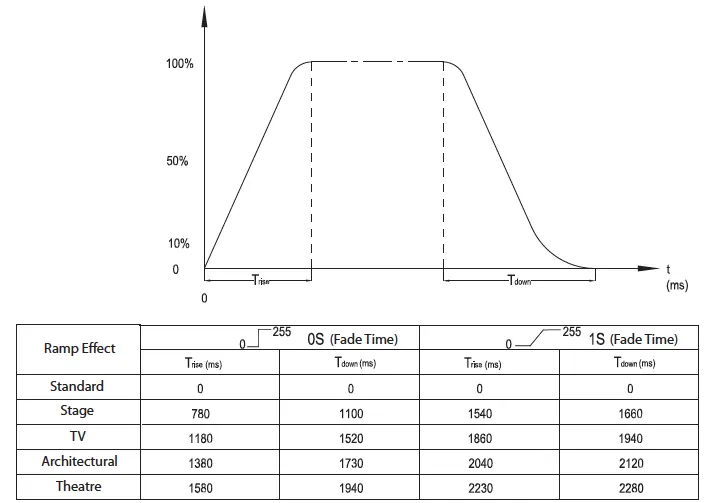
- Dimming Curves: Select from Standard, Stage, TV, Architectural, or Theatre curves.
- Pixel Flip: Adjusts the starting LED module and chase direction.
Cleaning and Maintenance
Regular maintenance ensures longevity and optimal light output.
- Cleaning: Clean the external lens surface at least every 20 days using a soft cloth. Do not use alcohol or solvents.
- Inspections: Perform a detailed electric check every three months. Ensure all screws and fasteners are tight.
- Warning: There are no user-serviceable parts inside. Do not attempt repairs yourself, as this voids the warranty.
Technical Specifications
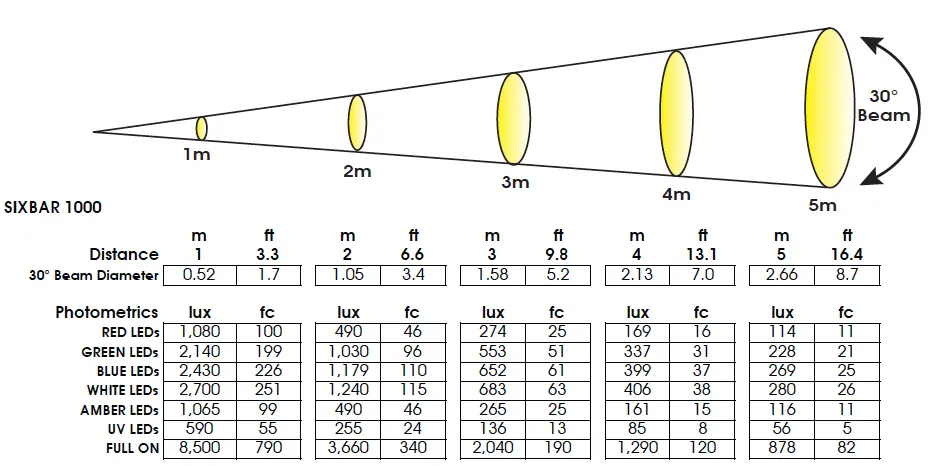
- Source: (12) 12W 6-in-1 RGBAW+UV LEDs.
- Beam Angle: 30 degrees.
- Power: AC 110-240V, 50/60Hz, 145W max consumption.
- Weight: 16.0 lbs (7.3 kg).
- Operating Temperature: 5°F to 113°F (-15°C to 45°C).
Practical help
Common problems
Fixture not receiving DMX signal
Check that the XLR cable is fully inserted, the controller is powered on, the cable is not defective, and a DMX terminator is installed on the last fixture.
LCD display is locked
Press and hold the MODE button for 10 seconds to unlock the display.
Light smoke or smell during initial operation
This is a normal process caused by excess paint burning off the interior casing; it will decrease over time.
Before use
- Inspect the shipping carton for damage.
- Verify all accessories (powerCON cable, frost filter, glare shield) are included.
- Ensure the installation surface can support 10 times the weight of the fixture.
- Confirm the power source is within the 110-240V range.
- Install a safety cable for all suspended installations.
Specs in practice
- Power Linking
- Maximum of 6 units at 110V or 15 units at 240V can be daisy-chained.
- Protection Class
- Class 1 device; must be properly grounded.
- Operating Temperature
- Fixture must operate between 5°F and 113°F (-15°C to 45°C).
Images and diagrams
- Fixture Overview: Identifies DMX ports, power ports, and menu buttons.
- DMX Terminator: Shows how to wire a 120-ohm resistor between pins 2 and 3.
- Pixel Flip: Illustrates how the LED module order changes based on the setting.
Model compatibility
- Compatible with ArtNet and Kling-NET protocols.
- Requires 3-pin or 5-pin XLR cables for DMX data.

Manual page author
Michael Turner
Technical manual editor
Reviews PDF manuals for structure, safety notes, and practical product details so readers can find the right information quickly.