Lighting / Stage Lighting
Quick Start Guide for Chroma-Q Color One 100X LED Par Fixture
Quick start guide for the Chroma-Q Color One 100X LED Par fixture. This guide covers installation, cabling, DMX control, standalone operation, menu settings, and safety precautions.
Table of contents
Quick Start Guide Overview
The Chroma-Q Color One 100X is an LED Par fixture featuring RGBA LEDs and a fully homogenized beam. It is designed for professional use and can operate as a standalone unit using the included IR Remote or be controlled via an external DMX console. The fixture is available in two versions: IP20 (chassis mount connectors) and IP65 (trailing leads).
Safety Information
- Professional Use Only: This product is not intended for domestic or outdoor use.
- Strobe Warning: The bright flash of light during power-up and continuous strobe effects may cause epileptic seizures.
- Safety Cable: Always use a safety cable when mounting the fixture.
Cabling and Connection
The connection method depends on the fixture version:
- IP20 Version: Equipped with chassis mount powerCon connectors for power input/through and chassis mount XLR 5-pin connectors for DMX input/through.
- IP65 Version: Equipped with trailing leads for both power and DMX input/through. The chassis is ground bonded.
Mounting
The fixture features a dual yoke system suitable for both floor mounting and overhead hanging applications. Always secure the fixture with a safety bond using the provision built into the enclosure.
Control and Menu Navigation
Control functions are accessed via the rear LCD display and four push buttons:
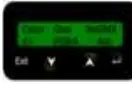
- Back Arrow (Enter): Stores the menu choice.
- Up Arrow: Increases the mode level or value.
- Down Arrow: Decreases the mode level or value.
- Exit: Returns to the previous menu.
Upon power-up, the software version is displayed, followed by the Main Menu, which shows the model name, DMX status, start address, control mode, and assigned DMX channels.
Standalone Operation and Look Store
The fixture includes 5 internal preset Looks for standalone operation. You can record and assign custom looks to these presets, which are preserved on power down. To create or edit a look, navigate to the Look Store menu, select a Look (1-5), use Enter to toggle between channels, and use the Up/Down arrows to adjust values. Press and hold Enter to save.
Technical Settings
The Technical menu allows for the following adjustments:
- Frequency: Select from 750, 1500, 3000, or 6000 Hz to synchronize the LED scan rate with video cameras and avoid flickering.
- ETC Compatible: Toggle On/Off to activate or deactivate ETC compatibility mode.
- Reset: Restores all control menu commands to factory defaults.
Troubleshooting and Support
If you experience difficulties, contact your selling dealer. For further factory service, contact [email protected]. Outside North America, call +44 (0)1494 446000. In North America, call +1 416-255-9494.
Practical help
Common problems
Flickering light on video camera
Adjust the Frequency setting in the Technical menu to 750, 1500, 3000, or 6000 Hz to match the camera scan rate.
No light output
Check the 'No DMX Present' setting in the menu; ensure it is not set to 'OFF'.
IR Remote not working
Ensure the fixture is set to 'IR Remote' mode in the 'No DMX Present' menu and point the remote directly at the fixture.
Before use
- Verify the fixture version (IP20 or IP65) to ensure correct cabling.
- Attach a safety cable to the fixture.
- Ensure the power source is compatible with the fixture requirements.
- Check that the DMX controller is connected via XLR 5-pin if using DMX control.
Images and diagrams
- The rear control panel features an LCD screen and four buttons: Back Arrow (Enter), Up Arrow, Down Arrow, and Exit.
Model compatibility
- The fixture supports ETC Compatible mode, which can be toggled in the Technical menu.

Manual page author
David Miller
Documentation analyst
Organizes user manual content into clear summaries, with attention to model details, product context, and everyday usability.