Lighting / Stage Lighting
User Manual for Flash 17R Beam IP65 Moving Head
Comprehensive user guide for the Flash 17R Beam IP65 moving head light. Includes installation instructions, safety warnings, DMX channel configurations, and technical specifications.
Quick answers from the manual
Quick answer
- The Flash 17R Beam IP65 is a professional moving head light. It requires secure mounting using two clamps and a safety cable. It operates on 100-240V AC and supports 16 or 20 DMX channel modes. p. 2, 3
Key actions
- Mounting the fixture p. 2, 3
- Connecting DMX p. 3, 14
First start
- Check for damage, verify voltage, mount securely, connect power and DMX. p. 2, 3
Problems and fixes
Base movement during pan
Securely fasten the base to a surface or rigging.
p. 2, 12Maintenance and reset
- Reset via DMX channel 16 (16CH mode) or 19 (20CH mode). p. 7, 11
Technical specifications
| Parameter | Value | Meaning | Pages |
|---|---|---|---|
| Power | 600W | Power consumption | p. 3, 13 |
| Weight | 30kg | Net weight | p. 3, 13 |
Where to find it in the PDF
- Safety Information p. 2, 12
- Product Information p. 3, 13
- DMX Channels p. 5, 6, 7, 8
Table of contents
Manual images
Click an image to enlargeQuick guide from the manual
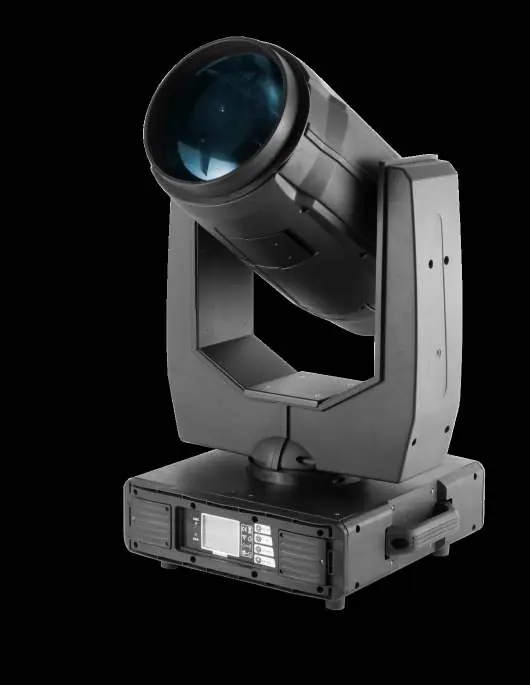
The Flash 17R Beam IP65 is a professional moving head light. For safe and trouble-free operation, ensure the device is securely mounted using two clamps and a safety cable. Always keep the device connected to power to prevent condensation buildup. The operating temperature range is -30°C to +50°C.
Product Overview
The 17R Beam IP65 features a 17R MSD light source, 540° pan range, and 210° tilt range. It includes an interchangeable color wheel with 14 colors + open, a GOBO wheel with 17 fixed gobos, a 2-facet rotating prism, and a frost filter.
Installation and Mounting
- Mounting: The unit must be mounted via screw holes on the bracket. Always ensure the structure can support 10 times the weight of the unit.
- Safety: Use two clamps to rig the fixture. Do not hang the fixture from only one clamp. Lock each clamp with both 1/4-turn fasteners (locked at 90° clockwise). Always use a safety cable capable of holding 12 times the unit's weight.
- Sunlight Warning: Position or shade the head so the front lens is not exposed to sunlight or strong light sources, as this can focus rays and create a fire hazard.
Connection
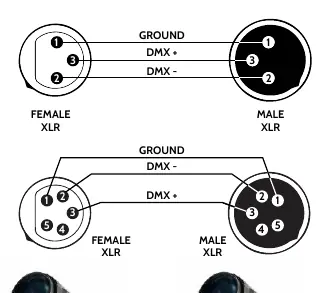
The device is equipped with DMX (in/out) via 3-pin XLR sockets and power input/output via powerCON connectors. Ensure the power grid supply parameters match the device requirements (100-240V AC, 50-60Hz).
DMX Channel Configuration
The fixture supports 16 and 20 DMX channel modes. These modes control pan, tilt, position speed, color wheel, strobe, dimmer, color, gobo, prism, focus, and reset functions.
Practical help
Common problems
Base moves when panning
Ensure the fixture is securely fastened to a surface or rigging hardware before applying power.
Condensation inside the unit
Keep the device connected to power to prevent condensation buildup.
Lamp is dark or voltage issues
Ensure voltage is within +/- 10% of requirements. Restart after 20 minutes of cooling if necessary.
Before use
- Check for transportation damage
- Verify power supply voltage and frequency
- Ensure secure mounting with 2 clamps
- Attach safety cable
- Check DMX signal termination
Specs in practice
- PAN 540° / TILT 210°
- Range of motion
Images and diagrams
- DMX wiring diagram shows pinout for XLR connectors (Ground, DMX+, DMX-)
- Daisy-chaining setup for DMX controllers
Model compatibility
- Requires 3-pin XLR DMX cables
- Requires powerCON power cables

Manual page author
Emily Carter
User documentation editor
Prepares concise manual descriptions and highlights the most useful setup, operation, and maintenance information for readers.