Electronics / Camera Accessories
Elgato Light Strip Pro User Guide
Quick start guide for the Elgato Light Strip Pro. Learn how to mount, cut, install the Control Center app, and set up your smart lighting.
Quick answers from the manual
Quick answer
- The Elgato Light Strip Pro is a smart LED strip controlled via the Elgato Control Center app. It can be cut to size at copper pads and mounted using adhesive or magnets. p. 2, 3
Key actions
- Cut the strip to size p. 2
- Mount the strip p. 2, 3
- Install and pair p. 3
First start
- Download the Control Center app, connect the strip to the controller and power, then follow the in-app pairing process. p. 3
Show 3 more answers Show less
Maintenance and reset
- Keep the lighting surface free from dirt and dust. If it becomes dirty, wipe it lightly with a soft cloth moistened with a little water and mild, neutral detergent. p. 3
Technical specifications
| Parameter | Value | Meaning | Pages |
|---|---|---|---|
| Total Length | 2000 mm | Maximum length of the light strip. | p. 2 |
| Controller Size | 88 x 39 x 19 mm | Physical dimensions of the controller unit. | p. 2 |
Where to find it in the PDF
- Regulatory Information p. 1
- Mounting Instructions p. 2, 3
- Installation and App Setup p. 3
Table of contents
Manual images
Click an image to enlargeQuick guide from the manual
The Elgato Light Strip Pro is a smart LED lighting solution controlled via the Elgato Control Center app. This guide covers the essential steps for mounting, customizing the length, and connecting the device to your network.
Mounting and Customization
The light strip can be adjusted to fit your specific application needs.
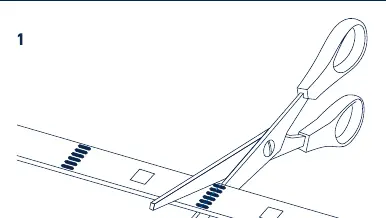
- Cutting: You can shorten the Light Strip Pro by using a pair of scissors to bisect the oval copper pads. Important: Always disconnect the light strip from power before cutting.
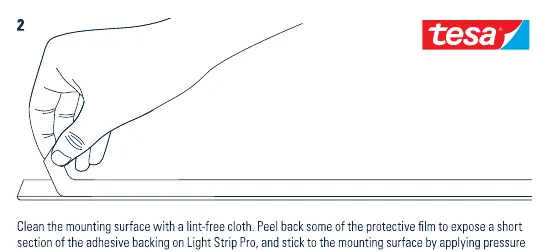
- Adhesive Mounting: Clean the mounting surface with a lint-free cloth. Peel back a section of the adhesive backing and press firmly onto the surface for 5 to 10 seconds. Continue peeling and pressing along the length of the strip.
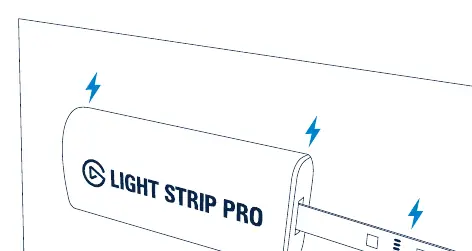
- Magnetic Mounting: The controller and the light strip are magnetic, allowing for glueless mounting on ferromagnetic metal surfaces.
Installation and Setup
Follow these steps to connect your Light Strip Pro:
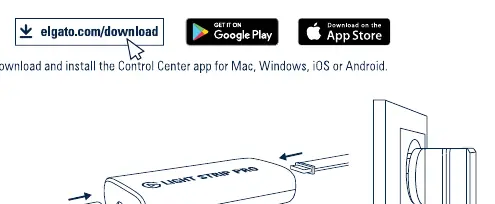
- Download App: Download and install the Elgato Control Center app for Mac, Windows, iOS, or Android from elgato.com/download.
- Connect: Connect the LED strip to the controller, then plug the controller into a power outlet. The light will engage pairing mode.
- Pairing: Launch the Control Center app and click the + icon to add the new accessory. Follow the in-app instructions to complete the setup.
- Wi-Fi Setup: If using a Mac, you can also use the Wi-Fi icon in the top right status menu to select the accessory and complete the setup via the Airport Utility process.
Safety Warnings
- The Light Strip Pro may become hot during prolonged use; handle with care.
- For indoor use only.
- Do not cover the product, especially the controller.
- Keep away from children.
- Do not leave in direct sunlight.
- Medical Warning: If you have an ICD or pacemaker, avoid close or prolonged contact with the magnets on the controller or strip.
Official resources from the manual
Manufacturer information
Elgato
Practical help
Common problems
Light strip is too long for the application area
Use a pair of scissors to cut the strip at the designated oval copper pads. Ensure the device is unplugged before cutting.
Cannot connect to Wi-Fi
Ensure you are using the Elgato Control Center app and follow the in-app pairing process. If on Mac, you can use the Airport Utility via the Wi-Fi status menu.
Before use
- Download the Elgato Control Center app.
- Ensure the mounting surface is clean and lint-free.
- Check for magnetic interference if you have an ICD or pacemaker.
- Disconnect from power before cutting the strip.
Show more Show less
Specs in practice
- Total Length
- 2000 mm (78.8 in).
- Controller Dimensions
- 88 x 39 x 19 mm.
Images and diagrams
- Cutting guide: Shows where to cut the strip on the copper pads.
- Magnetic mounting: Shows the controller attaching to metal surfaces.
- App setup: Shows the Control Center interface for adding the device.
Model compatibility
- Compatible with Mac, Windows, iOS, and Android via Control Center app.
- Magnetic mounting requires ferromagnetic metal surfaces.

Manual page author
David Miller
Documentation analyst