Electronics / Microphone Accessories
Elgato Prompter 20WAD9901 User Guide
Quick start guide and setup manual for the Elgato Prompter 20WAD9901. Learn how to connect your camera using various backplates, mount the device to a tripod, connect to your computer, and install the necessary software.
PDF source: polski · summary: English
Quick answers from the manual
Quick answer
- The Elgato Prompter connects to your camera via one of three included backplates (Ring, Facecam Pro, or Universal Shroud) and to your computer via a single USB-C cable for data and power. p. 2, 6
Key actions
- Attach the appropriate backplate to the Prompter using the 2 thumbscrews. p. 2, 3, 4
- Connect the USB-C cable to the Prompter and your computer. p. 6
First start
- Download and install Camera Hub from elgato.com/downloads to get necessary drivers and software. p. 6
Show 2 more answers Show less
Technical specifications
| Parameter | Value | Meaning | Pages |
|---|---|---|---|
| Rating | 5 VDC, 900 mA | Power input requirements | p. 1 |
| Operation Temperature | 0-60 °C | Safe operating temperature range | p. 1 |
Where to find it in the PDF
- Connecting Your Camera p. 2, 3, 4
- Mounting Elgato Prompter p. 5
- Accessorizing p. 6
- Software p. 6
Table of contents
Manual images
Click an image to enlargeQuick guide from the manual
The Elgato Prompter 20WAD9901 is a teleprompter designed for use with various cameras and webcams. To set it up, you must first attach the appropriate backplate for your camera, mount the Prompter to your tripod or support system, connect it to your computer via USB-C, and install the Camera Hub software.
Connecting your camera
Elgato Prompter includes interchangeable backplates to block surrounding light and prevent glare. Choose the backplate that matches your camera type.
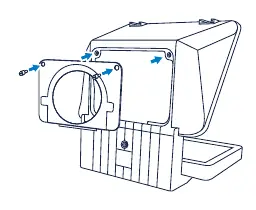
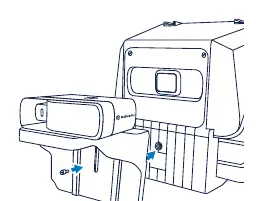
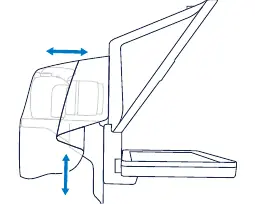
Ring backplate
Designed for larger DSLR/Mirrorless cameras or camcorders with threaded lenses. Do not use with motorized lenses.
- Seat the ring backplate into the back of Prompter and fasten with the 2 thumbscrews.
- Attach the appropriate step-up ring (included) to your camera lens threads (compatible with 49, 52, 55, 58, 62, 67, 72, 77, and 82 mm threads).
- Slide the Prompter onto the step-up ring until fully seated and secure.
Facecam Pro backplate
Designed specifically for use with Elgato Facecam Pro.
- Seat the Facecam Pro backplate into the back of Prompter and fasten with the 2 thumbscrews.
- Remove any existing monitor mount from the Facecam Pro.
- Attach the Facecam Pro to the camera L-bracket using the provided thumbscrew.
- Attach the camera L-bracket to the Prompter.
- Raise the L-bracket so the Facecam Pro is level with the backplate opening, push it forward to seat it, and tighten the thumbscrews.
Universal shroud backplate
For other cameras, camcorders, and webcams that do not fit the other backplates.
- Seat the universal shroud backplate into the back of Prompter and fasten with the 2 thumbscrews.
- Attach the camera to the L-bracket using the provided thumbscrew (requires 1/4" thread on the camera).
- Attach the L-bracket to the Prompter.
- Lift the shroud, center the camera lens in the Prompter opening, and tighten the L-bracket.
- Move the camera forward without touching the Prompter glass.
Mounting Elgato Prompter
Ensure your tripod or mounting device can support the weight of the Prompter and your camera.
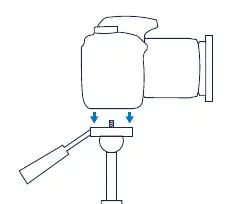
- Use the center 1/4" mount on the Prompter to screw it onto your tripod or mount.
- If using accessories, you may use the additional 1/4" mount located beneath the Prompter's display.
- If your ball head cannot support the weight, use the additional 1/4" mounts on the bottom of the Prompter with extra support accessories (e.g., Elgato Heavy Clamp and Flex Arm).
Accessorizing Elgato Prompter
The Prompter features 2 cold shoe mounts for accessories like lights, microphones, or field monitors. Note that adding accessories increases the weight and front-heaviness of the system; ensure your mount can handle the additional load.
Connecting to your computer
The Prompter connects to Mac or Windows computers using a single USB-C cable for both data and power.
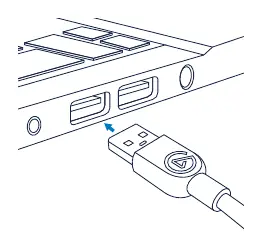
- Plug the right-angle USB-C plug into the Prompter, angled downward.
- Plug the other end into an available USB 3.0 port on your computer.
Software
Visit elgato.com/downloads to download the necessary software.
- Camera Hub: Required for DisplayLink drivers and software features (teleprompting software, Twitch Chat reading software).
- Android: Download the DisplayLink Presenter app from the Play Store.
Official resources from the manual
Manufacturer information
Elgato
Practical help
Common problems
Ball head cannot support the weight of the Prompter and camera.
Use the additional 1/4" mounts on the bottom of the Prompter to provide extra support, such as using an Elgato Heavy Clamp and Flex Arm.
Camera lens touches the Prompter glass.
Move the camera as far forward as possible without hitting the glass. Ensure the lens does not protrude when zooming.
Motorized lenses.
Do not use motorized lenses with the Ring backplate.
Before use
- Check your camera's lens cap to determine the thread size for the step-up ring.
- Ensure your tripod or mounting device can support the combined weight of the Prompter and your camera.
- Verify that your camera has a 1/4" thread if using the Universal Shroud backplate.
- Download and install Camera Hub from elgato.com/downloads.
- Ensure the ball head is fully tightened before docking the Prompter.
Show more Show less
Specs in practice
- Operation Temperature
- 0-60 °C (32-140 °F).
- Maximum Operation Height
- 200 cm (78.7 in).
Images and diagrams
- The manual provides detailed diagrams for connecting three different types of backplates: Ring, Facecam Pro, and Universal Shroud.
- Mounting diagrams illustrate how to attach the Prompter to a tripod using the center 1/4" mount.
- The USB-C connection diagram shows the correct orientation of the right-angle plug.
Model compatibility
- Ring backplate is compatible with 49, 52, 55, 58, 62, 67, 72, 77, and 82 mm lens threads.
- Universal Shroud backplate requires a 1/4" thread on the camera.
- Compatible with Mac and Windows computers via USB 3.0.
- Android support via DisplayLink Presenter app.

Manual page author
Emily Carter
User documentation editor