Power / Solar Accessories
EPEVER WiFi 2.4G Adapter User Manual
Quick guide for the EPEVER WiFi 2.4G Adapter. Learn how to connect, configure, and monitor your solar controller or inverter via the EPEVER cloud and mobile app.
Quick answers from the manual
Quick answer
- The EPEVER WiFi 2.4G Adapter enables remote monitoring of EPEVER solar controllers and inverters by transmitting operational data to the EPEVER cloud via a 2.4G WiFi network. p. 1
Key actions
- Connect the adapter to the device port (RJ45 or DB9). p. 1
- Configure WiFi settings via the mobile app. p. 2
First start
- Power on the device, connect to the 2.4G WiFi network via the app, and log in to the EPEVER Cloud. p. 2
Problems and fixes
Reset to factory settings
Press the Reset/Reload button with a sharp object while powered on until the indicator flashes twice.
p. 1Maintenance and reset
- Factory reset via the Reset/Reload button. p. 1
Where to find it in the PDF
- Overview and Appearance p. 1
- Operations and Specifications p. 2
Table of contents
Manual images
Click an image to enlargeQuick guide from the manual
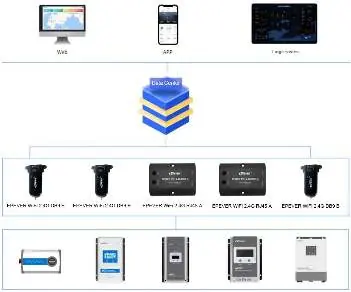
The EPEVER WiFi 2.4G Adapter is designed to transmit operational data from EPEVER solar controllers, inverters, or inverter/chargers to the EPEVER cloud server in real-time. This allows users to remotely monitor devices via the EPEVER server, mobile app, or a large screen. Note: The adapter requires a 2.4G WiFi network to function; it cannot upload data without a local 2.4G WiFi connection.
Product Overview
There are two versions of the adapter available:
- EPEVER WiFi 2.4G RJ45 A: Designed for devices with an RJ45 port.
- EPEVER WiFi 2.4G DB9 B: Designed for devices with a DB9 interface.
Both models feature a factory reset button and status indicators for Link and Power.
System connection
To connect the WiFi transmission terminal:
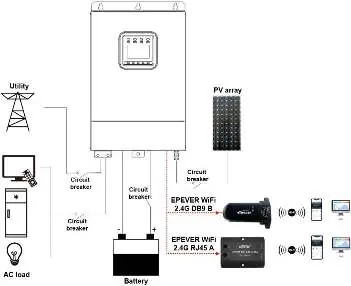
- Identify the correct port on your solar controller, inverter, or inverter/charger (RJ45 or DB9).
- Connect the WiFi adapter directly to the communication port of the device.
- The device is powered directly by the communication port.
Operations
To set up remote monitoring via the mobile app:
- Turn on the WiFi switch on your mobile phone and connect to a 2.4G WiFi network.
- Open the EPEVER app and click the EPEVER Cloud icon to enter the login page.
- Click the Wifi On Cloud icon to navigate to the network connection page.
- Connect the WiFi terminal to the 2.4G WiFi network by searching for hotspots or scanning the QR code.
- Input the WiFi password and click Write to connect.
- Once the connection shows 100%, click Confirm to return to the home page.
Indicator Status
The adapter provides visual feedback via indicators:
- Link Indicator: Solid green means connected to WiFi; OFF means not connected; Fast flashing green indicates reset to factory mode.
- Power Indicator: Solid green means normal power; OFF means not powered.
Factory Reset
If you need to restore factory settings:
- Ensure the terminal is powered on.
- Use a sharp object to press and hold the Reset/Reload button.
- The indicator light will flash twice quickly, confirming the factory settings are restored.
Specifications
- Input voltage: DC5V
- Communication method: RS485
- Working Frequency: 2.4~2.4835GHz
- Enclosure: IP54
- Environment temp: -40℃~ 85℃
Practical help
Common problems
Device not connecting to WiFi
Ensure you are using a 2.4G WiFi network (5G is not supported). Check that the signal is within the 30-meter range.
Need to reset to factory settings
Press the Reset/Reload button with a sharp object while the device is powered on until the indicator flashes twice.
Before use
- Verify your solar controller/inverter has an RJ45 or DB9 port.
- Ensure a 2.4G WiFi network is available.
- Download the EPEVER mobile app.
- Confirm the device is powered on.
Specs in practice
- Input voltage
- DC5V (powered by the communication port).
- Communication method
- RS485.
- Working Frequency
- 2.4~2.4835GHz.
Images and diagrams
- The system connection diagram illustrates the adapter connecting the solar controller/inverter to the cloud/mobile app via a 2.4G WiFi network.
Model compatibility
- RJ45 A model is for devices with RJ45 ports.
- DB9 B model is for devices with DB9 interfaces.

Manual page author
David Miller
Documentation analyst
Organizes user manual content into clear summaries, with attention to model details, product context, and everyday usability.