Electronics / Surveillance Monitors
User Manual for Ernitec 0070-24110-M 10" TVI Metal Frame Monitor
Quick guide for the Ernitec 0070-24110-M 10" TVI Metal Frame Monitor. Includes setup instructions, OSD menu navigation, connection diagrams, and troubleshooting tips.
Table of contents
Manual images
Click an image to enlargeQuick guide from the manual
This manual provides instructions for the Ernitec 10" TVI Metal Frame Monitor (Model 0070-24110-M). It covers installation, connection, OSD menu configuration, and basic maintenance to ensure optimal performance.
Connection Options
The monitor supports multiple input types. Ensure all cables are connected correctly before powering on the device.
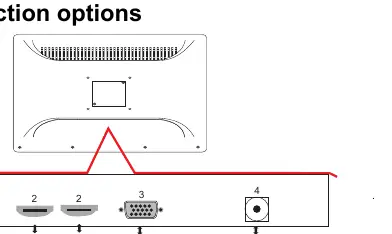
- BNC: Supports TVI/CVI/AHD/CVBS input/output.
- HDMI: Two HDMI inputs available.
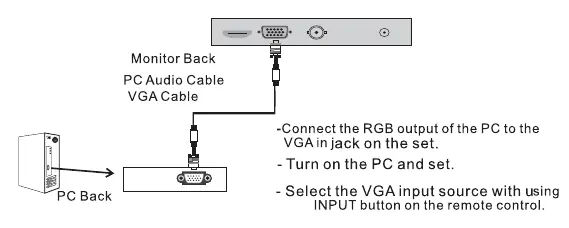
- VGA: Standard VGA input for PC connection.
- Power: 12V DC input.
Remote Control and OSD Setup
Use the remote control to navigate the On-Screen Display (OSD) menu for adjustments.
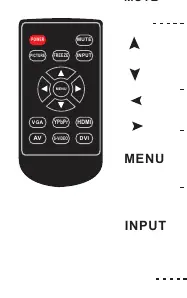
- POWER: Switch monitor between standby and active mode.
- MUTE: Toggle sound.
- MENU: Access the main menu.
- INPUT: Cycle through input sources (VGA, BNC, HDMI 1, HDMI 2).
- Navigation: Use arrow keys to select and adjust settings.
OSD Settings
The OSD menu allows for fine-tuning the display:
- Picture Adjust: Modify Contrast, Brightness, Color, Sharpness, and Tint.
- Color Temperature: Adjust Red, Green, and Blue gain levels.
- Aspect Ratio: Switch between 4:3 and 16:9 modes.
- Noise Reduction: Set to Off, Low, Middle, or High.
Maintenance
To maintain the monitor's longevity:
- Always turn off and unplug the power cord before cleaning.
- Wipe the screen and cabinet with a soft, damp, lint-free cloth.
- Do not use abrasive cleaners.
- If the monitor will not be used for an extended period, disconnect the power cable.
Manufacturer information
Ernitec
Practical help
Common problems
No sound or picture
Check that all cables are connected correctly, the power button is pressed, and contrast/brightness settings are adjusted.
Remote control does not work
Check for obstructions between the remote and sensor, ensure batteries are installed with correct polarity, or replace batteries.
Signal out of range (VGA mode)
Adjust resolution, horizontal frequency, or vertical frequency; check if the signal cable is loose.
Power is suddenly turned off
Check if the sleep timer is set or if power supply is interrupted.
Before use
- Verify all accessories are included (Power cord, power supply, remote control).
- Install a CR2032 3V battery into the remote control.
- Connect the appropriate video cable (BNC, HDMI, or VGA) to the monitor.
- Connect the 12V power supply.
- Ensure the monitor is placed on a stable surface.
Specs in practice
- BNC Input/Output
- Supports TVI, CVI, AHD, and CVBS video signals.
Images and diagrams
- The remote control features dedicated buttons for Power, Mute, Menu, Input selection, and Picture settings.
- The rear connection panel includes ports for BNC, HDMI, VGA, and 12V DC power.
- Battery installation requires opening the compartment on the back of the remote and inserting a CR2032 battery.
Model compatibility
- VGA mode requires specific resolution and frequency settings to avoid 'Signal out of range' errors.
- The monitor supports plug-and-play capability for PC connections using the VESA DDC protocol.

Manual page author
David Miller
Documentation analyst
Organizes user manual content into clear summaries, with attention to model details, product context, and everyday usability.