Electronics / Surveillance Monitors
User Manual for Ernitec 0070-24108-M Surveillance Monitor
Quick guide for the Ernitec 0070-24108-M surveillance monitor. Learn how to connect devices, configure OSD settings, troubleshoot common issues, and perform maintenance.
Table of contents
Manual images
Click an image to enlargeQuick guide from the manual
This surveillance monitor is designed for 24/7 operation. Before using the device, ensure all cables are connected properly and the power source is compatible. The monitor supports various inputs including VGA, HDMI, and BNC. Use the remote control or front panel buttons to navigate the On-Screen Display (OSD) menu to adjust picture, sound, and system settings.
Introduction and Controls
The front panel features essential controls for operation. The remote control allows for convenient adjustments from a distance of up to 7 meters. Key functions on the remote include:

- POWER: Switches the monitor between standby and active modes.
- MUTE: Toggles sound on/off.
- MENU: Opens and exits the main OSD menu.
- INPUT: Cycles through available video sources (VGA, BNC1, BNC2, HDMI, YPBPR).
- Navigation buttons: Used to select and adjust menu options.
Installation and Connections
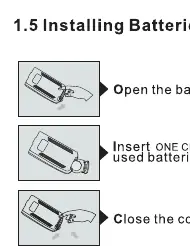
Installing Batteries: Open the battery compartment on the back of the remote control. Insert one CR2032 3V battery, ensuring correct polarity. Do not mix old and new batteries.
External Equipment Connections:
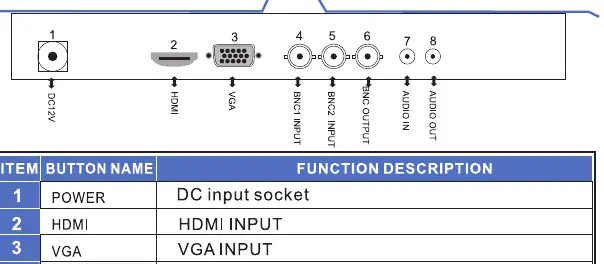
- Power: Connect the power cord to the DC 12V input socket.
- PC Connection: Connect the PC's RGB output to the VGA input on the monitor. The monitor supports VESA DDC protocol for automatic configuration.
- BNC Connection: Connect the BNC output of your processor to the BNC input on the monitor. You can daisy-chain monitors using the BNC output.
Basic OSD Setup
To access the OSD menu, press the MENU button. Use the navigation buttons to select sub-menus and adjust settings:
- Picture Menu: Adjust Contrast, Brightness, Color, Tint, Sharpness, Color Temp, Aspect Ratio, and Picture Mode.
- Sound Menu: Adjust Bass, Treble, Balance, Sound Mode, and Auto Volume.
- Option/Function Menu: Configure OSD Language, OSD Duration, Transparency, OSD Reset, and Software Update (via USB).
Troubleshooting
If you encounter issues, perform these checks before contacting service:
- No sound: Check the volume level, ensure the Mute function is off, and verify audio cable connections.
- Remote control not working: Check battery polarity, ensure there are no obstructions between the remote and the sensor, and verify the correct input mode is selected.
- Signal out of range: Adjust the resolution or vertical/horizontal frequency on your source device.
- No picture: Ensure the power plug is connected, the monitor is powered on, and the correct input source is selected.
Maintenance and Safety
Cleaning: To clean the screen, use a soft cloth dampened with a mixture of lukewarm water and mild dish detergent. Wring the cloth until almost dry before wiping. Clean the cabinet with a soft, dry, lint-free cloth. Do not use wet cloths on the cabinet.
Safety: Do not expose the monitor to rain or moisture. Ensure adequate ventilation around the monitor. If the monitor will not be used for an extended period, disconnect the power cord.
Manufacturer information
Ernitec
Practical help
Common problems
Signal out of range
Adjust the resolution, horizontal frequency, or vertical frequency of the source device.
No sound
Check the volume level, ensure the Mute button is not active, and verify that audio cables are connected properly.
Remote control does not work
Check battery polarity, ensure there is no obstruction between the remote and the sensor, and verify the correct operating mode (MONITOR/VCR).
No picture
Check that the power plug is connected to a wall outlet and the power button on the front panel is pressed.
Before use
- Ensure the power cord is connected correctly.
- Install one CR2032 3V battery in the remote control.
- Verify all video cables (HDMI, VGA, BNC) are securely connected.
- Select the correct input source using the INPUT button.
- Ensure the monitor has adequate ventilation.
Images and diagrams
- The rear panel contains the DC 12V input, HDMI port, VGA port, BNC inputs/outputs, and Audio ports.
- The remote control features dedicated buttons for Power, Mute, Menu, Input, and Picture settings.
Model compatibility
- Remote control effective range is within 7 meters.
- Supports VESA DDC protocol for plug-and-play PC connection.

Manual page author
Michael Turner
Technical manual editor
Reviews PDF manuals for structure, safety notes, and practical product details so readers can find the right information quickly.