Home Appliances / Cleaning Robots
eufy RoboVac 11S Owner's Manual
Comprehensive owner's manual for the eufy RoboVac 11S, 11S Max, and 15C Max. Includes setup instructions, cleaning modes, maintenance schedules, troubleshooting, and technical specifications.
Table of contents
Manual images
Click an image to enlargeQuick Guide from the Manual
This manual provides instructions for the eufy RoboVac 11S (T2108), 11S Max (T2126), and 15C Max (T2128). Before using the device, ensure the main power switch on the bottom is turned on, the side brush is installed, and the charging base is placed against a wall on a hard, level surface. Clear the floor of power cords, small objects, and tasseled rug edges to prevent entanglement.
Important Safety Instructions
- For household use only.
- Do not use on wet surfaces or to pick up flammable liquids.
- Keep hair, loose clothing, and fingers away from moving parts.
- Ensure the dust collector and filters are in place before use.
- Do not expose the device to fire or temperatures above 130°C / 265°F.
- The battery must be removed before the device is disposed of.
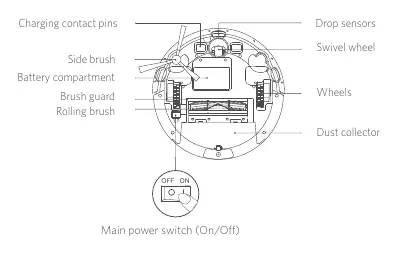
RoboVac Anatomy
The RoboVac features a bumper, infrared sensors, and an auto-cleaning button on the top. The bottom includes the rolling brush, side brush, drop sensors, wheels, and the main power switch. The dust collector is located at the rear of the unit.
Preparation and Setup

- Install the side brush: Snap it into place before use.
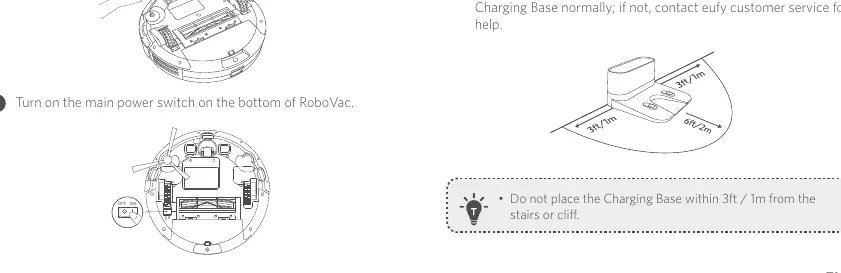
- Power on: Turn the main power switch on the bottom to the ON position.
- Charging Base placement: Place the base on a hard, level surface against a wall. Ensure there is at least 3ft (1m) of clearance on the left and right sides, and 6ft (2m) in front.
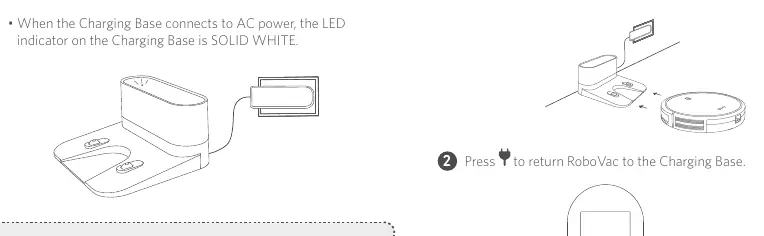
- Charging: Connect the power adapter to the base and a wall outlet. Align the RoboVac's charging pins with the base pins to charge.
Using Your RoboVac
The RoboVac offers several cleaning modes controlled via the remote (or eufy Clean app for 15C Max):
- Auto Cleaning: Optimizes the cleaning path automatically. This is the default mode.
- Spot Cleaning: Cleans a specific area in a spiral pattern for 2 minutes.
- Edge Cleaning: Follows walls to clean edges for 20 minutes.
- Quick Cleaning: Stops after 30 minutes to save power.
- Manual Cleaning: Use directional buttons on the remote to steer the robot.
BoostIQ Feature: Automatically increases suction power on thicker carpets. This can be adjusted in Auto or Quick cleaning modes.
Cleaning and Maintenance
Regular maintenance ensures optimal performance:
- Dust Collector: Empty after each use. Wash with water if necessary (air-dry completely).
- Filters: Clean once a week; replace every 2 months. Do not wash the high-performance filter.
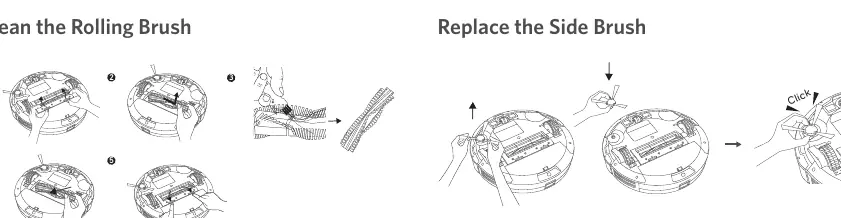
- Rolling Brush: Clean once a week; replace every 6-12 months.
- Side Brush: Clean once a month; replace every 3-6 months.
- Sensors/Charging Pins: Clean once a month with a dry cloth.
Troubleshooting
If the RoboVac encounters an issue, it will emit beeps and the red indicator light will flash or stay solid:
- One beep: Left/right wheel stuck.
- Two beeps: Side brush stuck or bumper stuck.
- Three beeps: Suction fan stuck or RoboVac stuck on an obstacle.
- Four beeps: Rolling brush stuck or battery level too low.
For persistent issues, ensure the main power switch is on, the battery is charged, and the remote is within 16ft (5m) of the device.
Specifications
- Input: 19V 0.6A
- Battery: DC 14.4V Li-ion 2600 mAh
- Dust Collector Capacity: 0.6 L
- Cleaning Time: Max. 100 mins
- Charging Time: 300 - 360 mins
Manufacturer information
eufy
Practical help
Common problems
RoboVac cannot be activated
Ensure the main power switch is set to 'I', the battery is fully charged, and the remote control is within 16ft (5m).
Suction power is weak
Empty the dust collector, clean the filters, and check the suction inlet for obstructions.
RoboVac stops working suddenly
Check if the robot is trapped on an obstacle, the battery is low, or if there is an error tone indicating a stuck part.
Cannot schedule cleanings
Ensure the main power switch is on and the time/schedule on the remote is set correctly.
Before use
- Remove power cords and small objects from the floor.
- Fold tasseled edges of rugs underneath.
- Install the side brush.
- Turn on the main power switch on the bottom.
- Place the Charging Base on a hard, level surface against a wall.
- Remove objects within 3ft/1m to the left/right and 6ft/2m in front of the base.
Specs in practice
- Cleaning Time
- Maximum runtime of 100 minutes on a full charge.
- Charging Time
- Requires 300 to 360 minutes to fully charge the battery.
- Dust Collector Capacity
- Holds 0.6 liters of debris.
- Max Mode Suction Power
- Up to 1300Pa (11S) or 2000Pa (11S Max/15C Max).
Images and diagrams
- RoboVac Anatomy: Identifies the bumper, sensors, dust collector, and main power switch locations.
- Charging Base: Shows the required clearance around the base for proper docking.
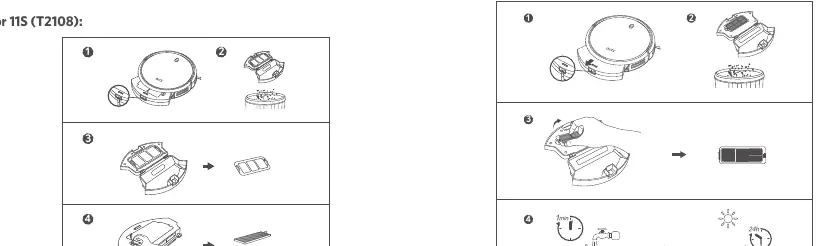
- Dust Box Cleaning: Illustrates the process of removing and cleaning the filter and dust collector.
Model compatibility
- 15C Max (T2128) supports Wi-Fi and app control.
- 11S (T2108) and 11S Max (T2126) are controlled via the included remote.

Manual page author
Emily Carter
User documentation editor
Prepares concise manual descriptions and highlights the most useful setup, operation, and maintenance information for readers.