Home Appliances / Ovens
User Manual for Eureka NERE 10SW Robot Vacuum
Quick guide for the Eureka NERE 10SW robot vacuum. Learn how to assemble the unit, install side brushes, set up the self-emptying base, and identify key components for operation.
Table of contents
Manual images
Click an image to enlargeQuick Start Guide
Before using your Eureka NERE 10SW, ensure the floor is clear of excess clutter and cables to prevent the robot from getting stuck. Follow the assembly steps below to prepare your device for its first cleaning cycle.
Parts and Components
The package includes the following items:
- Robot Vacuum
- Self-Emptying Base
- Side Brushes (x2)
- Cleaning Brush
- Instruction Manual
How to identify parts of your robot
Familiarize yourself with the robot's layout to ensure proper operation:
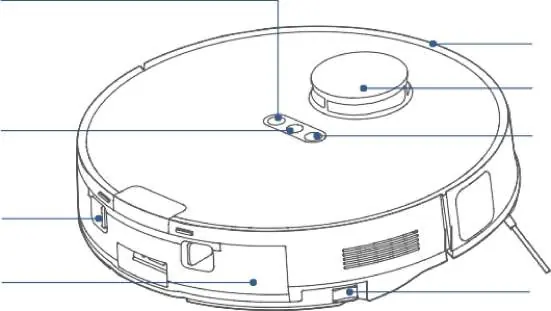
- Top: Network/Spot Cleaning Button, Power Button, Recharging Button, Bumper, LiDAR Sensor.
- Bottom: Cliff Sensors, Main Brush, Auto-lifting Mop Assembly, Charging Contacts, Omni-directional Wheel, Carpet Detection Sensor, Side Brush, Main Wheel.
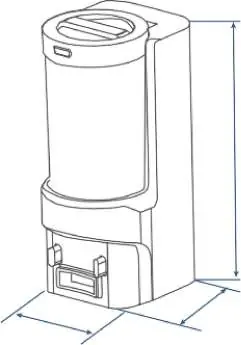
- Self-Emptying Base: Dust Cup, Self-empty Inlet, Charging Contacts, Power Cable Slot.
Installation
Follow these steps to set up your robot:
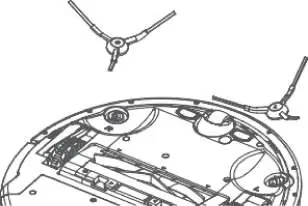
- Side Brushes: Turn the main unit over. Attach the side brush to its color-matched post and press down until it fits into place.
- Filter Installation: The robot comes with the filter installed. Before use, ensure the filter is securely in place. If you need to remove the dustbin, pull up the lid, ensure the filter is snapped into place, and the dustbin lid and bottom latch are securely closed before reinserting.
- Setting up self-emptying base: Place the base flat against a wall on a level surface. Ensure there is at least 1.5 ft (0.5m) of clearance on the sides and 5 ft (1.5m) in front. Store excess power cords in the slot at the back of the base. Connect the base to a power outlet in an area with a strong wireless network signal.
Safety Warnings
Always remove excess clutter and cables from the floor before starting a cleaning cycle to ensure the robot operates without obstruction.
Practical help
Common problems
Robot not connecting to network
Ensure the self-emptying base is placed in an area with a strong wireless network signal to maintain connection.
Robot getting stuck
Remove excess clutter and cables from the floor before cleaning.
Before use
- Remove excess clutter and cables from the floor.
- Ensure the filter is securely installed in the dustbin.
- Check that the dustbin lid and bottom latch are securely closed.
- Place the self-emptying base on a level surface against a wall.
- Ensure the base has at least 1.5 ft (0.5m) of clearance on sides and 5 ft (1.5m) in front.
Specs in practice
- Self-Emptying Base Dimensions
- 445mm height x 244mm depth x 178mm width.
- Robot Dimensions
- 350mm diameter x 97mm height.
Images and diagrams
- The robot features a LiDAR sensor on top for navigation and cliff sensors on the bottom to prevent falls.
- The self-emptying base includes a dust cup and a power cable slot at the back.
Model compatibility
- The mopping function requires the water tank to be filled with water.

Manual page author
Emily Carter
User documentation editor
Prepares concise manual descriptions and highlights the most useful setup, operation, and maintenance information for readers.