Electronics / Security Cameras
User Manual for Ezviz Pan & Tilt Wi-Fi Camera 0235C8KY
Quick guide for the Ezviz Pan & Tilt Wi-Fi Camera. Learn how to set up, mount, connect to Wi-Fi or wired network, and understand indicator statuses.
Table of contents
Manual images
Click an image to enlargeQuick Guide
This guide provides essential information for setting up and operating your Ezviz Pan & Tilt Wi-Fi Camera. Please read all safety warnings before installation.
Packing List
Ensure your package contains the following items. If any are missing or damaged, contact your local dealer:
- Camera
- Power adapter
- Power cable
- Screw components
- Mounting plate
- Product documents
Device Appearance
The camera features various interfaces depending on the model type (A, B, or C). Key components include:
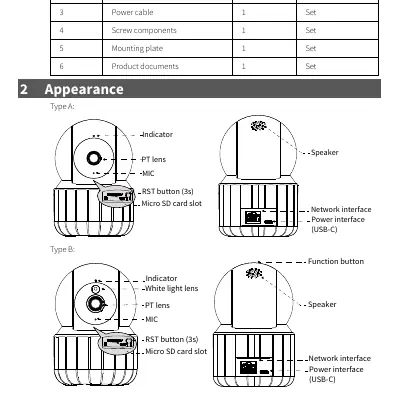
- PT Lens: Pan and tilt lens for viewing.
- Micro SD Card Slot: For local storage (disconnect power before inserting/removing).
- RST Button: Hold for 3 seconds to reset the device.
- Function Button: Hold for 2 seconds to start or end a call.
- Network Interface: For wired network connection.
- Power Interface: USB-C port for power.
Indicator Status
The indicator light provides feedback on the camera's status:
- Steady Red: Connected to power.
- Blinking Red: Resetting or waiting for configuration.
- Steady Blue: Connected to server; playing live video.
- Blinking Blue: Connecting to network; not connected to server.
Accessing Your Camera
Option 1: Connect to 2.4GHz Wi-Fi
- Connect your mobile phone to the 2.4GHz Wi-Fi network.
- Download and install the Ezviz app.
- Follow the on-screen instructions to add and manage the device.
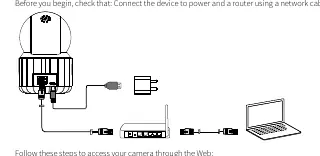
Option 2: Connect to Wired Network
- Connect the device to power and a router using a network cable.
- Open a web browser and enter the default IP address: 192.168.1.13.
- Enter the default username (admin) and password (123456) to log in.
Note: It is strongly recommended to change the default password after your first login to ensure security.
Mounting the Camera
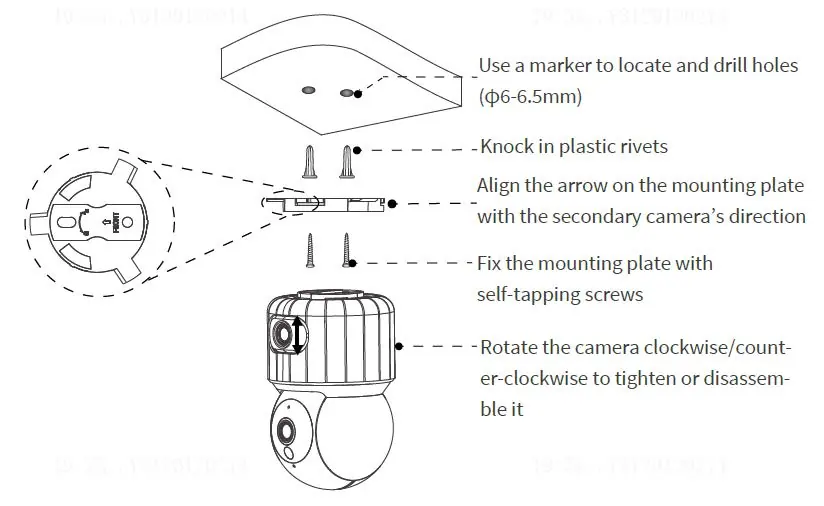
Ceiling Mount
- Use a marker to locate and drill holes (6-6.5mm).
- Knock in plastic rivets.
- Align the arrow on the mounting plate with the secondary camera's direction.
- Fix the mounting plate with self-tapping screws.
- Rotate the camera clockwise/counter-clockwise to tighten or disassemble it.
Desktop Placement
Place the device on the edge of a table or elevate it to ensure the lens is not blocked.
Safety and Network Security
To maintain security, keep firmware updated, disable UPnP if not needed, use strong passwords, and isolate your video surveillance network. The device must be installed and maintained by a trained professional.
Practical help
Common problems
Camera not connecting to Wi-Fi
Ensure your phone is connected to a 2.4GHz Wi-Fi network, not 5GHz.
Micro SD card damaged
Always disconnect power before inserting or removing the Micro SD card.
Default password security
Change the default password (admin/123456) immediately after the first login to a strong password with digits, letters, and special characters.
Before use
- Verify package contents.
- Ensure a 2.4GHz Wi-Fi network is available.
- Download the Ezviz app.
- Disconnect power before inserting a Micro SD card.
- Ensure the mounting surface is flat and stable.
Specs in practice
- Blinking Red
- Device is resetting or waiting for configuration.
- Blinking Blue
- Device is attempting to connect to the network.
Images and diagrams
- RST button: Press and hold for 3 seconds to reset the camera.
- Function button: Press and hold for 2 seconds to start or end a call.
- PT lens: Can be adjusted manually or via the app/web interface.
Model compatibility
- Supports 2.4GHz Wi-Fi only.
- Default Web IP: 192.168.1.13.
- Default Web Login: admin / 123456.

Manual page author
David Miller
Documentation analyst
Organizes user manual content into clear summaries, with attention to model details, product context, and everyday usability.