Industrial / Electrical
Installation Instructions for Falcon Ridge Honda Pioneer 1000 5 Full Cab Enclosure
A comprehensive installation and care guide for the Falcon Ridge Full Cab Enclosure for Honda Pioneer 1000 5. Includes step-by-step mounting procedures, Velcro strip placement, snap stud installation, and storage recommendations.
Table of contents
Manual images
Jump to the sectionQuick guide from the manual
This document provides installation instructions for the Falcon Ridge Full Cab Enclosure designed for the Honda Pioneer 1000 5. For optimal results, perform the installation in temperatures of 70 degrees F or warmer to ensure proper adhesion of the Velcro strips. If necessary, store adhesive Velcro at room temperature before starting.
Installation order
Install the seven components of the cab in the following sequence:
- Soft Front Doors
- Middle Rear Window
- Soft Rear Doors
- Rear Rear Window
- Top Cap
Soft Front Doors
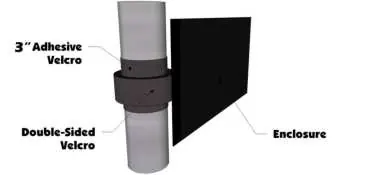
Begin by applying the 5", 6", and 8" adhesive Velcro strips to the frame. Hold the door against the frame and attach it using the double-sided Velcro strips sewn perpendicular to the door edge. At each double-sided strip, adhere a 3" adhesive Velcro strip to the inside of the frame, then wrap the double-sided strip around it for a secure fit. Finally, install the snap studs by screwing them into the plastic doors; it is recommended to first place the studs into the canvas sockets to mark the correct position on the plastic.

Middle Rear Window
Apply the 47" adhesive Velcro strip across the top of the roll cage. Attach the double-sided Velcro strips down the side bars, starting from the top and working downwards.
Soft Rear Doors
Zip the rear door to the middle rear window to ensure proper alignment. Attach the top front corner to the Velcro, use the 9" adhesive strip for the top rear tab, and secure the edges using 3" adhesive strips and double-sided Velcro as done with the front doors. Install snap studs into the plastic doors as previously described.
Rear Rear Window
Place the 64" adhesive Velcro strip across the top of the roll cage. Attach double-sided Velcro down the side bars and secure the straps with side-release buckles around the bars just under the bed.
Top Cap
Install the straps with grommets onto the middle bolt of the Lexan windshield. Wrap the remaining straps with Velcro around the rear roll cage. Place the top over the vehicle, ensuring the front is identified by the more steeply curved sides, and secure using the ladder lock buckles.
Cleaning and Storage
Clean the cab with a soft rag or sponge using mild liquid detergent and warm water. Never use a dry cloth on windows. To store, roll the cab into an 8-inch diameter roll rather than folding it to prevent damage to the windows. Store at room temperature and avoid extreme heat or cold.
Practical help
Common problems
Adhesive Velcro not sticking properly
Ensure installation is performed in temperatures of 70 degrees F or warmer. Store adhesive strips at room temperature prior to installation.
Windows damaged during storage
Never fold the cab. Always roll it into a roll approximately 8 inches in diameter.
Snap studs difficult to align
Place the snap studs into the sockets in the canvas first, then push the screw into the plastic to leave a mark before drilling or screwing.
Before use
- Ensure the installation area is clean and flat.
- Verify all parts against the included parts list.
- Check that the ambient temperature is at least 70 degrees F.
- Clean the vehicle frame thoroughly before applying adhesive Velcro.
- Ensure the Lexan windshield is installed before mounting the Top Cap.
Specs in practice
- Temperature requirement
- 70 degrees F or warmer is required for proper adhesive Velcro performance.
- Storage diameter
- Roll the cab to approximately 8 inches in diameter to prevent window damage.
Images and diagrams
- The manual provides specific diagrams for the double-sided Velcro attachment method, showing how to wrap the strip around the frame and the 3-inch adhesive Velcro.
- A diagram is provided for the ladder buckle lacing process used for the Top Cap.
Model compatibility
- Designed specifically for the Honda Pioneer 1000 5.
- Requires a Lexan windshield for proper Top Cap installation.

Manual page author
David Miller
Documentation analyst
Organizes user manual content into clear summaries, with attention to model details, product context, and everyday usability.